Replace Rv Hot Water Heater Element
RV hot water heaters are an important part of any RV. Without hot water, you wouldn’t be able to take showers or wash dishes. If your RV’s hot water heater isn’t working, it could be because the element needs to be replaced.
Replacing the element in an RV hot water heater is a relatively easy process.
If your RV’s hot water heater is giving you trouble, it might be time to replace the element. This is a fairly easy task that you can do yourself, and it will save you the cost of hiring a professional.
To replace the element, you’ll need to start by turning off the power to the hot water heater.
Then, drain the tank by opening the drain valve and attaching a hose. Once the tank is empty, remove the access panel to the element.
Using a wrench, remove the old element and discard it.
Then, screw in the new element and reattach the access panel. Finally, turn the power back on and fill the tank. You should now have hot water again!
How To Replace Your RV Electric Water Heater Element – Suburban Electric Element Replacement
How do I replace the heating element in my RV water heater?
If your RV water heater is not working properly, it may be time to replace the heating element. Here is a step-by-step guide on how to do just that:
1. First, you will need to turn off the power to your RV water heater.
You can do this by flipping the switch to the “Off” position, or by unplugging the unit from the power source.
2. Next, you will need to locate the heating element. This is usually located near the bottom of the unit.
3. Once you have located the heating element, you will need to remove it from the unit. To do this, you will need to unscrew it from its housing.
4. Once the heating element is removed, you can now install the new one.
To do this, simply screw it into place.
5. Finally, turn the power back on to your RV water heater and test it out.
Can you change a water heater element without draining the tank?
It is possible to change a water heater element without draining the tank, but it is not recommended. Draining the tank first will make the job much easier and less messy. It will also help to prevent any sediment from getting into the new element and causing problems.
How do I test my RV hot water heater element?
When it comes to testing your RV hot water heater element, there are a few things you’ll need to do in order to get an accurate reading. First, you’ll need to turn off the power to the unit. Next, you’ll need to remove the access panel to the element.
Once you have access to the element, you’ll need to use a multimeter to test it for continuity. If the element is good, you should see a reading of continuity on the multimeter. If there is no continuity, then the element is likely bad and will need to be replaced.
See also: How To Vent A Torpedo Heater
How do I change the heating element in my Atwood RV water heater?
If you find that your Atwood RV water heater isn’t heating water as well as it used to, it may be time to change the heating element. Here’s how to do it:
First, shut off the power to the water heater.
Then, remove the access panel to the heating element. You’ll likely see two screws holding it in place.
Next, use a wrench to loosen the heating element.
Be careful not to damage the threads. Once it’s loose, remove the heating element and inspect it for damage.
If the heating element is damaged, it will need to be replaced.
You can purchase a new one from most RV dealers or online retailers.
Once you have a new heating element, simply screw it back into place and reattach the access panel. Turn the power back on and test the water heater to make sure it’s working properly.
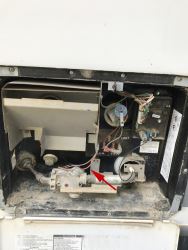
Credit: www.etrailer.com
Atwood rv hot water heater element replacement
If you have an Atwood RV water heater, you may eventually need to replace the heating element. This is a relatively easy repair that you can do yourself, as long as you have a few basic tools and supplies.
First, you’ll need to purchase a replacement element.
You can find these online or at a local RV parts store. Make sure to get the correct size for your Atwood water heater.
Once you have the replacement element, the next step is to remove the old one.
Start by turning off the power to the water heater. Then, drain the water from the tank.
Next, remove the access panel from the front of the water heater.
You’ll see the heating element inside. Use a wrench to loosen the nuts that hold it in place, and then carefully remove the element.
Now, it’s time to install the new element.
Simply reverse the process that you used to remove the old one.
Dometic rv water heater element replacement
If you have a Dometic RV water heater, you may eventually need to replace the element. This is a fairly easy process, but there are a few things you need to know before you get started.
First, you need to identify the type of element you have.
There are two types of elements used in Dometic RV water heaters: standard and quick recovery. Standard elements are less expensive but take longer to heat up the water. Quick recovery elements cost more but heat up the water faster.
Once you know which type of element you have, you can purchase a replacement from your local RV dealer or online. Be sure to get the correct size and type of element for your water heater.
To replace the element, first turn off the power to the water heater.
Next, drain the water from the heater. Remove the access panel and unscrew the old element. Screw in the new element and reassemble the water heater.
Rv electric water heater element location
If you’re like most people, you probably don’t think much about your RV’s water heater until you need it. Then, you might find yourself wondering where the heck the water heater element is located.
Here’s a quick guide to help you find the water heater element in your RV.
First, locate the water heater. It’s usually stored in a cabinet or compartment near the water pump.
Once you’ve found the water heater, open the access panel.
This will give you a clear view of the water heater tank.
Locate the element in the tank. It will be a metal rod that’s screwed into the side of the tank.
unscrew the element and remove it from the tank.
Now that you know where the water heater element is located, you can replace it if necessary. Just screw in a new element and screw the access panel back on.
Conclusion
If your RV’s hot water heater is starting to show its age, one of the first things that will go is the heating element. Fortunately, this is an easy fix that anyone can do with just a few tools. You’ll need to drain the hot water heater, remove the old element, and install the new one.
Then, you can fill it back up and be on your way!
You Can Also Read: