
If your RV water heater is not working properly, it may be due to an issue with the pilot light. In order to adjust the pilot light on your RV water heater, you will need to access the control panel. Once you have located the control panel, you will need to find the knob that controls the pilot light.
Once you have found the knob, you will need to turn it to the “on” position. If the pilot light is still not working, you may need to adjust the flame.
- Locate the pilot light on your RV water heater
- This is usually a small knob or lever near the bottom of the unit
- Turn off the power to the water heater
- Use a small screwdriver or Allen wrench to adjust the pilot light
- Turn it clockwise to make the flame bigger or counterclockwise to make it smaller
- Once the flame is the desired size, turn the power back on to the water heater
Adjusting pilot on Atwood RV water heater.mov
How do I adjust the pilot on my water heater?
If your water heater pilot light won’t stay lit, it may be time to adjust the pilot. Follow these steps to adjust the pilot on your water heater:1. Locate the pilot light adjustment screw on the gas control valve.
This is usually located near the pilot light.2. Turn the screw clockwise to increase the gas flow to the pilot light.3. Turn the screw counterclockwise to decrease the gas flow to the pilot light.
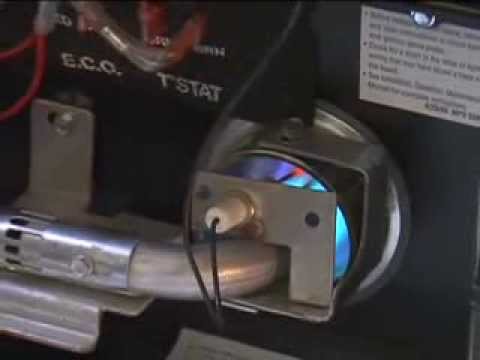
4. Check the pilot light flame. It should be blue and steady. If it is yellow or flickering, continue adjusting the screw until the flame is blue and steady.
5. Once the flame is blue and steady, turn the screw clockwise until it is tight. This will ensure that the gas flow to the pilot light is not accidentally adjusted.
How do you adjust the pilot light on a camper?
If your camper’s pilot light won’t stay lit, it may be due to a clogged burner orifice. You can clean the orifice with a needle or a toothpick. If that doesn’t work, you may need to replace the thermocouple.
To adjust the pilot light on a camper, start by turning off the gas supply. Then, remove the screw that secures the pilot light tube to the gas control knob. Next, use a small screwdriver to turn the set screw on the gas control knob clockwise to increase the gas flow, or counterclockwise to decrease the gas flow.
Finally, replace the screw that secures the pilot light tube and turn on the gas supply.
Can you adjust a RV hot water heater?
If your RV hot water heater isn’t working as efficiently as it used to, there are a few things you can do to adjust it. First, check the anode rod. If it’s corroded, replace it.
Next, check the gas pressure. It should be between 4 and 10 inches of water column pressure. If it’s too low, adjust the regulator.
Finally, clean the burner assembly and check the thermostat. If it’s not working properly, replace it.
See also: Hot Water Heater Not Getting 240V
How do you adjust the flame on a gas water heater?
If you have a gas water heater, you may need to adjust the flame from time to time. This is not a difficult task, but it is one that should be done with care. Here are the steps you need to take to adjust the flame on your gas water heater:
1. Locate the gas valve. This is usually located near the bottom of the water heater.2. Turn the gas valve to the “Off” position.
3. Wait for the water heater to cool down. You don’t want to be working with hot water while you’re adjusting the flame.4. Locate the adjusting screw.
This is usually located near the gas valve.5. Turn the adjusting screw clockwise to increase the flame, or counterclockwise to decrease the flame.6. Turn the gas valve back to the “On” position.
Credit: yourfulltimervliving.com
Rv water heater pilot light won’t stay lit
If your RV’s water heater pilot light won’t stay lit, there are a few possible causes. First, check the gas line to see if there is a blockage. Next, check the thermocouple to see if it needs to be replaced.
Finally, check the pilot light orifice to see if it is clogged.
How to light pilot light on camper water heater
If your camper has a gas water heater, you’ll need to know how to light the pilot light. This is a simple process, but one that you’ll need to be familiar with in case the pilot light ever goes out.To light the pilot light on your camper water heater, start by locating the pilot light assembly.
This is usually located near the bottom of the water heater. Once you’ve found it, open the access panel and look for the pilot light.Once you’ve found the pilot light, use a long lighter to ignite it.
Hold the flame to the pilot light for 30-60 seconds to make sure it’s lit. Once the pilot light is lit, you can close the access panel and enjoy hot water in your camper!
How to light a pilot light on a camper furnace
If your RV furnace has a pilot light, you may need to light it before you can use the furnace. Here’s how to do it:1. Locate the pilot light on your furnace.
It should be near the bottom of the unit.2. Find the knob or switch that controls the pilot light. It may be labeled “pilot” or “ignite.”
3. Turn the knob or switch to the “on” position.4. Use a long match or lighter to light the pilot light. Once the pilot light is lit, you can turn the knob or switch to the “off” position.
5. Wait a few minutes for the furnace to warm up, then turn on the blower to circulate the heat.
Conclusion
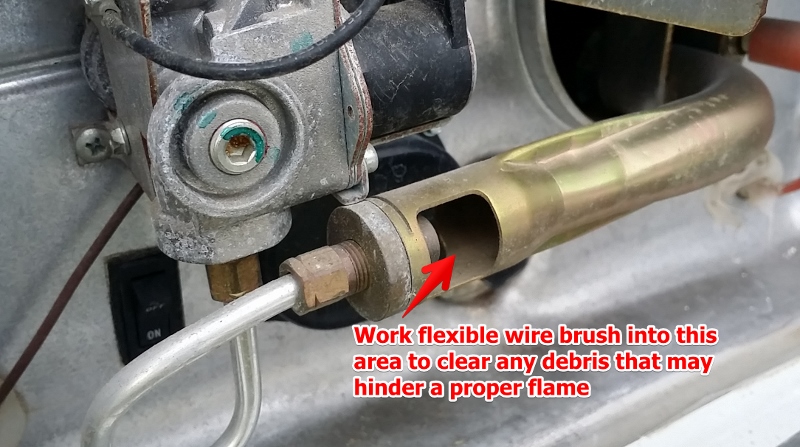
If your RV’s pilot light won’t stay lit, or if it keeps going out, there are a few things you can do to try to fix the problem. First, clean any dirt or debris from the area around the pilot light. Then, check the pilot light tube to make sure it’s clear.
If it’s clogged, you can try cleaning it with a wire brush. If that doesn’t work, you may need to replace the pilot light tube. Finally, if none of those things work, you may need to replace the entire water heater.
You Can Also Read: