

Fixing a leaky heater core can seem like a big job, especially if you’re new to car repairs. You might worry about all the parts you have to take out just to get to it. But don’t let it scare you.
Learning How to Fix a Heater Core Leak is totally doable with clear steps. We’ll walk you through it, making it easy to understand and follow along. Get ready to learn how to tackle this common car issue step by step.
Understanding Heater Core Leaks
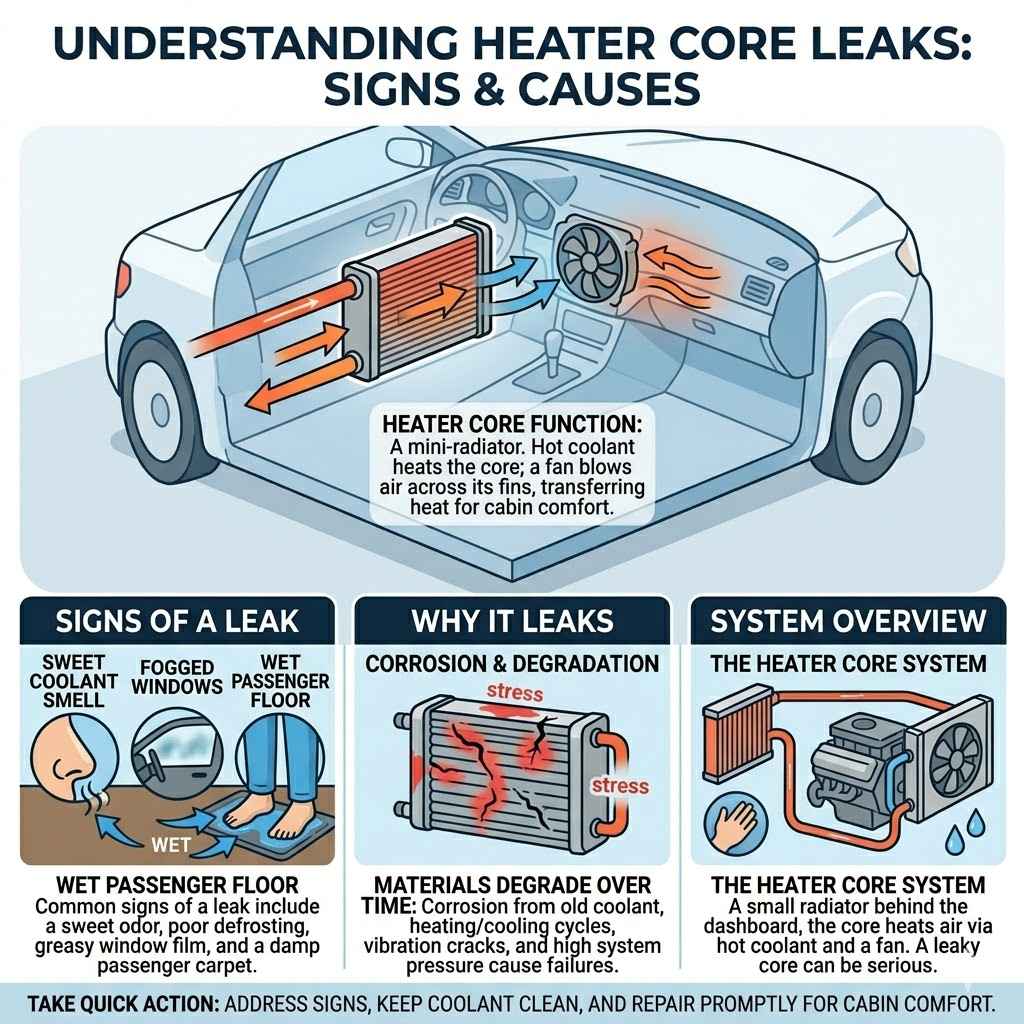
A heater core leak happens when the small radiator-like part inside your car’s dashboard that heats the cabin gets a hole or crack. This part is like a mini-radiator for your car’s heating system. It uses hot engine coolant to warm up the air that blows into your car.
When it leaks, coolant can escape, causing all sorts of problems. You might notice a sweet smell, foggy windows inside your car, or a puddle of liquid on the passenger floor. These are all signs that your heater core needs attention.
This section will cover what a heater core is, why it leaks, and the common signs you’ll see. Knowing these basics helps you understand the problem better before you start fixing it. It’s like knowing the enemy before you fight.
What is a Heater Core
The heater core is a small heat exchanger, similar in design to a car’s main radiator but much smaller. It’s usually located behind the dashboard of your vehicle. Hot engine coolant flows through the heater core’s tubes.
A fan then blows air across the fins of the heater core. This process transfers the heat from the coolant to the air. The warmed air is then directed into the car’s cabin through the vents, providing heat for the occupants.
It’s a vital component for comfort during cold weather. Without a working heater core, your car’s heating system won’t produce any heat.
Why Heater Cores Leak
Over time, the materials that make up the heater core can degrade. This can be due to corrosion from the coolant itself or from constant heating and cooling cycles. Small vibrations from driving can also lead to stress cracks.
Sometimes, poor quality coolant or neglecting to flush and replace the coolant at recommended intervals can speed up this corrosion process. Also, if the cooling system pressure gets too high, it can put extra strain on the heater core, potentially causing it to fail prematurely.
Signs of a Leaking Heater Core
One of the most common signs is a persistent sweet smell inside your car, which is the scent of the engine coolant. You might also notice your car’s defroster isn’t working as well, or the windows fog up constantly with a greasy film.
A wet passenger-side floor mat or carpet is another strong indicator. This happens as coolant leaks out and collects in the lowest part of your car’s interior. If you see a green, orange, or pinkish puddle under your dashboard on the passenger side, it’s very likely your heater core is leaking.
Diagnosing a Heater Core Leak
Before you can fix a heater core leak, you need to be sure that’s the problem. Sometimes, other leaks can mimic heater core issues. Proper diagnosis ensures you’re not doing unnecessary work.
We’ll cover how to confirm if your heater core is the culprit.
This part is about using your senses and some simple checks to pinpoint the leak. It’s like being a detective for your car. We’ll help you gather the clues to be certain.
Visual Inspection
The first step is to look for obvious signs. Open your car’s hood and check the coolant reservoir. Is the coolant level lower than it should be?
Look around the engine bay for any wet spots or stains, especially on hoses connected to the firewall.
Next, check the inside of your car. Look for any dampness on the carpet, especially on the passenger side floor. Feel the carpet; is it wet or sticky?
Also, check the inside of your windshield and side windows for a greasy film.
The Sweet Smell Test
Engine coolant has a distinct, sweet odor. If you constantly smell this inside your car, especially when the heater is on, it’s a strong indicator of a coolant leak. This smell can be quite potent and hard to ignore.
Sometimes, the smell might be faint at first but becomes stronger as the engine warms up or as more coolant escapes. Pay attention to when you notice the smell most. Is it constant, or does it appear after driving for a while?
Checking for Coolant Puddles
The most definitive sign is finding an actual puddle of coolant inside your car. This usually collects on the passenger side floor. The color of the puddle will match your coolant’s color (often green, orange, pink, or blue).
If you find this wet spot, carefully touch the liquid. It should feel slightly slick or greasy. Collect a small amount in a clean container if possible to confirm it’s coolant.
This is a very strong sign the heater core has failed.
Pressure Testing the Cooling System
A mechanic often uses a cooling system pressure tester. This tool attaches to the radiator or expansion tank and pressurizes the system. This helps to force out any leaks, making them easier to spot.
If you don’t have this tool, you can sometimes observe leaks after the car has been sitting. However, a pressure test is the most reliable way to confirm a leak, especially if it’s slow. It simulates the pressure the system experiences while running.
How to Fix a Heater Core Leak
Now we get to the core of the matter: fixing the leak. This involves accessing the heater core, which is usually inside the dashboard. The process can vary a lot depending on your car’s make and model.
Some cars make it easier than others.
We’ll break down the general steps involved. This is where your patience and a good set of tools will come in handy. We aim to guide you through each crucial stage of the repair.
Option 1 Replacing the Heater Core
This is the most common and recommended repair for a leaky heater core. It involves removing the old unit and installing a new one. It’s a labor-intensive job because you often have to remove a significant portion of the dashboard to reach the heater core.
You’ll need to disconnect hoses, remove trim pieces, and sometimes even the entire dashboard assembly. Once the old heater core is out, the new one is installed, and everything is reassembled. It’s a thorough fix that ensures your heating system will work properly again.
Tools and Materials Needed
- Socket set and wrenches
- Screwdriver set (Phillips and flathead)
- Pliers (various types)
- Gloves and safety glasses
- Drain pan for coolant
- Shop rags or towels
- New heater core (ensure it’s the correct part for your vehicle)
- New coolant (appropriate type for your car)
- Torque wrench (recommended for reassembly)
- Trim removal tools
Step-by-Step Replacement Process
- Drain the coolant from the cooling system. Place a drain pan under the radiator petcock or lower radiator hose and open it to drain the fluid. Dispose of the old coolant properly.
- Disconnect the battery. This is a safety precaution to prevent electrical shorts.
- Locate and disconnect the heater hoses that run from the engine bay to the firewall, leading to the heater core. There will likely be two hoses. Have a rag ready as some coolant may spill.
- Begin removing dashboard components. This is the most time-consuming part. You’ll need to remove trim panels, the glove box, the center console, and possibly the steering column. Refer to your car’s service manual for specific instructions.
- Once the dashboard is sufficiently opened or removed, you can access the heater core assembly. It’s usually housed in a plastic or metal casing.
- Unbolt and remove the old heater core. Carefully maneuver it out of its housing.
- Install the new heater core. Ensure it is seated properly in its housing.
- Reassemble the dashboard components in reverse order of removal. Make sure all screws, clips, and panels are securely fastened.
- Reconnect the heater hoses.
- Refill the cooling system with the correct type of new coolant. Bleed the air out of the system by running the engine with the heater on and the bleed screw open (if applicable) until only coolant comes out.
- Reconnect the battery. Start the engine and check for any leaks around the heater hoses and the firewall where the heater core passes through. Turn on the heater to ensure it’s working and blowing warm air.
Option 2 Heater Core Sealants (Temporary Fix)
There are products on the market designed to temporarily seal small leaks in the heater core. These are essentially additives that you pour into the coolant reservoir. They work by expanding and hardening when they come into contact with air or a leak point.
This is not a permanent solution. It’s more of a stop-gap measure to buy you some time to save up for a proper repair or to get you through a critical period. The effectiveness can vary greatly depending on the size and location of the leak.
Some sealants can also potentially clog other parts of the cooling system.
How Sealants Work
These sealants contain small particles or chemicals that react with oxygen or moisture. When coolant escapes through a small crack or hole in the heater core, it comes into contact with air. This contact triggers a chemical reaction that causes the sealant particles to swell and harden, blocking the leak.
They are designed to flow through the cooling system like coolant. When they encounter a leak, they are drawn into the gap and then solidify, creating a plug. It’s a bit like a liquid bandage for your heater core.
When to Consider Using Sealant
Using a sealant might be an option if the leak is very small and you need to drive your car for a short while longer. It’s also a consideration if you are on a very tight budget and cannot afford the more extensive repair of replacing the heater core.
However, it’s crucial to understand that this is a temporary fix. These sealants can sometimes cause other issues, such as clogging radiator passages or the heater core itself, making future repairs more difficult. It’s generally not recommended as a long-term solution.
Risks of Using Sealant
The main risk is that sealants are not always effective at stopping the leak. Even if they do, they can sometimes clog up the very parts they are supposed to be helping. This includes the delicate passages within the radiator and the heater core itself.
A clogged heater core will result in poor heating performance, even if it stops leaking coolant. This can necessitate replacing both the heater core and potentially the radiator if they become blocked by the sealant.
Maintaining Your Cooling System After Repair
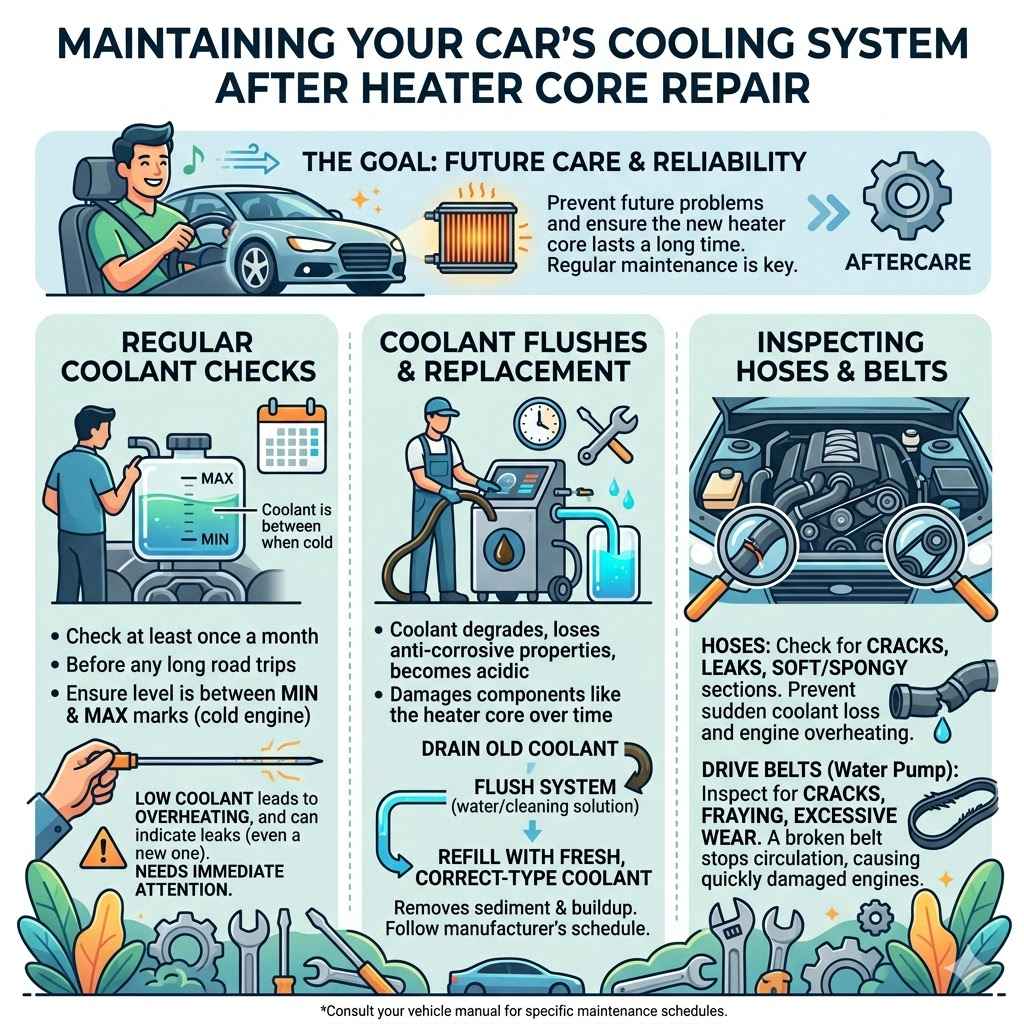
After you’ve fixed your heater core, it’s important to keep your cooling system in good shape. This helps prevent future problems and ensures your new heater core lasts a long time. Regular maintenance is key.
This part is about future care. It’s about making sure the fix lasts and your car stays reliable. Think of it as aftercare for your car’s heating system.
Regular Coolant Checks
Make it a habit to check your coolant level regularly. Do this at least once a month, and also before any long road trips. The coolant level should be between the ‘min’ and ‘max’ marks on the reservoir when the engine is cold.
Low coolant can lead to overheating and can also mean there’s a leak somewhere in the system, possibly even a new one in the heater core or elsewhere. Consistently low coolant needs immediate attention.
Coolant Flushes and Replacement
Coolant degrades over time. It loses its anti-corrosive properties and can become acidic, which can damage cooling system components like the heater core. Follow your vehicle manufacturer’s recommended schedule for coolant flushes and replacement.
A coolant flush involves draining out the old coolant, flushing the system with water or a special cleaning solution, and then refilling it with fresh, correct-type coolant. This removes any sediment or buildup that could cause problems.
Inspecting Hoses and Belts
While you’re checking under the hood, take a look at your coolant hoses and drive belts. Hoses can develop cracks, leaks, or become soft and spongy with age. A damaged hose can lead to a sudden coolant loss and engine overheating.
Drive belts are crucial for running components like the water pump, which circulates the coolant. Inspect them for cracks, fraying, or excessive wear. A broken belt will stop coolant circulation and can quickly lead to engine damage.
Frequently Asked Questions
Question: How long does it take to fix a heater core leak
Answer: Replacing a heater core can take anywhere from 4 to 8 hours, depending on your car’s model. Some vehicles are more complex and require more time to access the heater core.
Question: Can I drive my car with a leaking heater core
Answer: It is not recommended to drive your car for extended periods with a leaking heater core. The loss of coolant can lead to engine overheating, which can cause severe and expensive damage.
Question: What are the symptoms of a bad heater core
Answer: Common symptoms include a sweet smell inside the car, fogged-up windows, a wet passenger floorboard, and no heat coming from the vents.
Question: How much does it cost to replace a heater core
Answer: The cost can vary widely, typically ranging from $500 to $1500 or more, depending on the vehicle’s make and model, labor rates, and parts cost.
Question: Is a heater core leak covered by warranty
Answer: Generally, factory warranties cover leaks for a certain period or mileage. Aftermarket warranties may also cover it, but it depends on the specific policy details.
Summary
Tackling a heater core leak is a common car repair. You can identify it by smells, foggy windows, or puddles on the floor. The best fix is usually replacement, which involves dashboard removal.
Temporary sealants exist but are not a lasting solution. Regular coolant checks and system maintenance are key to preventing future issues and ensuring your car’s heating system stays in top shape for years to come.