DIY Masonry Heater: Transform Your Space Efficiently
Imagine transforming your home into a cozy sanctuary, where the warmth lingers long after the fire has gone out. A DIY masonry heater can make this dream a reality.
Unlike traditional fireplaces, masonry heaters are designed to efficiently store and radiate heat, keeping your space warm and your energy bills low. If you’ve ever felt the chill of winter seeping into your bones, or craved the crackle and glow of a real fire, you’re in the right place.
This guide will walk you through the process of building your own masonry heater, step by step. Ready to embrace warmth and craftsmanship? Let’s dive in and discover how you can create a centerpiece that not only heats your home but also adds charm and value.

Credit: m.youtube.com
Benefits Of Masonry Heaters
Masonry heaters keep homes warm. They use less wood than others. These heaters store heat well. They release warmth slowly. This keeps the house cozy for hours. You save fuel and money with them. Less wood means less chopping. Less wood means less cost.
Masonry heaters are eco-friendly. They burn wood cleaner. Less smoke goes into the air. This helps our planet stay healthy. Using less wood also saves trees. Trees are important for nature. Protecting them is crucial.
These heaters look beautiful. They add charm to any home. Many designs are available. Some have pretty tiles. Others have sleek stone. They match different styles. A warm fire inside creates a nice atmosphere.

Credit: dirtcheapbuilder.com
Planning Your Masonry Heater
Measure the room size. Masonry heaters need space. Consider height and width. Small rooms might not fit large heaters. Think about ventilation. Air must flow freely. Check walls and corners. Avoid blocking doorways or windows.
Masonry heaters can be costly. Materials affect price. Bricks and stone vary in cost. Installation fees add up. Decide on a budget. Compare prices. Look for discounts. Quality matters. Cheap might break easily. Plan wisely to avoid overspending.
Choose your style. Traditional or modern designs available. Brick patterns vary. Some prefer simple looks. Others like decorative styles. Consider the room’s theme. Match colors and shapes. Custom designs possible. Add personal touches. Make it unique. Think about the heater’s purpose. Will it be a main feature or blend in?
Materials Needed
Bricks and stones are key for building a masonry heater. Firebricks are special bricks that handle heat well. Red clay bricks are cheaper but less heat-resistant. Natural stones like granite or limestone add a nice look. Choose stones that can take high temperatures.
Insulation keeps the heat inside the heater. Ceramic fiber blankets are good for this. Vermiculite boards are light and easy to use. Both materials keep your heater safe and efficient. They stop the heat from escaping too quickly.
Some tools are essential for this project. Trowels help spread mortar. Level ensures everything is straight. Mixing buckets are needed for mixing mortar. Safety gear like gloves and goggles are very important. Measuring tape helps get the right sizes for bricks and stones.
Step-by-step Construction Guide
Start with a strong base. Use concrete blocks or bricks. Measure the area well. Keep everything level. A good base keeps the heater safe. Make sure it won’t move.
Allow the foundation to dry. This might take a day. Once dry, check it again. Everything must be flat.
Begin with the core. It’s the heart of the heater. Use special firebricks. They handle heat well. Stack them carefully. Follow your plan. Keep bricks tight together.
Use mortar to stick them. Let it dry. Check the alignment often. The core must be strong.
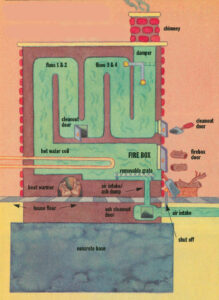
Heat channels are key. They guide the warm air. Use more firebricks. Build paths inside the core. Make them twist and turn. This helps the heat spread.
Keep channels smooth. Avoid blocking them. Test by blowing air. It should flow easily.
Now, finish the heater. Add an outer layer. Use pretty bricks. Choose a nice pattern. The outside must look nice.
Seal any gaps. Check every part. Make sure it’s safe. Enjoy your new heater!
Safety Tips
Proper ventilationis crucial for your masonry heater. Fresh air keeps your home safe. Make sure the chimney is clear. Check for blockages often. Ventilation prevents harmful gases. These gases can be dangerous.
Regular maintenanceextends the life of your heater. Inspect the heater parts frequently. Look for cracks or damage. Clean the surfaces to remove dirt. Dirt can cause problems. Regular checks ensure safety.
Handling combustible materialsrequires care. Keep these items far from the heater. They can catch fire easily. Use a safe storage area. Always have a fire extinguisher nearby. It can help in emergencies.
Enhancing Your Space
Masonry heatersblend with any room style. Pick colors that match your walls. Choose shapes that fit your room’s theme. Make it a part of your home. A well-integrated heater enhances beauty. It adds warmth and charm.
Decorate your heater for a personal touch. Add tiles with pretty designs. Use paint for vibrant colors. Place art nearby. Hang pictures close to the heater. These elements make it unique. They bring life and style to the heater.
Masonry heaters do more than warm rooms. Use them for cooking too. Place a shelf above for storage. Make it a gathering spot. Friends can sit by the heater. Enjoy warmth while cooking meals. This makes the heater useful and fun.

Credit: m.youtube.com
Frequently Asked Questions
Are Masonry Heaters Worth It?
Masonry heaters are worth it for efficient heat, eco-friendly design, and reduced energy costs. They offer consistent warmth, enhance home aesthetics, and increase property value. Their longevity and minimal maintenance make them a smart investment for sustainable heating solutions.
Does A Masonry Heater Need A Chimney?
Yes, a masonry heater requires a chimney. The chimney ensures proper ventilation and expels smoke and gases safely. A well-designed chimney enhances the heater’s efficiency. Make sure the chimney complies with local building codes for safety and performance. Proper maintenance ensures optimal function and longevity.
Are Masonry Heaters Safe?
Masonry heaters are safe when properly designed and installed. They burn efficiently, reducing emissions. Regular maintenance and using seasoned wood enhance safety. Always follow manufacturer guidelines and local codes. Ensure proper ventilation and chimney cleaning to prevent hazards. Consult professionals for installation and maintenance to ensure optimal safety.
What Are Masonry Heaters Made Of?
Masonry heaters are made of bricks, stones, or tiles. These materials store heat efficiently. Their dense construction ensures long-lasting warmth. Fireclay and refractory cement are often used to withstand high temperatures. The outer layer can be finished with various materials for aesthetic appeal.
Conclusion
Building a DIY masonry heater offers warmth and efficiency. It’s a rewarding project for home enthusiasts. You save on heating costs while enjoying a cozy environment. Planning and patience are key to success. Gather the right materials before starting. Follow reliable guides for the best results.
Safety should always come first. Double-check your work to avoid issues. A well-built heater adds comfort to your home. It also increases property value. Embrace the charm of a masonry heater. Create a warm and inviting space for family and friends.