
Many people find fixing a loose heater door a bit tricky at first. It might seem like a small thing, but it can stop your heater from working right. Don’t worry if you’re not a repair pro.
This guide will walk you through exactly How to Fix a Loose Heater Door Causing No Heat. We’ll make it super simple, step by step. You’ll learn what to do and see how easy it can be.
What Causes a Loose Heater Door No Heat
A loose heater door is a common problem that can prevent your heating system from working correctly. This happens when the door that allows air to flow into the heater becomes dislodged or the seal around it breaks. This can happen due to wear and tear, accidental bumps, or improper installation.
When the door is loose, it might not close properly, or it might let outside air in. This disrupts the airflow the heater needs to warm your home. It’s a problem many homeowners face, especially with older heating systems.
Signs of a Loose Heater Door
You might notice a few signs if your heater door is loose. The most obvious is that your heater isn’t blowing hot air, or it’s blowing much cooler air than usual. You might also hear unusual noises, like whistling or rattling, coming from your heater unit.
Sometimes, you can visually see that the door isn’t sitting flush or looks out of place. Checking these signs early can help you fix the problem before it gets worse.
It’s important to know that a loose heater door can lead to other issues if not fixed. It can make your heater work harder, using more energy. This means higher bills and a less efficient system.
It can also affect the overall temperature control in your home.
- Unusual Noises A loose door can flap or vibrate as air moves around it. This creates a rattling or whistling sound. You might hear this especially when the heater first kicks on.
- Reduced Heat Output The main sign is that your home doesn’t get as warm as it should. The heater struggles to push warm air through when the airflow is interrupted.
- Visible Gaps or Misalignment You can sometimes see a gap where the door should be sealed tightly. It might look crooked or not shut all the way.
Common Causes of Heater Door Issues
Heater doors can become loose for several reasons. Over time, the hinges or mounting points can wear out. Small vibrations from the heater running can loosen screws.
If someone accidentally bumped the unit, it could shift the door. Sometimes, cleaning or maintenance work might not have re-secured the door properly.
The seal around the heater door is also important. This seal keeps air from escaping or entering where it shouldn’t. If this seal is damaged, cracked, or missing, it can cause airflow problems.
Think of it like a window seal; if it’s broken, drafts can get in.
- Age and Wear Components can simply wear out over time. Hinges might loosen, and seals can degrade.
- Physical Impact A bump or jolt to the heater unit can misalign the door or break its mounting.
- Improper Installation If the door wasn’t attached correctly initially, it’s more likely to become loose.
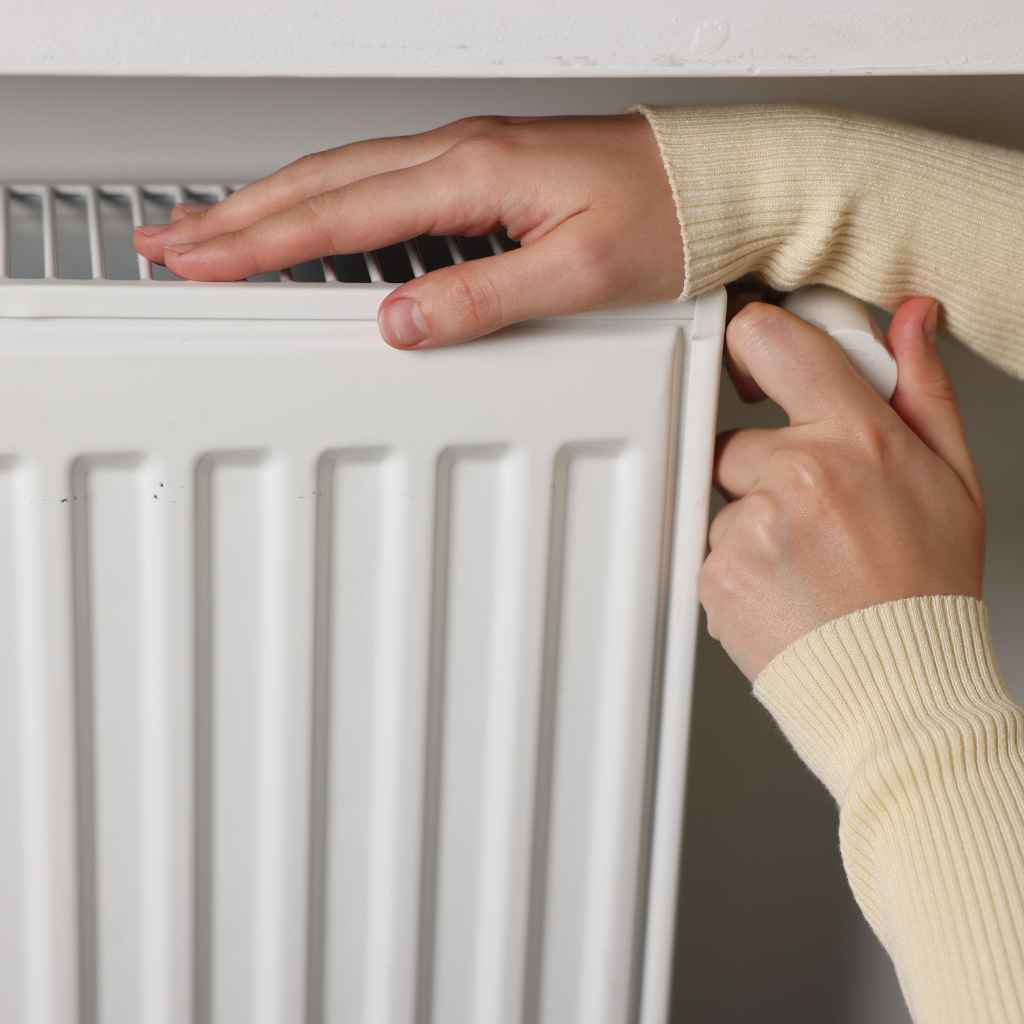
How to Fix a Loose Heater Door Step-by-Step
Fixing a loose heater door is usually a straightforward process. The key is to identify what is loose and how to secure it. Most fixes involve tightening screws, reattaching brackets, or replacing a worn seal.
You don’t need special tools for many of these repairs. A basic toolkit is often all you need to get your heater working again.
Safety First When Repairing Your Heater
Before you start any work on your heater, safety is the most important thing. Always turn off the power to your heating system at the main breaker box. This prevents any electrical shock.
Also, make sure the heater has cooled down if it was recently running. Wear gloves to protect your hands from sharp edges.
- Turn Off Power Locate your home’s electrical panel. Find the breaker that controls your furnace or heater and switch it off.
- Let It Cool If the unit was just running, give it some time to cool down. This avoids burns.
- Wear Protective Gear Safety glasses and gloves are a good idea. This protects you from dust, sharp metal, and potential electrical hazards.
Identifying the Loose Component
Once it’s safe, open the access panel to the heater door. Look closely at how the door is attached. Is it a hinge system?
Are there screws holding it in place? Is there a latch or a clip that’s come undone? Gently try to move the door to see where the play is.
This will tell you what needs to be fixed.
Sometimes, the problem isn’t with the door itself but with the frame it attaches to. If the frame is bent or damaged, the door won’t sit properly. You’ll need to assess the entire opening.
Tightening Screws and Brackets
If you see any loose screws, use a screwdriver that fits the screw head to tighten them. Don’t overtighten, as this can strip the screws or damage the material. Just make them snug.
If a bracket has come loose, see if it can be re-secured with its original screws. If screws are missing, you might need to get replacements from a hardware store.
A common fix is simply re-securing the screws that hold the door’s frame or hinges. These can vibrate loose over time. Tightening them often solves the problem quickly.
- Locate all screws around the door and its frame.
- Use the correct screwdriver (Phillips or flathead) to tighten each screw until it’s snug.
- If a bracket is loose, reattach it to the unit and secure it with screws.
Replacing Damaged Seals
If the seal around the heater door is worn out or damaged, it needs to be replaced. You can buy replacement weatherstripping or gasket material at most hardware stores. Clean the area where the old seal was.
Cut the new material to size and press it firmly into place, ensuring a good seal.
A good seal is vital for efficient heating. It prevents air leaks that make your system work harder. If your old seal is cracked, brittle, or missing in spots, it’s time for a new one.
- Remove Old Seal Carefully peel or scrape off any remnants of the old sealing material.
- Clean the Surface Wipe the area clean with a damp cloth to remove dust and debris.
- Apply New Seal Press the new weatherstripping firmly onto the surface. Most come with adhesive backing.
Securing Hinges and Latches
If your heater door uses hinges, check if they are bent or if the pins have come out. You might need to re-seat hinge pins or tighten screws that attach the hinges to the door and the unit. For latches, ensure they are engaging properly.
If a latch is bent, you might be able to gently straighten it. If it’s broken, it may need replacement.
Hinges are like the joints of the door. If they’re not working right, the door won’t hang or close correctly. Make sure they move smoothly and are securely attached.
Testing the Repair
After you’ve made your repairs, it’s time to test if it worked. Turn the power back on to your heating system at the breaker box. Then, turn on your thermostat.
Listen for any unusual noises and feel if warm air is coming out of your vents. The heat should feel consistent and strong.
If the problem is solved, you’ll notice your home warming up much better. If you still have issues, you might need to re-examine the door or consider if there are other problems.
Troubleshooting Common Heater Door Problems
Sometimes, even after tightening screws or replacing seals, a heater door can still cause problems. This is where troubleshooting comes in. You’ll need to look a bit deeper to find out why the repair didn’t fully fix the issue.
This could involve checking for damage to the door itself or the housing it fits into.
When the Door Won’t Stay Shut
If the door still won’t stay shut after you’ve tightened everything, the issue might be with the latch mechanism. The latch could be bent, broken, or misaligned. You might need to adjust the keeper on the frame to catch the latch properly.
Sometimes, the door itself might have warped slightly, preventing a secure close.
A warped door is less common but can happen with extreme temperature changes over many years. If the door is bent, it may need to be replaced.
Air Leaks Around the Door
If you can still feel air leaking around the door, the seal might not be adequate or properly applied. Double-check that the new seal is making full contact all the way around. Sometimes, the surface where the seal is applied might be uneven, requiring a thicker or more flexible sealing material.
If there are visible gaps in the heater unit itself, not just the door seal, those will need attention too.
These air leaks can be sneaky. They might be small but can still impact your heating efficiency. Finding them is key to stopping them.
The Heater Still Isn’t Producing Heat
If you’ve fixed the loose door and the heat is still weak or absent, the problem might not be with the door at all. The loose door might have been a symptom of a larger issue, or it might not have been the primary cause of no heat. You might need to check other components of your heating system, such as the furnace filter, thermostat, pilot light, or electrical connections.
This is when it’s a good idea to consult a professional. They can diagnose more complex heating system failures.
Sample Scenario One
Sarah noticed her living room was always colder than the rest of the house. Her furnace seemed to be running, but the heat wasn’t strong. She decided to check the access panel on her furnace.
She found that the small door covering the main airflow intake was slightly ajar. A few screws looked loose. She got her screwdriver, tightened them up, and then noticed the rubber seal around the door was cracked in one spot.
She went to the hardware store, bought some new weatherstripping, and replaced the old seal. After she turned the furnace back on, her home warmed up evenly and quickly. The problem was solved!
Sample Scenario Two
Mark heard a rattling sound from his furnace. He opened it up and saw that the metal cover plate, which acts like a door for a component inside, was loose. One of the clips holding it in place had broken off.
He couldn’t easily
When to Call a Professional
While many heater door issues are DIY-friendly, there are times when professional help is needed. If you’ve tried the basic fixes and the problem persists, it’s time to call a qualified HVAC technician. They have the tools and expertise to diagnose more complex problems.
These might include issues with the blower motor, igniter, or thermostat.
Also, if you’re uncomfortable working with electrical components or don’t have the right tools, it’s safer to let a pro handle it. Trying to fix something beyond your skill level can sometimes cause more damage.
- Persistent Problems If your heater still doesn’t work after your repairs, a professional can find the root cause.
- Complex Issues Problems involving gas lines, electrical wiring, or internal components are best left to experts.
- Lack of Confidence If you’re not comfortable with the repair, it’s always best to get professional assistance. Safety and proper repair are key.
Understanding Professional Diagnosis
HVAC technicians have specialized equipment to test airflow, temperature, and electrical systems. They can quickly pinpoint problems that might seem mysterious to a homeowner. They can also identify issues that are related to the door but aren’t the door itself, like a blocked duct.
A professional diagnosis ensures that all parts of your heating system are checked. This gives you peace of mind that the repair is complete and correct.
Benefits of Professional Repair
Calling a professional ensures the repair is done right the first time. They can also spot potential future problems before they become serious. Many professionals offer warranties on their work, giving you extra assurance.
They are trained to work safely and efficiently.
Regular maintenance checks by a professional can also prevent issues like loose heater doors from happening in the first place. It’s an investment in your home’s comfort and your system’s longevity.
Frequently Asked Questions
Question: What tools do I need to fix a loose heater door?
Answer: You will likely need a screwdriver set with various sizes of Phillips and flathead bits. Gloves and safety glasses are also recommended. A tape measure might be useful if you need to buy replacement seals.
Question: How long should it take to fix a loose heater door?
Answer: For simple fixes like tightening screws or replacing a seal, it can take anywhere from 15 minutes to an hour. More complex issues might take longer.
Question: Can a loose heater door cause my furnace to not turn on at all?
Answer: A loose door itself typically won’t prevent the furnace from turning on. However, some safety sensors might be triggered by airflow issues that a loose door could contribute to, indirectly affecting startup.
Question: Is it safe to use duct tape to temporarily fix a loose heater door?
Answer: For very temporary fixes, a strong, heat-resistant tape might work for a short period. However, it’s not a long-term solution and could eventually fail or affect airflow. It’s best to use proper repair methods or call a professional.
Question: What if I can’t find the exact replacement seal for my heater door?
Answer: You can often use a general-purpose weatherstripping or gasket material from a hardware store. Make sure it’s durable and designed for similar applications. Measure the gap and choose a seal that fits snugly.
Summary
Fixing a loose heater door that causes no heat is often a simple DIY job. By following safety steps, identifying the loose parts, and making the necessary adjustments like tightening screws or replacing seals, you can restore your heater’s function. If problems persist, professional help is available.