
Are you looking to customize your car’s seat heaters but don’t know where to start? Cutting seat heaters might sound tricky, but with the right steps, you can do it safely and effectively.
Imagine having the perfect fit for your seats, giving you warmth exactly where you want it. In this guide, you’ll discover simple tips and tricks that make the process easy, saving you time and money. Keep reading to learn how to cut seat heaters without damaging them and enjoy cozy drives all year round.
Tools Needed
Cutting seat heaters requires specific tools for best results. Having the right equipment ensures a clean and safe process. Prepare all tools before starting your project.
Essential Equipment
You need a sharp utility knife or scissors to cut the heater material. A ruler or measuring tape helps mark exact cutting lines. Use a marker or pencil to draw guide lines on the heater. A flat surface provides stability during cutting. A multimeter can check electrical connections after cutting the heater.
Safety Gear
Wear insulated gloves to protect your hands from sharp edges and electric shock. Safety glasses shield your eyes from small debris. Use a dust mask if dust or particles form during cutting. Avoid loose clothing that might catch on tools. Work in a well-lit area to see clearly and avoid mistakes.
Credit: www.aliexpress.com
Preparing Your Vehicle
Before cutting seat heaters, prepare your vehicle carefully. This step keeps you safe and protects your car parts. Proper preparation also makes the cutting process easier and cleaner.
Follow each step slowly. Take your time to avoid mistakes or damage. Use the right tools and work in a well-lit space.
Disconnecting The Battery
First, disconnect the car battery. This stops electricity flow and lowers shock risk. Use a wrench to remove the negative cable from the battery terminal. Keep the cable away from the battery to prevent a short circuit.
Check that no power runs through the seats. This step protects you and the car’s electronics. Never start any work before disconnecting the battery.
Removing The Seat
Next, remove the seat to reach the heater easily. Move the seat all the way back to find bolts under the front. Use a socket wrench to remove these bolts.
Slide the seat forward to access rear bolts. Remove those bolts as well. Lift the seat carefully to avoid damaging wires or connectors below.
Disconnect any electrical plugs under the seat. Note their positions for easy reinstallation later. Now, place the seat on a clean surface before cutting the heater.
Locating The Seat Heater
Before cutting a seat heater, first find its exact location. This step helps prevent damage and ensures safety. Knowing where the heater is helps you work precisely and confidently.
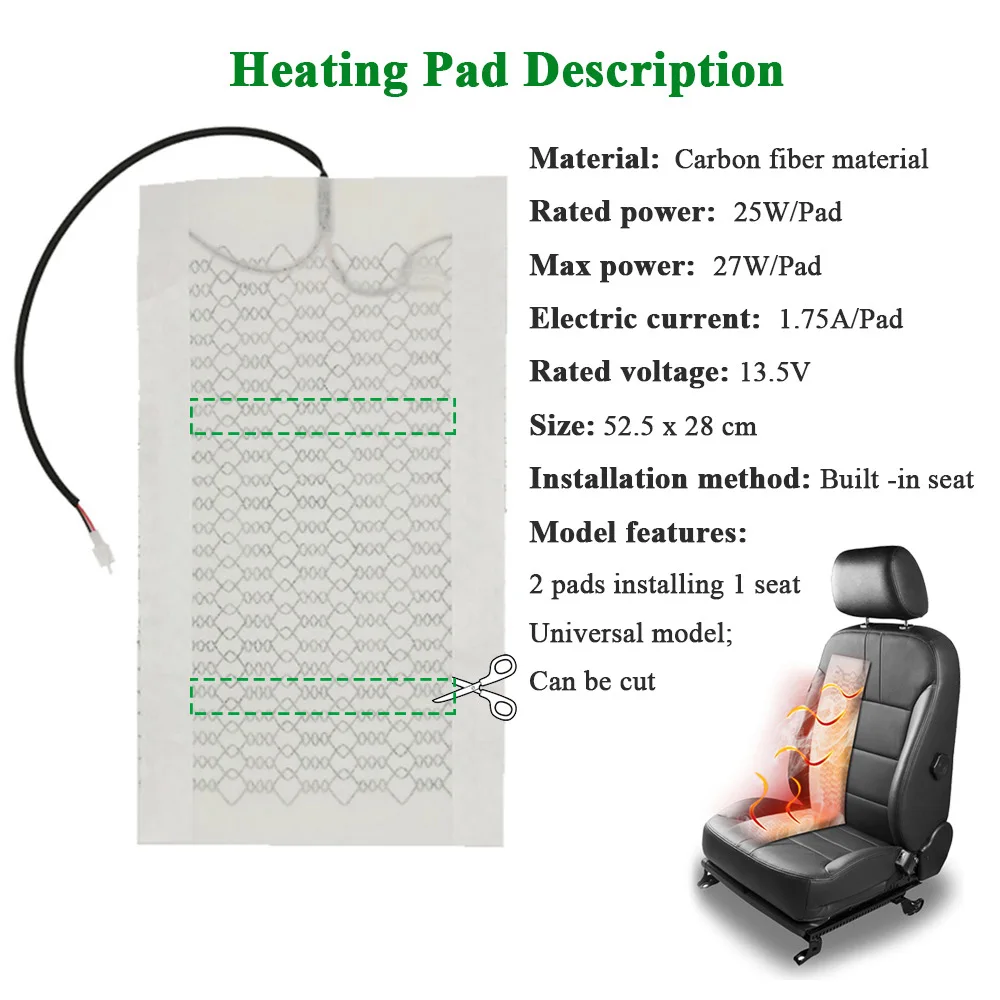
The seat heater is usually inside the seat cushion or backrest. It looks like a thin, flat pad or mesh. Locating it correctly is the key to a smooth process.
Finding The Heating Element
Start by removing the seat cover carefully. Use a flat tool to avoid tearing the fabric. The heating element lies under the cover.
Look for a flat, rubbery pad with wires attached. It may be glued or sewn to the seat foam. Handle it gently to avoid damage.
Tracing The Wiring
Follow the wires from the heating element to their connection point. Wires often run under the seat or along the frame. Use a flashlight for better visibility.
Check for any connectors or plugs. These connect the seat heater to the car’s electrical system. Mark their location for easy reassembly.
Cutting The Seat Heater
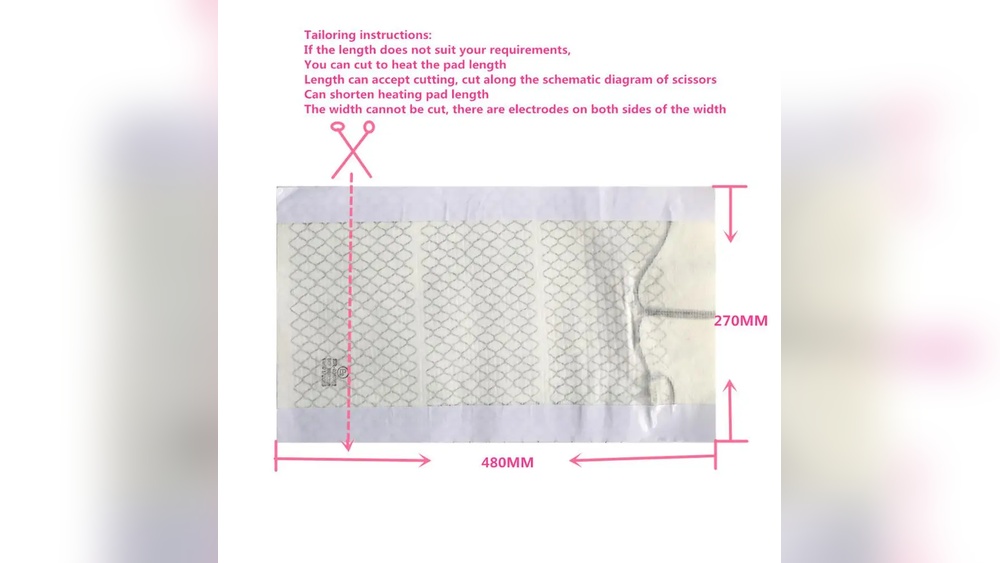
Cutting the seat heater is a delicate step in installing or customizing heated seats. It requires care and precision to avoid damage. Proper cutting ensures the heater fits perfectly and works safely. Follow clear steps to mark and cut accurately.
Marking The Cut Points
Start by laying the seat heater flat on a clean surface. Check the heater’s instructions for allowed cut areas. Use a ruler or tape measure to find the exact spots. Mark these spots clearly with a pencil or fabric marker. Mark only the areas where cutting is safe. Avoid cutting near wires or heating elements.
Using The Right Tools
Choose sharp scissors or a utility knife for clean cuts. Dull tools can damage the heater’s wires. Cut slowly and steadily along the marked lines. Keep your hands steady to avoid slipping. Use tools designed for fabric or thin plastic materials. After cutting, inspect the edges to ensure no wires are exposed.
Removing And Disposing
Removing and disposing of seat heaters is important for safety and cleanliness. The process must be done carefully to avoid damage and hazards. Proper removal helps prepare the seat for new installations or repairs. Safe disposal protects the environment from harmful materials.
Detaching The Heater Pad
Start by disconnecting the power supply to the seat heater. Gently pull the seat cover to expose the heater pad. Use a flat tool to loosen adhesive holding the pad in place. Slowly lift the heater pad without tearing it. Check for any wires attached and carefully disconnect them. Keep the heater pad intact for proper disposal or recycling.
Safe Disposal Methods
Do not throw seat heaters in regular trash bins. They contain electronic components and materials that harm the environment. Find local electronic waste recycling centers to drop off the heater pad. Some auto shops accept old seat heaters for safe disposal. Wrap the heater pad in a plastic bag to prevent leaks. Follow local rules for disposing of electronic and hazardous waste.
Reassembling The Seat
Reassembling the seat after cutting seat heaters is a careful process. It ensures safety and proper function. Take time to fit all parts back correctly. Follow each step to avoid damage or errors.
Reattaching Components
Start by placing the heating element carefully inside the seat. Align it with the original position. Secure the wires without bending or pinching them. Reattach any clips or fasteners removed earlier. Make sure the foam padding fits snugly over the heating element. Replace the seat cover evenly, avoiding wrinkles or folds.
Testing For Functionality
Before fully tightening everything, test the seat heater. Turn on the vehicle’s power and activate the seat heater switch. Check if the seat warms up evenly and quickly. Listen for unusual sounds or smells. If it does not heat correctly, recheck connections. Only finish assembly after confirming the heater works well.
Safety Tips
Cutting seat heaters requires care and attention. Safety is the top priority. Follow these safety tips to avoid accidents and damage during the process.
Avoiding Electrical Hazards
Always disconnect the power source before cutting seat heaters. Working on live wires can cause shocks or short circuits. Use insulated gloves to protect your hands. Check the heater wires for any damage before cutting. Keep water and liquids away from the work area. Use a voltage tester to ensure no electricity flows through the wires. Properly insulate any exposed wires after cutting.
Handling Sharp Tools
Use sharp scissors or a utility knife for clean cuts. Dull blades can slip and cause injuries. Cut slowly and steadily to control the tool better. Keep your fingers away from the cutting path. Store sharp tools safely when not in use. Wear protective gloves to avoid cuts. Make sure your workspace is well-lit to see clearly.

Credit: www.ebay.com
Frequently Asked Questions
How Do You Safely Cut Seat Heaters?
To safely cut seat heaters, disconnect power first. Use sharp scissors and cut along marked lines only. Avoid cutting wires or heating elements to prevent damage or hazards.
Can Seat Heaters Be Resized By Cutting?
Seat heaters can sometimes be resized by cutting, but only where indicated. Cutting outside marked areas may damage functionality and void warranties.
What Tools Are Needed To Cut Seat Heaters?
You need sharp scissors or a utility knife to cut seat heaters. Additionally, use gloves and disconnect power before starting for safety.
Will Cutting Seat Heaters Affect Their Heating Performance?
Cutting seat heaters improperly can reduce heating performance or cause failures. Always follow manufacturer guidelines to maintain proper function.
Conclusion
Cutting seat heaters can improve comfort and safety in your vehicle. Always measure carefully before making any cuts. Use the right tools to avoid damage. Take your time and follow instructions step by step. Check connections to ensure everything works well.
If unsure, ask a professional for help. Proper handling keeps your seat heater functional and secure. Small efforts lead to better results and longer use. Remember, safety comes first in every modification you make.