
Many car owners face a tricky warning light on their dashboard and feel a bit lost. The check engine light often comes on, and one common reason is an O2 sensor heater circuit malfunction. This can sound complicated, especially if you’re new to car repairs.
Don’t worry, though! This guide will walk you through exactly how to fix this problem, step by step. We’ll make it simple so you can get your car running smoothly again without stress.
Understanding O2 Sensor Heater Circuit Issues
This section explains what an oxygen sensor is and why its heater circuit matters. It covers how a faulty heater circuit can cause problems for your car’s engine performance and fuel efficiency. We’ll also look at why this issue pops up and what the check engine light means in this context.
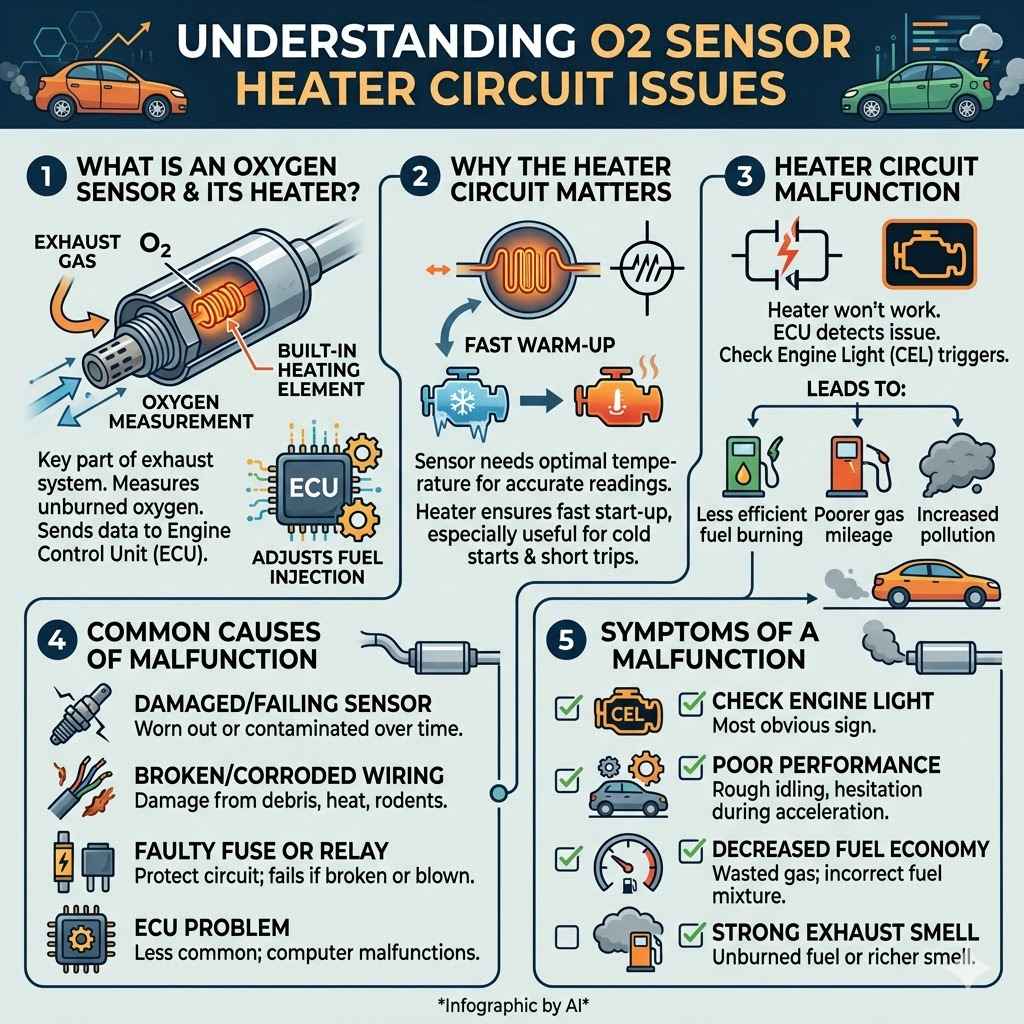
What is an Oxygen Sensor and Its Heater?
An oxygen sensor, also called an O2 sensor, is a key part of your car’s exhaust system. Its main job is to measure the amount of unburned oxygen in your exhaust gases. This information is sent to your car’s computer, the Engine Control Unit (ECU).
The ECU then uses this data to adjust how much fuel your engine injects. Getting the right amount of fuel helps your car run efficiently and reduces harmful emissions.
Most modern O2 sensors have a built-in heating element. This heater is important because it helps the sensor reach its optimal operating temperature quickly. When your car starts, the engine is cold, and so is the O2 sensor.
The O2 sensor needs to be hot to send accurate readings to the ECU. The heater element warms it up fast, so it starts working correctly much sooner. This is especially useful for cold starts and in short trips.
Why the Heater Circuit Matters
The heater circuit is what powers this warming element. It’s essentially a small electrical circuit that supplies voltage and ground to the heater. If this circuit has a problem, the heater won’t get hot enough or won’t work at all.
This means the O2 sensor cannot provide accurate data to the ECU, especially when the engine is first started.
When the O2 sensor heater circuit malfunctions, the ECU detects this issue. It will often trigger the check engine light to let you know there’s a problem. The ECU might try to compensate, but it can lead to less efficient fuel burning.
This can result in poorer gas mileage and increased pollution.
Common Causes of O2 Sensor Heater Circuit Malfunction
Several things can cause this problem. The most common is a damaged or failing O2 sensor itself. Over time, sensors can wear out or get contaminated with exhaust deposits.
Another frequent cause is a broken or corroded wire leading to the O2 sensor. The wiring harness can get damaged from road debris, heat, or even rodents.
A faulty fuse or relay in the O2 sensor heater circuit can also be the culprit. These small electrical components protect the circuit. If a fuse blows or a relay fails, the heater won’t receive power.
Sometimes, the problem might be with the ECU itself, though this is less common.
Symptoms of a Malfunctioning O2 Sensor Heater
The most obvious symptom is the check engine light. However, you might notice other signs too. Your car might not run as smoothly as usual, especially when it’s cold.
You could experience rough idling or hesitation when you accelerate.
Another common symptom is a decrease in fuel economy. Because the ECU isn’t getting accurate O2 sensor readings, it might inject too much fuel, leading to wasted gas. In some cases, you might even smell unburned fuel or notice a richer exhaust smell.
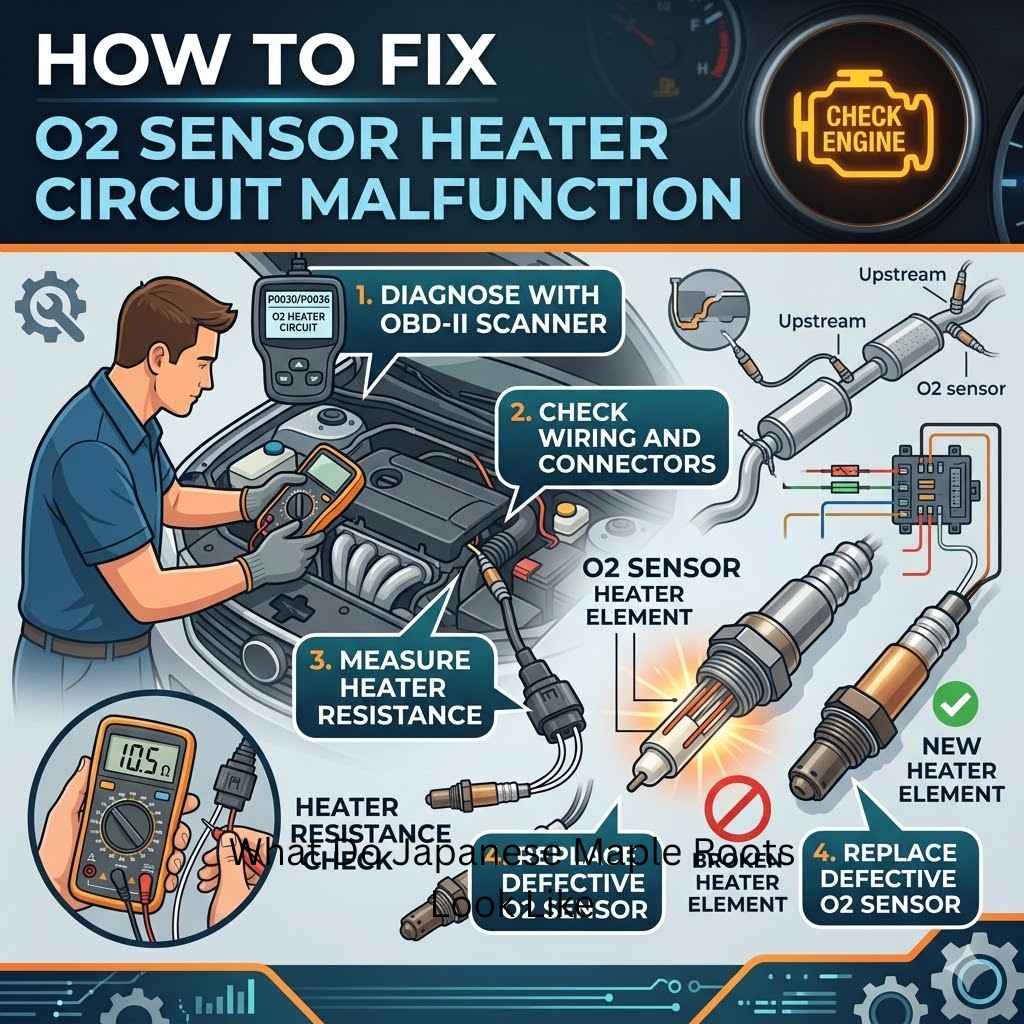
How to Fix O2 Sensor Heater Circuit Malfunction Step By Step
This section provides a clear, step-by-step guide on how to diagnose and repair an O2 sensor heater circuit malfunction. It covers checking fuses, inspecting wiring, and testing the sensor itself. The aim is to empower you with the knowledge to tackle this common car problem.
Step 1 Checking Fuses and Relays
The first and simplest step is to check the fuses and relays related to your O2 sensor. Your car’s owner’s manual will show you where the fuse box is located and which fuses are for the O2 sensors. You can usually find diagrams on the fuse box cover as well.
Carefully remove each fuse and inspect it. If the metal wire inside is broken, the fuse is blown and needs to be
Step 2 Inspecting the Wiring Harness
Next, you need to carefully inspect the wiring harness that connects to the O2 sensor. The O2 sensor usually has a few wires running from it. Follow these wires as far as you can to look for any visible damage.
This includes cuts, abrasions, melted spots, or loose connections.
Pay close attention to areas where the wiring might rub against other engine components or be exposed to heat. Look for corrosion on the connectors, especially if your car has been exposed to moisture or salt. A loose connection can prevent the sensor from receiving the correct signals or power.
Here’s how to check for wiring issues:
- Visually inspect all accessible wiring from the O2 sensor to its connector.
- Gently wiggle the wires to see if any connections feel loose or broken.
- Look for signs of rodent damage, such as chewed wires.
- Check for any melted plastic or burn marks on the wiring or connectors, which indicates overheating.
If you find any damaged wires, they will need to be repaired or replaced. This might involve splicing in new wire or re-securing loose connectors. For safety, disconnect the car’s battery before attempting any electrical repairs.
Step 3 Testing the O2 Sensor Heater Element
If the fuses, relays, and wiring look good, the next step is to test the O2 sensor’s heater element directly. This requires a multimeter, a tool that measures electrical resistance, voltage, and current. You’ll need to disconnect the O2 sensor from its wiring harness.
The O2 sensor will have specific pins for the heater circuit. Your car’s repair manual will tell you which pins to test. You’ll set your multimeter to the resistance (ohms) setting.
Touch the probes to the heater element pins on the O2 sensor. The resistance reading should be within a specific range, typically between 2 and 30 ohms, depending on the sensor type.
If the resistance is very high (like “OL” or infinity) or very low (close to zero), the heater element is likely bad. If the multimeter shows no reading or a reading outside the specified range, the heater element has failed.
Step 4 Testing Heater Circuit Power and Ground
Even if the sensor’s internal heater is good, it needs power and a good ground connection from the car’s wiring to work. This is where you test the car’s side of the harness. With the ignition turned on (but the engine off), you can use your multimeter to check for voltage at the O2 sensor connector.
Consult your car’s repair manual to identify which pins on the harness should receive power for the heater circuit. Place one probe of the multimeter on the power pin of the harness connector and the other probe on a good ground point on the engine or chassis. You should see a voltage reading, usually around 12 volts.
You also need to ensure there’s a good ground connection. You can test this by putting the multimeter probes on the ground pin of the harness connector and a known good ground point. The resistance should be very low.
If you don’t get voltage or a good ground, the problem lies in the car’s wiring or its connection to the ECU.
Step 5 Replacing the O2 Sensor
If your tests indicate that the O2 sensor’s heater element is faulty, or if other tests point to a bad sensor, it’s time to replace it. This is often the most common fix when troubleshooting this particular error code. You can often buy a new O2 sensor from an auto parts store.
Before you remove the old sensor, apply some penetrating oil to help loosen it. O2 sensors can be very tight because they are screwed into the hot exhaust system. You might need a special O2 sensor socket wrench for this job.
Once the old sensor is removed, clean the threads in the exhaust pipe to ensure a good seal for the new sensor.
Install the new O2 sensor. Make sure it’s screwed in snugly but not overtightened, as this can damage the sensor or the exhaust pipe. Reconnect the wiring harness.
After replacing the sensor, you’ll need to clear the error code from your car’s computer using an OBD-II scanner. Then, drive the car to see if the check engine light stays off.
Here are some tips for replacing an O2 sensor:
- Always disconnect the battery before starting any work.
- Use a dedicated O2 sensor socket wrench for easier removal.
- Apply anti-seize compound to the threads of the new sensor (check if it’s pre-coated).
- Ensure you purchase the correct O2 sensor for your car’s make, model, and year.
A common scenario involves a driver who notices a significant drop in fuel economy after their check engine light comes on. They take it to a mechanic who diagnoses an O2 sensor heater circuit malfunction. The mechanic finds a corroded wire connector that was letting moisture into the system, damaging the sensor.
After replacing the connector and the O2 sensor, the fuel economy returns to normal, and the check engine light goes off. This real-world example highlights how a seemingly small issue can have a noticeable impact on driving.
Diagnosing O2 Sensor Heater Circuit Malfunction Codes
Understanding the diagnostic trouble codes (DTCs) associated with O2 sensor heater circuit malfunctions is crucial for effective repair. This section will cover common codes, how to read them with a scanner, and what they specifically indicate about the problem. This knowledge helps in pinpointing the exact cause.
Reading Diagnostic Trouble Codes DTCs
The first step in diagnosing any check engine light issue is to read the diagnostic trouble codes stored in your car’s computer. You’ll need an OBD-II scanner for this. You can buy these scanners or often borrow them from auto parts stores.
Plug the scanner into the OBD-II port, usually located under the dashboard on the driver’s side.
Turn the ignition key to the “ON” position (without starting the engine). The scanner will then communicate with your car’s computer and display any stored DTCs. Write down the exact code numbers shown.
These codes are standardized and tell you what system or sensor the car’s computer detected a problem with.
Common O2 Sensor Heater Circuit DTCs
Several specific DTCs relate to O2 sensor heater circuit malfunctions. Some of the most common ones include:
- P0135 O2 Sensor Heater Circuit Malfunction (Bank 1 Sensor 1)
- P0141 O2 Sensor Heater Circuit Malfunction (Bank 1 Sensor 2)
- P0155 O2 Sensor Heater Circuit Malfunction (Bank 2 Sensor 1)
- P0161 O2 Sensor Heater Circuit Malfunction (Bank 2 Sensor 2)
The “Bank” refers to the side of the engine (if it’s a V-engine), and the “Sensor” number indicates which O2 sensor it is. Sensor 1 is typically before the catalytic converter, and Sensor 2 is after it. These codes directly point to a problem with the heating element or its circuit.
What the Codes Mean for Your Repair
These codes are very specific. They tell you that the ECU has detected an issue with the heater circuit of a particular O2 sensor. This could mean:
- The heater element inside the O2 sensor has failed.
- There’s an open circuit in the wiring to the heater element.
- There’s a short circuit in the wiring to the heater element.
- The heater circuit is not receiving the correct voltage or ground signal from the car.
Knowing which specific code you have helps you focus your diagnostic efforts. For example, P0135 specifically tells you the issue is with the heater circuit of the Bank 1 Sensor 1. This immediately tells you which sensor to inspect first.
Example Scenario: P0135 Code
Imagine your check engine light comes on, and you scan your car to find the code P0135. This code indicates a problem with the heater circuit of the primary oxygen sensor on the first bank of your engine.
Following the steps outlined earlier, you would first check the fuse and relay associated with this O2 sensor. If they are good, you would then inspect the wiring harness connected to Bank 1 Sensor 1 for any visible damage or corrosion. If the wiring appears intact, you would then test the resistance of the heater element within the O2 sensor itself using a multimeter.
If the resistance reading is outside the manufacturer’s specifications or shows an open circuit, the O2 sensor itself likely needs to be replaced. This systematic approach, guided by the DTC, helps ensure you’re addressing the correct component.
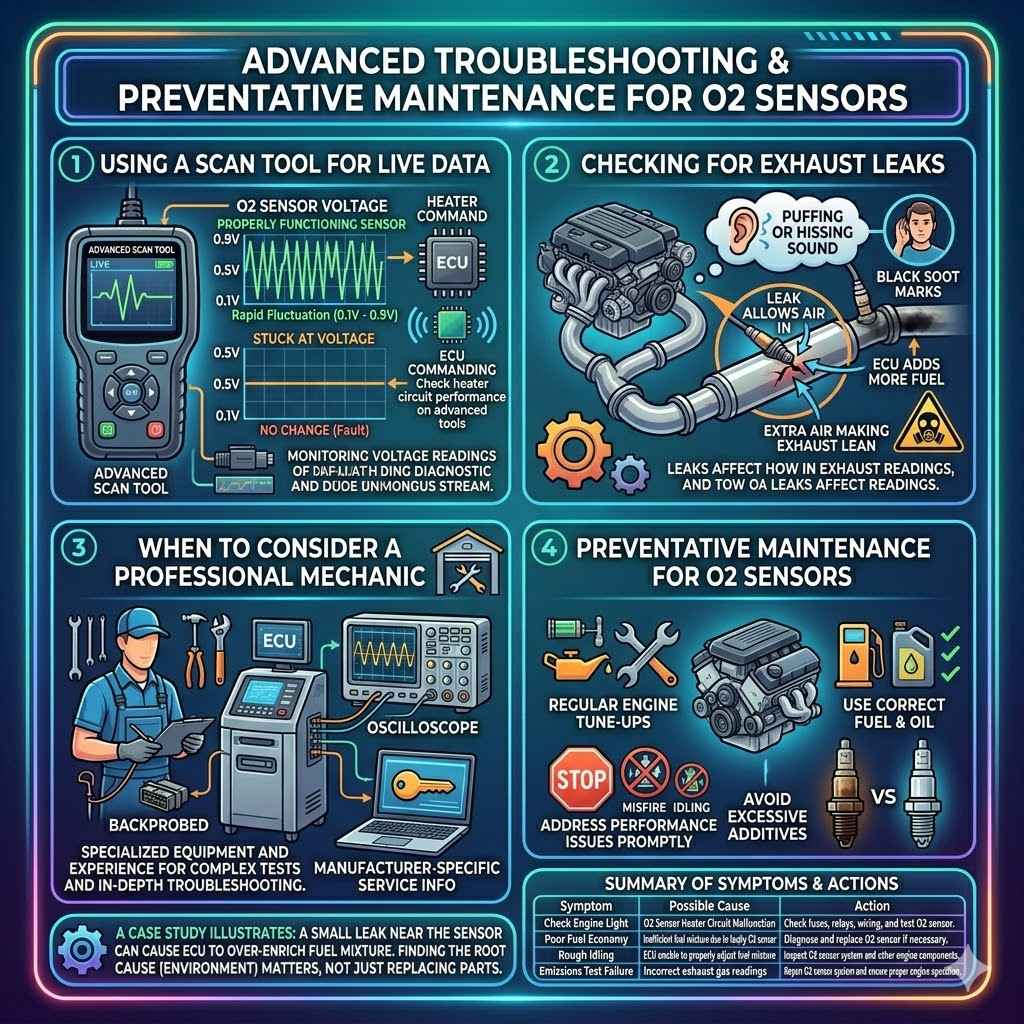
Advanced Troubleshooting and Maintenance
This section covers more in-depth troubleshooting techniques and preventative maintenance tips related to O2 sensors and their heater circuits. It aims to provide a complete picture for maintaining your vehicle’s emissions system.
Using a Scan Tool for Live Data
Beyond just reading codes, an advanced scan tool can provide live data from your car’s sensors. This is incredibly useful for diagnosing O2 sensor issues. You can monitor the voltage readings from the O2 sensors as the engine runs.
For a properly functioning O2 sensor, you should see its voltage fluctuate rapidly, typically between about 0.1 and 0.9 volts, as the ECU adjusts the fuel mixture. If the O2 sensor is stuck at a high or low voltage, or if it’s not changing at all, it indicates a problem.
When troubleshooting a heater circuit malfunction, you can also look for data related to the heater circuit’s performance, if your scan tool supports it. Some advanced tools can show if the ECU is commanding the heater on and if the sensor is responding correctly. This can help differentiate between a sensor problem and a wiring or ECU issue.
Checking for Exhaust Leaks
Exhaust leaks can significantly affect O2 sensor readings, even if the heater circuit itself is functioning correctly. If there’s a leak in the exhaust system before the O2 sensor, it can allow extra air into the exhaust stream. This extra air makes the exhaust appear lean to the O2 sensor.
A lean condition means there’s too much oxygen. The O2 sensor will try to tell the ECU to add more fuel. If the O2 sensor’s heater circuit is also malfunctioning, the ECU might not get a clear enough picture to make the right adjustments.
Therefore, it’s always a good idea to check for exhaust leaks when you’re dealing with O2 sensor-related codes.
You can often identify exhaust leaks by listening for a puffing or hissing sound from the exhaust system, especially when the engine is cold. You might also see black soot marks around exhaust pipe connections or gaskets.
When to Consider a Professional Mechanic
While many O2 sensor heater circuit malfunctions can be fixed by a DIYer with basic tools and knowledge, there are times when it’s best to call a professional. If you’ve gone through all the steps and can’t pinpoint the problem, or if you’re uncomfortable working with electrical systems or exhaust components, a mechanic can help.
Mechanics have specialized diagnostic equipment and extensive experience. They can perform more complex tests, such as backprobing the ECU connectors or using oscilloscopes to analyze sensor signals. They can also access manufacturer-specific service information that might provide more detailed troubleshooting procedures for your particular vehicle.
Preventative Maintenance for O2 Sensors
Regular maintenance can help prevent O2 sensor issues. One key aspect is ensuring your engine is running properly. Issues like misfires, coolant leaks into the combustion chamber, or excessive oil burning can contaminate and damage O2 sensors over time.
Using the correct fuel and oil for your vehicle is also important. Some additives in fuels or oils can degrade O2 sensors. Keeping your engine tuned up and addressing any other engine performance problems promptly can extend the life of your O2 sensors.
Here’s a summary of preventative steps:
- Perform regular engine tune-ups as recommended by your vehicle manufacturer.
- Use high-quality fuel and engine oil that meets your vehicle’s specifications.
- Address any engine performance issues, such as rough idling or misfires, promptly.
- Avoid using fuel additives unless specifically recommended by your car manufacturer.
Consider this case: A car owner consistently experiences poor gas mileage and a check engine light shortly after a previous repair. They’ve replaced the O2 sensor themselves. Upon visiting a specialized mechanic, it’s discovered there was a very small exhaust leak near the sensor.
This leak was allowing outside air to affect the sensor’s readings, causing the ECU to enrich the fuel mixture unnecessarily. Fixing the leak, rather than just replacing parts, resolved the issue. This illustrates that sometimes the root cause isn’t the sensor itself but its environment.
| Symptom | Possible Cause | Action |
|---|---|---|
| Check Engine Light | O2 Sensor Heater Circuit Malfunction (DTCs P0135-P0161) | Check fuses, relays, wiring, and test O2 sensor. |
| Poor Fuel Economy | Inefficient fuel mixture due to faulty O2 sensor | Diagnose and replace O2 sensor if necessary. |
| Rough Idling | ECU unable to properly adjust fuel mixture | Inspect O2 sensor system and other engine components. |
| Emissions Test Failure | Incorrect exhaust gas readings | Repair O2 sensor system and ensure proper engine operation. |
Frequently Asked Questions
Question: How long does it take to fix an O2 sensor heater circuit malfunction?
Answer: The time can vary. Checking fuses and wiring might take less than an hour. Replacing an O2 sensor typically takes about 1-2 hours, depending on accessibility and if any rusted parts are involved.
Question: Can I drive my car with an O2 sensor heater circuit malfunction?
Answer: Yes, you can usually drive your car, but it’s not recommended for long periods. Your car might get worse gas mileage and produce more pollution. It could also lead to further engine problems.
Question: What’s the difference between O2 sensor heater circuit malfunction and a bad O2 sensor?
Answer: A heater circuit malfunction means the heating element in the sensor isn’t getting power or working. A bad O2 sensor could mean the entire sensor is failing, not just its heater.
Question: Do all cars have O2 sensor heater circuits?
Answer: Most modern cars manufactured in the last 20-25 years have O2 sensors with heater circuits to improve performance and emissions during cold starts.
Question: Can a faulty catalytic converter cause an O2 sensor heater circuit malfunction?
Answer: While a bad catalytic converter can cause other O2 sensor codes (like P0420), it usually doesn’t directly cause a heater circuit malfunction code. However, exhaust issues can sometimes lead to sensor problems indirectly.
Summary
Fixing an O2 sensor heater circuit malfunction is achievable with a systematic approach. By checking fuses, inspecting wiring, and testing the sensor itself, you can identify and resolve the issue. This guide provides the clear steps needed to get your car running efficiently again.