

Many car owners find themselves wondering how to flush a heater core properly. It sounds like a tricky job, especially for beginners. You might worry about making a mistake or not getting it clean enough.
But it doesn’t have to be hard! We’re here to show you a simple way to tackle this task. This guide will break down the process step-by-step, making it easy to follow.
Let’s get your car’s heater working like new again.
Why Your Car Heater Might Need a Flush
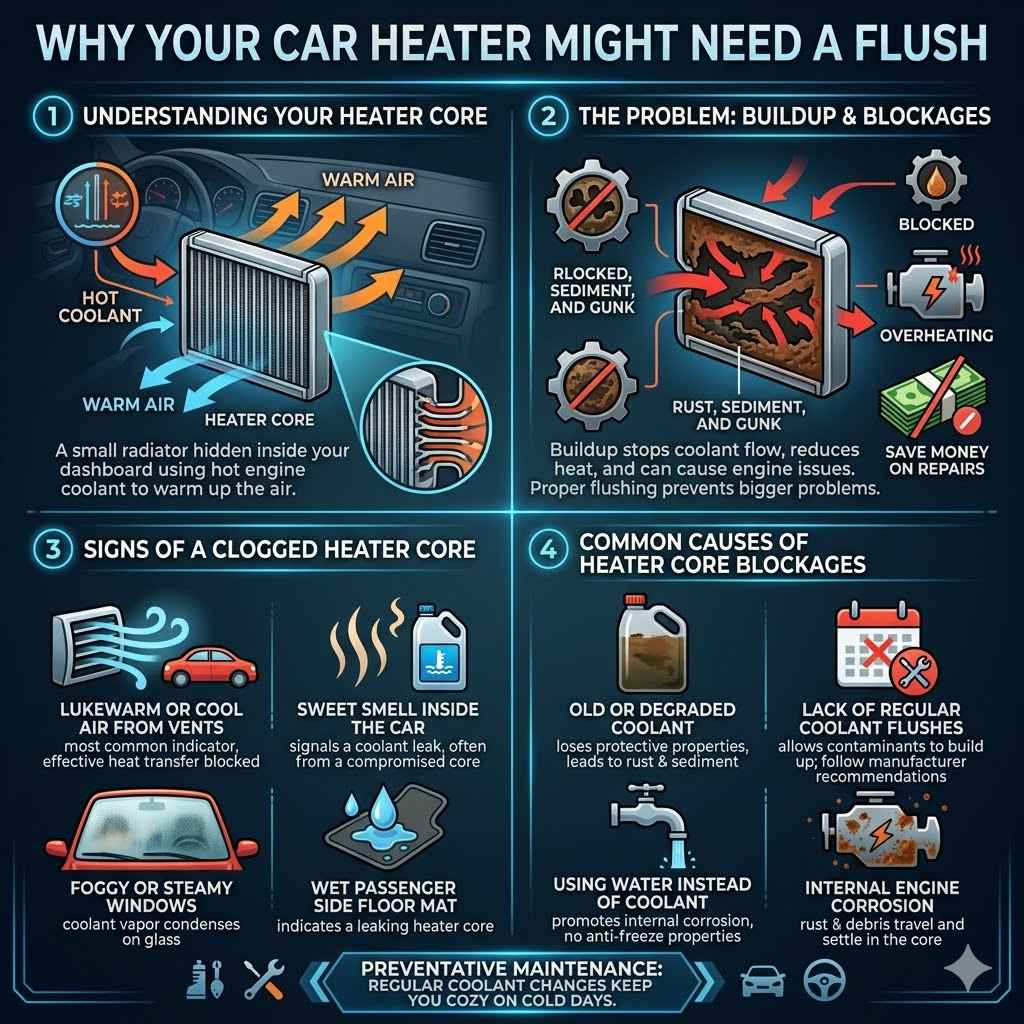
Your car’s heater core is like a small radiator hidden inside your dashboard. It uses hot coolant from your engine to warm up the air that blows into your car. Over time, rust, sediment, and other gunk can build up inside it.
This buildup stops the hot coolant from flowing freely, which means your heater won’t get as hot as it should. Sometimes, a blocked heater core can even cause your engine to overheat. Knowing how to flush a heater core properly can save you money on repairs and keep you cozy on cold days.
It’s a common maintenance task that can prevent bigger problems down the road.
Signs of a Clogged Heater Core
Several signs tell you your heater core might be blocked. The most obvious is when your car’s heater blows cool or lukewarm air, even when the engine is fully warmed up. You might also notice a sweet, syrupy smell inside your car, which could mean coolant is leaking from the heater core.
Sometimes, the passenger side floor gets wet or damp from a leaking heater core. Another clue is a foggy windshield that’s hard to clear, especially on damp days, as coolant vapor can condense on the glass.
- Lukewarm or Cool Air from Vents: This is the most common indicator. The heater core can’t transfer heat effectively if it’s clogged with debris.
- Sweet Smell Inside the Car: This odor often signals a coolant leak, frequently originating from a compromised heater core.
- Foggy or Steamy Windows: A blocked heater core might leak coolant vapor, which then condenses on your windows.
- Wet Passenger Side Floor Mat: If you find dampness or puddles on the floor on the passenger side, it often points to a leaking heater core.
Common Causes of Heater Core Blockages
Heater core blockages usually happen over time. When your coolant gets old and breaks down, it can turn into sludge. This sludge, along with rust from the engine and radiator, can collect in the narrow passages of the heater core.
Using plain water instead of a proper coolant mix can speed up corrosion and blockages. Not changing your coolant regularly is a big reason why this happens. Even small leaks in the cooling system can introduce air, which can also cause problems and contribute to blockages.
- Old or Degraded Coolant: Coolant loses its protective properties over time, leading to rust and sediment formation.
- Lack of Regular Coolant Flushes: Failing to drain and replace coolant per your vehicle manufacturer’s recommendations allows contaminants to build up.
- Using Water Instead of Coolant: Water alone promotes rust and does not have the anti-corrosive or anti-freeze properties of proper coolant.
- Internal Engine Corrosion: Rust and debris from other parts of the cooling system can travel and settle in the heater core.
How to Flush a Heater Core Properly A Step-by-Step Guide
Learning how to flush a heater core properly is a valuable skill for any car owner. It involves a few key steps to ensure you remove all the gunk and restore heat to your cabin. We will guide you through the process, making it easy to understand and perform.
This method uses common tools and supplies you can get at most auto parts stores. Follow these instructions carefully, and you’ll have your heater blowing hot air again in no time.
Gathering Your Supplies and Tools
Before you start, make sure you have everything you need. This will make the process much smoother and prevent you from having to stop halfway through. Having the right materials ready is key to successfully flushing your heater core.
- New Coolant: You’ll need the correct type of coolant for your car. Check your owner’s manual.
- Distilled Water: This is important for flushing and mixing with new coolant. Don’t use tap water.
- Heater Hose Pliers: These special pliers are designed to clamp heater hoses without damaging them.
- Drain Pan: A large pan to catch the old coolant.
- Funnel: To add new coolant and flushing agents.
- Garden Hose: For flushing with water.
- Safety Glasses and Gloves: Protect your eyes and skin from hot coolant.
- Rags or Shop Towels: For cleaning up spills.
- Optional Flushing Agent: Some people use specialized heater core flush products.
Step-by-Step Heater Core Flushing Instructions
This guide will walk you through the process of how to flush a heater core properly. Safety first! Always wear safety glasses and gloves.
Coolant can be harmful if ingested.
- Allow the Engine to Cool Down Completely: Never attempt this on a hot engine. Hot coolant can cause severe burns. Wait until the engine is cool to the touch.
- Locate the Heater Hoses: Find the two rubber hoses that go from the engine compartment into the firewall of your car. These are your heater hoses. One carries hot coolant to the heater core, and the other returns cooler coolant.
- Clamp the Heater Hoses: Use heater hose pliers to carefully clamp both heater hoses. This stops coolant from flowing into the heater core. This is a crucial step to prevent coolant from entering the cabin later.
- Disconnect One Heater Hose: Choose one of the clamped hoses and disconnect it from the fitting on the engine side. Be ready with your drain pan underneath to catch any dripping coolant.
- Flush with Water (Method 1): Connect a garden hose to the disconnected heater hose. Turn on the water slowly. Flush water through the hose and into the heater core until the water coming out of the other heater hose (which should still be connected) runs clear. This can take several minutes. Flush until no more debris comes out.
- Flush with Flushing Agent (Method 2 – Optional): If using a chemical flush, follow the product’s instructions. Typically, you’ll add the flush to the system after running water, run the engine briefly, then flush again with water. This can help break down tougher clogs. Always follow the product label carefully.
- Reconnect the Heater Hose: Once the water runs clear, reattach the disconnected heater hose and secure it with its clamp. Make sure it’s a tight fit to prevent leaks.
- Remove the Other Heater Hose: Now, clamp the other heater hose and disconnect it. This hose usually goes back to the engine.
- Flush the System from the Engine Side: Connect your garden hose to this disconnected hose. Flush water through the system in the opposite direction. This second flush helps remove any remaining debris that might have been missed in the first flush.
- Reconnect the Second Heater Hose: Once water runs clear from this hose, reconnect it to its fitting on the engine and secure the clamp.
- Fill the Cooling System with Coolant: Remove the clamps from both heater hoses. Open your radiator cap (or coolant reservoir cap). Using a funnel, slowly fill the cooling system with the correct mixture of coolant and distilled water. Your owner’s manual will tell you the right ratio.
- Bleed Air from the System: Start the engine and let it run until it reaches normal operating temperature. Turn your car’s heater on high. You may need to slightly open a bleed screw or loosen a heater hose clamp briefly while the engine is running to let out trapped air. This is essential for proper coolant circulation and heater function. Keep adding coolant as needed if the level drops.
- Check for Leaks: Once the engine is warm and the heater is blowing hot, check all hose connections and the radiator for any signs of leaks.
Dealing with Stubborn Blockages
Sometimes, a simple flush might not be enough to fix a severely clogged heater core. These blockages can be tough to remove, but there are a few things you can try. It’s important to be patient and persistent.
Using a Stronger Flushing Agent
There are specific commercial heater core flush products available that are designed to break down rust, scale, and other deposits more effectively than plain water. These often contain mild acids or chelating agents.
- Application Process: You typically drain the old coolant, add the flush product to the system with distilled water, run the engine for a specific period (as per product instructions, usually 15-30 minutes), and then flush extensively with plain water.
- Considerations: Ensure the product is compatible with your vehicle’s cooling system materials. Always follow the manufacturer’s instructions precisely to avoid damage to seals or hoses. Some strong flushes might require multiple applications for very stubborn clogs.
Reverse Flushing the Heater Core
This is a more aggressive method where you flush water through the heater core in the opposite direction of normal coolant flow. This can dislodge particles that a forward flush might not remove.
- Procedure: After disconnecting one heater hose, instead of connecting a garden hose to it, you might use a specialized flush kit or a strong water source to force water backward through the heater core. You’d need to disconnect the other heater hose as well and allow the water to exit freely.
- Effectiveness: This method can be very effective for breaking up compacted sediment but carries a higher risk of dislodging larger particles that could then block other parts of the cooling system. It requires careful execution.
When to Consider Replacement
If you have tried multiple flushing methods and your heater still doesn’t work well, or if you suspect the heater core is leaking internally, it might be time to replace it. A damaged or severely corroded heater core may not be salvageable.
- Diagnosis: Signs of internal leakage include persistent coolant loss without external leaks, oil in the coolant, or the heater core itself being physically damaged.
- Replacement Difficulty: Replacing a heater core can be a complex and time-consuming job, often requiring the removal of the entire dashboard. It’s a job many people opt to have a professional mechanic do due to its difficulty.
Preventing Future Heater Core Issues
Once you’ve successfully learned how to flush a heater core properly, the next step is to prevent it from getting clogged again. Regular maintenance is key to keeping your car’s heating system working well.
Regular Coolant Changes
Your car’s coolant degrades over time. When it breaks down, it can cause corrosion and sediment buildup. Changing your coolant at the intervals recommended by your vehicle manufacturer is one of the most effective ways to prevent heater core problems.
- Manufacturer Recommendations: Always refer to your car’s owner’s manual for the correct coolant type and replacement schedule. Most cars need a coolant change every 30,000 to 100,000 miles, or every 2 to 5 years.
- Quality of Coolant: Using a high-quality, name-brand coolant specifically designed for your vehicle is important. Avoid using cheap imitations that might not offer the same level of protection against corrosion.
Using the Correct Coolant Mixture
A 50/50 mixture of coolant and distilled water is typically recommended for most climates. This mixture provides optimal protection against freezing and boiling, as well as corrosion.
- Distilled Water is Key: Always use distilled or de-ionized water when mixing with coolant. Tap water contains minerals that can cause deposits and accelerate corrosion within the cooling system, including the heater core.
- Importance of Ratio: The correct ratio ensures the coolant’s effectiveness. Too much water can lead to freezing and boiling issues, while too much pure coolant can reduce its ability to transfer heat efficiently and may not provide adequate corrosion protection.
Inspecting the Cooling System
Regularly inspect your cooling system for any signs of leaks or problems. Catching small issues early can prevent them from becoming major ones that affect your heater core.
- Hose and Belt Condition: Check the heater hoses for cracks, swelling, or softness. Also, inspect other cooling system hoses and the drive belts for wear and tear.
- Coolant Level and Condition: Keep an eye on your coolant level in the reservoir. If it’s consistently low, you might have a leak somewhere. Also, note the color and clarity of the coolant; a rusty or sludgy appearance indicates a problem.

Frequently Asked Questions
Question: How often should I flush my heater core?
Answer: You don’t need to flush your heater core every time you change your coolant. A flush is usually only necessary if you notice symptoms of a clogged heater core. If you maintain your cooling system regularly with proper coolant changes, you may never need to flush the heater core.
Question: Can I use a pressure washer to flush my heater core?
Answer: It is not recommended to use a pressure washer. The high pressure can potentially damage the delicate fins of the heater core or other components in your cooling system. A garden hose with steady water pressure is sufficient.
Question: What if I can’t find the heater hoses?
Answer: Heater hoses typically run from the engine bay into the car’s firewall. They are usually rubber and about half an inch to three-quarters of an inch in diameter. Consulting your car’s service manual or looking up a diagram for your specific vehicle model can help you locate them.
Question: Is it safe to drink coolant?
Answer: No, it is never safe to drink coolant. Coolant is toxic and can cause serious harm or death if ingested by humans or pets. Always handle it with care and dispose of it properly.
Question: My heater is working now but smells funny. What could it be?
Answer: A funny smell, especially a sweet one, can indicate a small leak in the heater core or its connections. Even if the heater is still working, it’s best to get this checked out and potentially flushed to prevent it from worsening and causing more damage.
Summary
You’ve learned how to flush a heater core properly. This process involves gathering the right tools, safely draining old coolant, flushing with water or a special agent, and refilling with fresh coolant. Regular maintenance, like coolant changes and system inspections, will help prevent future clogs.
Keep your car’s heating system in top shape with these simple steps.