
Are you tired of spending a fortune on heating bills every winter? Imagine a cozy home where warmth doesn’t break the bank.
Discover the world of DIY wood pellet heaters. These cost-effective and eco-friendly solutions not only keep your home toasty but also put you in control of your energy consumption. Picture yourself building a heater with your own hands, adding a personal touch to your space while saving money.
You don’t need to be a master craftsman to succeed. With the right guidance, you can turn this project into a rewarding experience. Ready to learn how a DIY wood pellet heater can transform your home and wallet? Let’s dive into this simple yet powerful innovation that promises comfort without compromise.
Benefits Of Wood Pellet Heaters
Wood pellet heaters save money. These heaters use less fuel. That means spending less on heating. Pellets are cheap and easy to find. You can buy them in many stores. They also burn longer. That means you refill less often. This makes them a smart choice for homes.
Wood pellets are green. They come from waste wood. This means less tree cutting. Burning pellets makes less smoke. Less smoke means cleaner air. It’s better for our planet. Using pellets helps reduce waste. This is good for nature.
Pellets burn evenly. This gives a steady heat. No sudden temperature changes. Your home stays warm all day. Pellets are made to burn slowly. This helps keep the heat the same. A warm home feels cozy and nice.
Choosing The Right Materials
Wood pelletscome in different types. Some are made from hardwood. Others use softwood. Hardwood pellets burn slowly. They give long-lasting heat. Softwood pellets ignite quickly. They produce intense heat.
Choosing high-quality componentsis crucial. Good components ensure efficient heating. Use a strong metal for the heater body. A reliable thermostat helps control temperature. Durable fans circulate the heat well. Make sure all parts fit together snugly. Proper assembly avoids heat loss.
Designing Your Heater
Choose a spot with enough space. Keep it away from walls and furniture. Air flow is important for safety. Allow room to add pellets easily. Find a spot near a power outlet. This helps with fans or controls. Remember, space affects heat distribution.
Safety is very important when building a heater. Use heat-resistant materials. This prevents accidents. Install a smoke detector nearby. It warns you of any danger. Use a fireproof mat under the heater. This protects the floor. Keep a fire extinguisher close. Just in case. Make sure all parts are secure. Loose parts can cause problems.
Building The Heater
You need some tools to build a wood pellet heater. A drill is important. It helps make holes. A screwdriver is needed too. Use it to tighten screws. Don’t forget a saw. It cuts wood pieces. Wear safety goggles. They protect your eyes. A measuring tape is helpful. It helps measure parts. You also need pliers. They grip things tight. Keep gloves handy. They protect your hands.
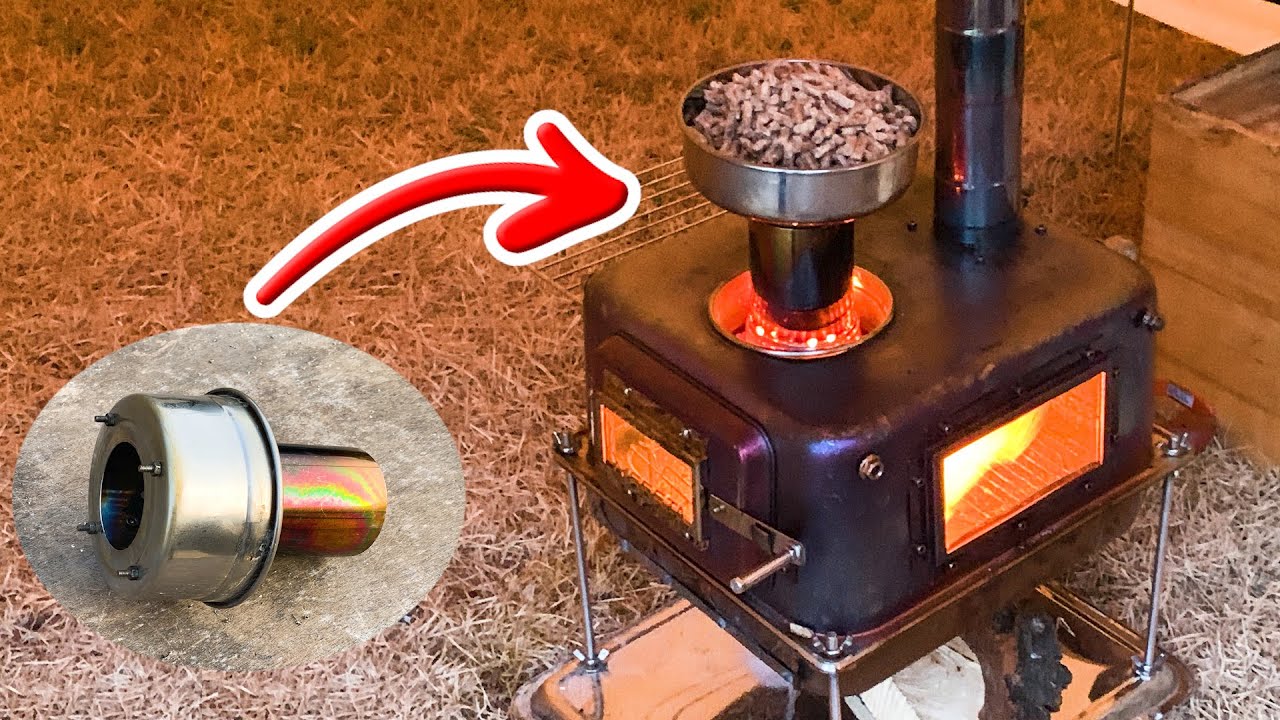
First, gather all your tools and materials. Measure and cut the wood as needed. Drill holes for screws and pipes. Attach parts with screws using a screwdriver. Check alignment of each piece. Assemble the heater body carefully. Insert the pellet holder inside. Ensure it fits snugly. Attach the vent pipe securely. Test for stability. Make sure everything is tight.
Installation Process
Installing a DIY wood pellet heater involves gathering materials, following clear instructions, and ensuring proper ventilation. Safety measures are crucial to prevent hazards. Enjoy efficient heating while keeping your space cozy and warm.
Choosing The Ideal Location
Pick a spot near an exterior wall for the heater. This helps with ventilation and airflow. Ensure the area is clear of clutter and flammable items. Safety first! A level surface is important. It keeps the heater stable. Check if the floor can support the heater’s weight. Consider the proximity to a power source. This makes installation easier. Avoid areas with heavy foot traffic. It’s safer for everyone.
Ventilation And Airflow
Proper airflow is key for safety. Ensure windows or vents are nearby. This helps with air circulation. Good ventilation prevents carbon monoxide buildup. Always keep the air path clear. Check the airflow direction. It should lead outside. Install a fan if needed. This boosts airflow efficiency. Regularly inspect vents for blockages. Clean them often to maintain airflow.
Maintenance Tips
Regular cleaning keeps your wood pellet heater working well. Ash buildup can block airflow. Remove ash weekly. Check the glass for soot. Clean it with a damp cloth. Inspect the burn pot for clogs. Clear it out often. Empty the ash drawer before it overflows. Keep your heater running smoothly. Check the exhaust for blockages. A clear path means better heating. Use a vacuum to clean inside parts. It helps remove dust.
Heater won’t start? Check the power source. Ensure it’s plugged in. Pellets not feeding? Look at the auger. It might be jammed. Low heat output? Inspect the air settings. Adjust them for better warmth. Smoke issues? Verify the vent is clear. Blockages can cause smoke. Strange noises? Parts might need tightening. Listen for loose screws. Error codes? Refer to the manual. It helps identify the problem.
Maximizing Efficiency
Using the right amount of pellets is important. Too many pellets can waste heat. Too few pellets may not produce enough warmth. Measure pellets carefully before using. Ensure pellets are dry and stored properly. Wet pellets do not burn well. Dry pellets give more heat. Choose high-quality pellets for best results. They burn cleaner and hotter.
Control temperature for comfort. Adjust settings to fit your needs. High heat settings use more pellets. Lower settings save pellets and energy. Use a thermostat for easy control. Keep room temperature steady. Avoid frequent adjustments. This helps the heater work better. Monitor the room temperature often. Make changes as needed.

Credit: permies.com
Comparing To Other Heating Solutions
Exploring heating options reveals the DIY wood pellet heater as efficient and cost-effective. It provides warmth using renewable fuel. Many appreciate its affordability and straightforward installation compared to traditional heating methods.
Wood Pellet Vs. Traditional Wood Stoves
Wood pellet heaters use compressed sawdust pellets
Pellet Heaters Vs. Gas Heaters
Pellet heaters use renewable sources. Gas heaters rely on fossil fuels. Pellet heaters are eco-friendly
Safety Considerations
Building a DIY wood pellet heater requires careful safety measures. Ensure proper ventilation to avoid harmful gas buildup. Use heat-resistant materials to prevent fire hazards.
Fire Prevention Measures
Always keep your heater on a flat surface. This helps stop it from tipping over. Clear the area around the heater. Remove any flammable items like paper and cloth. Check the heater for damage regularly. Look for cracks or worn parts. Never leave the heater unattended. Always turn it off before leaving the room. Use only approved pellets for your heater. Other types might cause a fire.
Carbon Monoxide Risks
Carbon monoxide is a dangerous gas. It has no smell. Make sure your heater has a vent. This lets the gas escape. Install a detector in your home. It will alert you if levels get too high. Open a window if you feel dizzy or sick. This can help clear the air. Seek fresh air immediately if the detector sounds. Safety comes first.

Credit: www.youtube.com
Frequently Asked Questions
Why Are People Getting Rid Of Pellet Stoves?
People are switching from pellet stoves due to maintenance hassles, cost of pellets, and better heating alternatives. Environmental concerns over emissions are increasing. Pellet stove efficiency can vary, prompting users to explore more consistent heating options.
How Long Will A 40 Lb Bag Of Pellets Burn?
A 40 lb bag of pellets typically burns for 24 to 36 hours. Burn time depends on stove efficiency and settings. Adjust the heat setting for longer or shorter durations. Use high-quality pellets for optimal performance and efficiency.
Is It Cheaper To Burn Pellets Or Oil?
Burning pellets is often cheaper than oil due to lower fuel costs and higher efficiency. Pellet stoves provide consistent heat and can reduce heating expenses. Oil prices fluctuate more, making pellets a cost-effective choice for many households. Consider initial setup costs for accurate comparison.
Can You Make Your Own Wood Pellets For Heating?
Yes, you can make your own wood pellets for heating. Use a pellet mill to compress sawdust or other biomass. Ensure the material is dry and free of contaminants. Homemade pellets can be cost-effective but require proper equipment and safety precautions.
Always research thoroughly before starting the process.
Conclusion
Building a DIY wood pellet heater can be rewarding and efficient. You save money and enjoy a cozy home. The process requires patience and a few tools. Always prioritize safety while working. Gather materials and follow step-by-step instructions. Your efforts will yield a reliable heating solution.
Embrace the satisfaction of crafting something useful. Share your experience with others interested in DIY projects. This heater is an eco-friendly option. It makes your space warm and inviting. Start your project today and enjoy the benefits of homemade warmth.
Your journey to a warmer home begins here.