
Sometimes, the heat in your car just stops working. It can be confusing, especially if you’re new to car care. A common reason for this is a blocked heater core.
It’s a small radiator inside your dashboard that warms up the air. When it gets clogged, warm coolant can’t flow through it. This leaves you with cold air when you need heat the most.
Don’t worry, though. Learning How to Flush a Clogged Heater Core is easier than you think with simple steps. We’ll walk you through it so you can get warm air back in your car.
Why Your Heater Core Clogs
Your car’s heater core can get clogged over time for a few main reasons. Think of it like a tiny radiator, and just like a big one, it can get plugged up with gunk. This gunk is usually a mix of rust, sediment, and old coolant that breaks down.
When your cooling system isn’t maintained, these particles can float around and eventually settle in the narrow passages of the heater core. This blockage prevents the hot engine coolant from flowing freely through the core, which is what heats the air blowing into your cabin. If you’ve ever noticed lukewarm air or no heat at all, a clogged heater core is a likely culprit.
What Clogs a Heater Core
The main reason a heater core gets clogged is due to poor maintenance of the engine’s cooling system. When coolant gets old, it can start to break down and form sludge or sediment. This is especially true if you use the wrong type of coolant or just plain water, which can lead to rust formation inside the engine and radiator.
These particles then get carried by the coolant and can get trapped in the small, winding tubes of the heater core.
- Coolant Degradation: Over time, coolant loses its protective properties. It can no longer prevent rust and corrosion as effectively. This leads to small metal particles breaking off from engine components.
- Improper Coolant Mixture: Using straight water or a poorly mixed coolant solution can accelerate corrosion and prevent proper heat transfer. The ideal mix usually involves a 50/50 ratio of antifreeze and distilled water for optimal performance and protection.
- Debris Contamination: Sometimes, if the cooling system has been opened for repairs, dirt or debris can accidentally get into the system. This foreign material can then travel to the heater core and cause a blockage.
- Age and Wear: Like any part of a car, the cooling system components age. Seals can degrade, and internal parts can wear down, all contributing to the creation of particles that can clog the heater core.
Signs of a Clogged Heater Core
There are several telltale signs that your heater core might be clogged. The most obvious one is a lack of heat when you turn on your car’s heater, even if the engine is running at normal temperature. You might also notice that the defroster isn’t working very well, or that you only get some warm air, but not a strong flow.
Sometimes, a clogged heater core can even cause your engine to overheat because the coolant can’t circulate properly through the entire cooling system. Another sign could be a sweet smell inside your car, which might indicate a coolant leak from the heater core itself.
Another sign to look out for is a fogging or steaming effect on your windshield, especially on the inside. This happens when hot coolant leaks from the heater core and the moisture evaporates on the glass. If you see a greasy film on the inside of your windows, that’s often coolant residue.
Some drivers also report hearing gurgling noises from the dashboard area, which can be air trapped in the cooling system due to a blockage in the heater core. These symptoms, especially when combined, strongly point towards a heater core issue that needs attention.
Gathering Your Tools and Supplies
Before you start the process of flushing your heater core, it’s important to have all the right tools and supplies ready. This makes the job go much smoother and prevents you from having to stop halfway through. Having everything within reach ensures you can complete the task efficiently and safely.
Gathering these items beforehand also helps you avoid any last-minute trips to the auto parts store, which can be inconvenient, especially if you need your car’s heat working sooner rather than later.
Essential Tools for Heater Core Flushing
You’ll need a few basic tools that most people have in their home toolbox. A good set of wrenches and pliers is always useful for disconnecting hoses. You’ll likely need a hose clamp pliers tool, as those clamps can be tricky.
A drain pan is a must for catching the old coolant. Safety glasses are crucial to protect your eyes from splashing coolant, which is a hazardous material. You might also need some rags or shop towels to clean up any spills, and possibly a stiff brush to help dislodge any stubborn debris.
- Adjustable Wrenches and Pliers: These are used to loosen and tighten hose clamps and fittings. Having a variety of sizes ensures you can tackle different types of fasteners.
- Hose Clamp Pliers: Specifically designed for the spring-type clamps found on many automotive hoses, making removal and installation much easier and safer.
- Drain Pan: A large capacity pan, at least 5-quart, is needed to collect the old coolant without making a mess.
- Safety Glasses: Essential for protecting your eyes from corrosive coolant splashes.
- Rags and Shop Towels: For cleaning up spills and wiping down components.
- Bucket: Useful for mixing flushing solutions or holding parts.
Choosing the Right Flushing Solution
When it comes to flushing your heater core, you have a few options for flushing solutions. Many auto parts stores sell specialized radiator flush products. These are designed to break down rust, scale, and other deposits.
You can also use a mixture of distilled water and white vinegar. The acidity of vinegar helps to dissolve mineral buildup and rust. Some people even use a strong detergent like dish soap, but this can sometimes create too many suds that are hard to rinse out.
Always follow the instructions on any commercial flush product you use.
Using distilled water is highly recommended for any flushing or refilling of your cooling system. Tap water contains minerals that can contribute to scale buildup, defeating the purpose of the flush. If you opt for a commercial flush, ensure it’s compatible with your vehicle’s cooling system materials.
Some older systems might react poorly to certain chemicals. Always refer to your car’s owner’s manual for any specific recommendations regarding coolant types and flushing agents.
Step-by-Step How to Flush a Clogged Heater Core
Now that you have your tools and supplies ready, let’s get to the actual process of flushing the heater core. This guide will walk you through each step clearly. Taking your time and following these instructions carefully will help ensure you can successfully clear that blockage and get warm air flowing back into your car.
Remember to always prioritize safety and work in a well-ventilated area.
Preparing Your Vehicle for the Flush
First, make sure your car’s engine is completely cool. Never attempt to work on the cooling system when the engine is hot, as pressurized hot coolant can cause severe burns. Park your car on a level surface.
You’ll need to locate the heater core hoses. These are typically two hoses that run from the engine compartment into the firewall (the wall between the engine and the cabin). They usually connect to the heater core inside the dashboard.
Next, you need to drain the old coolant from the system. You can do this by locating the drain plug on the bottom of your radiator or by disconnecting the lower radiator hose. Place your drain pan underneath the radiator or hose to catch the old coolant.
Dispose of the old coolant properly, as it is toxic. Many local auto parts stores or recycling centers accept used coolant for safe disposal. This step is crucial for removing the bulk of the old, potentially dirty coolant before you begin flushing.
Disconnecting the Heater Hoses
Once the engine is cool and the old coolant is drained, you need to disconnect the heater hoses. These are the two rubber hoses that enter your car’s firewall. Locate the clamps holding these hoses in place.
Use your hose clamp pliers to loosen and slide the clamps back away from the connection points. Then, carefully twist and pull the hoses off the fittings. You might need to use a bit of gentle prying with a flathead screwdriver, but be careful not to damage the hoses or the fittings.
Be prepared for some residual coolant to spill out when you disconnect the hoses. Have your drain pan ready to catch this. Some people like to label the hoses (e.g., “in” and “out”) or take a picture before disconnecting them, though it’s usually straightforward to identify which hose goes where based on their routing from the engine.
Ensure you have a firm grip on the hose and fitting when you pull them apart. If they are stuck, a little bit of penetrating oil around the fitting can help, but use it sparingly.
Flushing the Heater Core
Now for the core part: flushing. You have two main ways to do this. One is by using a reverse flush, and the other is a forward flush.
For a reverse flush, you’ll connect a garden hose to one of the heater core fittings and flush water through it in the opposite direction of normal coolant flow. For a forward flush, you’ll connect the hose to the other fitting and flush water in the normal direction.
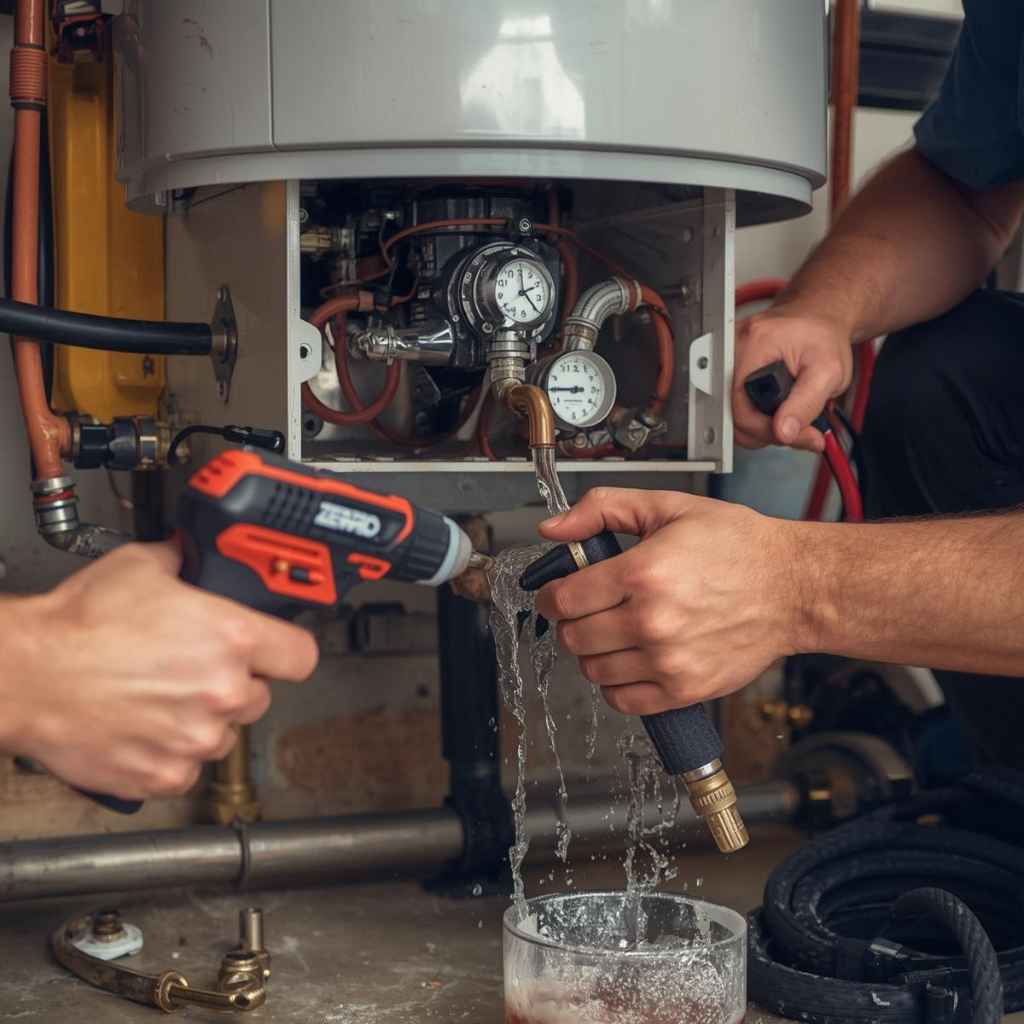
Many mechanics recommend a reverse flush for heater cores because it’s often more effective at dislodging blockages. You’ll need a way to securely attach your garden hose to one of the heater core inlet or outlet pipes. You can use a simple adapter or even a piece of tubing and hose clamps.
Turn on the water slowly at first. You should see dirty water and debris coming out of the other heater hose. Keep flushing until the water runs clear.
This process might take several minutes, and you may need to switch directions a couple of times.
Using a Garden Hose
To perform the flush with a garden hose, firmly attach the hose to one of the heater core ports. You might need to use a universal hose adapter or a piece of rubber tubing with clamps to get a secure fit. Ensure the connection is tight to prevent water from spraying everywhere.
Let the water run into the heater core and observe the discharge from the other hose. Initially, you will likely see a stream of discolored water and possibly small pieces of debris.
Continue flushing until the water exiting the heater core runs completely clear. This might take a good 10-15 minutes or even longer, depending on how clogged the core is. You can try flushing in both directions (forward and reverse) to ensure you dislodge as much sediment as possible.
Switching between directions can be more effective at breaking up stubborn blockages. Periodically, you can briefly turn the water pressure up and down to help agitate any lodged debris.
Using a Flushing Kit or Machine
For a more professional and often more effective flush, you can use a dedicated radiator flush kit or a pressurized flushing machine. These kits often come with adapters and instructions for connecting to your heater hoses. Flushing machines use pressurized water or compressed air to force debris out of the heater core.
They can be more efficient at clearing severe blockages than a simple garden hose. You can rent these machines from some auto parts stores or hire a mechanic who uses them.
These specialized tools are designed to apply consistent pressure and can often achieve a more thorough cleaning. The process usually involves connecting the machine to the heater core lines and running it for a specified period. Some machines even use a pulsed flow of water to better agitate and remove stubborn deposits.
Following the manufacturer’s instructions for the specific kit or machine you are using is essential for optimal results and to avoid any potential damage to the cooling system.
Rinsing and Reassembling
Once you’re satisfied that the heater core is clean, it’s time to rinse out any remaining flushing solution or debris. Use your garden hose to flush the heater core with clean water for several minutes. Again, let the water run until it comes out clear from both connections.
This step is important to remove any residue from the flush that could cause future problems.
After thoroughly rinsing, reconnect the heater hoses to their correct ports on the firewall. Make sure the clamps are tightened securely to prevent any leaks. It’s a good idea to double-check that the clamps are positioned correctly over the hose barbs.
You don’t want them to slip off later. Ensure the hoses are firmly seated on the fittings.
Refilling the Cooling System
With the heater hoses reconnected and secured, it’s time to refill your cooling system with fresh coolant. Refer to your car’s owner’s manual for the correct type and amount of coolant. Typically, you’ll use a 50/50 mixture of antifreeze and distilled water.
Slowly pour the coolant into the radiator or the coolant reservoir until it reaches the appropriate level. Make sure to fill the system gradually to allow air to escape.
Once filled, start the engine and let it run for a few minutes with the heater turned on high. This helps to circulate the new coolant and push out any remaining air pockets. Keep an eye on the coolant level in the reservoir and top it off if necessary.
You may need to bleed the cooling system to remove any trapped air. Check for leaks around the heater hoses and radiator. Periodically check the coolant level over the next few days and top up as needed.
Troubleshooting and Maintenance Tips
Even after a thorough flush, you might encounter some issues or want to prevent future clogs. Troubleshooting common problems and implementing regular maintenance can save you a lot of hassle down the road. A well-maintained cooling system is key to preventing heater core issues and other engine problems.
When the Flush Doesn’t Work
If flushing the heater core doesn’t restore heat, the blockage might be too severe, or there could be another issue. In some cases, the heater core itself might be internally damaged or corroded beyond repair. If you’ve flushed multiple times and still have no heat, it might be time to consider replacing the heater core.
This is a more involved repair that often requires removing the entire dashboard, so many people opt to have a professional mechanic handle it.
Another possibility is an issue with the engine’s thermostat, water pump, or radiator. If the thermostat isn’t opening, hot coolant won’t reach the heater core. A failing water pump won’t circulate coolant effectively.
A blocked radiator can also restrict coolant flow. You’ll need to diagnose these other components if the heater core flush doesn’t solve the problem. Checking for diagnostic trouble codes with an OBD-II scanner can also provide clues.
Preventing Future Clogs
The best way to avoid a clogged heater core is through regular cooling system maintenance. This includes flushing and replacing your coolant at the intervals recommended in your car’s owner’s manual. Using the correct type of coolant and ensuring it’s mixed properly with distilled water is also vital.
Inspect your hoses regularly for any signs of wear, cracking, or leaks.
- Regular Coolant Changes: Follow your vehicle manufacturer’s recommendations for coolant flush and replacement intervals. This removes old coolant and any accumulated debris.
- Use Quality Coolant and Distilled Water: Always use the specified type of coolant for your vehicle and mix it with distilled water. Tap water contains minerals that can cause scale.
- Inspect Hoses and Belts: Periodically check the heater hoses and other cooling system components for wear or leaks. Replace any damaged parts promptly.
- Keep the System Clean: If you notice any signs of rust or debris in the coolant, address it immediately. A clogged radiator or engine passages can lead to heater core issues.
Understanding Coolant Types
There are different types of coolant, often referred to by color (like green, orange, or pink). These are typically based on different chemical additives that protect against corrosion and freezing. It’s crucial to use the type of coolant recommended by your vehicle’s manufacturer.
Mixing different types of coolant can lead to chemical reactions that reduce their effectiveness and can even damage your cooling system components, including the heater core.
For instance, older vehicles often used traditional green ethylene glycol coolant. Newer vehicles might use extended-life coolants (ELCs) that come in various colors like orange, red, or yellow. Always consult your owner’s manual to identify the correct coolant specification (e.g., HOAT, OAT) for your car.
Using the wrong type can cause gelling, which is a thick, jelly-like substance that can clog radiators and heater cores very effectively.
Frequently Asked Questions
Question: How long does it take to flush a heater core
Answer: The time it takes can vary, but typically it takes about 1 to 3 hours. This includes draining the old coolant, flushing, rinsing, and refilling the system.
Question: Can I just use water to flush the heater core
Answer: You can use water for flushing, but it’s best to use distilled water. Tap water contains minerals that can leave deposits. After flushing with water, make sure to refill with the proper coolant mixture.
Question: Will flushing damage my heater core
Answer: If done carefully and with the right solutions, flushing should not damage a healthy heater core. However, very old or corroded cores might be more susceptible to leaks after flushing.
Question: What if I smell coolant after flushing
Answer: A small amount of coolant smell might be present right after the flush due to residue. If the smell is strong or persists, check all hose connections and the heater core itself for leaks.
Question: Should I flush my heater core if there are no symptoms
Answer: It’s generally not necessary to flush a heater core if there are no symptoms of a blockage or poor heating. However, regular coolant changes as per your owner’s manual will help prevent future issues.
Summary
Learning how to flush a clogged heater core is a valuable skill for any car owner. By following these simple, step-by-step instructions, you can clear blockages and restore heat to your vehicle. Remember to gather your tools, prepare your car safely, and take your time during the flushing and refilling process.
Regular maintenance of your cooling system is key to preventing future problems.