
Having a warm car seat on a chilly morning feels great, doesn’t it? But sometimes, that cozy warmth just stops working. It can be a bit confusing, especially if you’re new to car repairs, to figure out why your car seat heater isn’t heating up anymore.
Lots of people run into this problem, and it might seem tricky to fix. But don’t worry! This guide is here to make it super simple.
We’ll walk you through everything step by step so you can get that warmth back. Get ready to learn some easy fixes.
Understanding Car Seat Heater Problems
Car seat heaters are a common comfort feature in many vehicles, offering welcome warmth during colder months. When they stop working, it can be quite a surprise and a significant inconvenience. These systems, while generally reliable, can encounter issues due to wear and tear, electrical faults, or simple component failures.
For someone who isn’t a seasoned mechanic, diagnosing the exact cause of a non-functional seat heater can feel like a puzzle. This section will help you understand the common reasons why your car seat heater might not be working, setting the stage for troubleshooting and repair. We’ll cover the basic operation and typical failure points.
How Car Seat Heaters Work
Car seat heaters are essentially simple electrical heating elements embedded within the seat’s upholstery. These elements are usually made of a resistive wire or a carbon fiber material. When you turn on the seat heater, electricity flows through this resistive material.
As electricity passes through, the material heats up, and this warmth is then transferred to the seat cushion and backrest, making it comfortable for you. The system typically includes a power switch, a thermostat to control the temperature, and fuses to protect the circuit from electrical surges.
- Heating Elements: The core of the system, these are thin wires or carbon mats woven into the seat fabric. They generate heat when electricity passes through them. If these elements are damaged, broken, or short-circuited, they won’t heat up.
- Thermostat Control: Most seat heaters have a thermostat. This device monitors the seat’s temperature and tells the heating element when to turn on and off to maintain a set warmth. A faulty thermostat can cause the heater to not turn on at all or to overheat.
- Wiring and Connectors: The electrical signals travel through a network of wires. These wires can become frayed, pinched, or disconnected over time, especially with the constant movement of the seat. Loose or broken connections are a very common reason for a seat heater to stop working.
- Fuses and Relays: Like all electrical components in a car, seat heaters are protected by fuses. If there’s a power surge or a short circuit, the fuse will blow, cutting off power to prevent further damage. A blown fuse is a simple fix but indicates an underlying issue.
Common Failure Points
Several factors can lead to a car seat heater failing. One of the most frequent issues is damage to the heating elements themselves. This can happen if something sharp punctures the seat or if the wires become brittle from age and heat cycles.
Another common problem is a faulty switch. If the switch is worn out or has loose connections, it won’t send power to the heating element. Electrical shorts are also a concern; these occur when wires rub against each other or metal parts, causing an unintended flow of electricity that can blow a fuse or damage components.
- Physical Damage to Elements: Over time, the delicate heating wires can be stressed. Frequent sitting, shifting weight, or even a dropped object can cause them to break or fray. This breakage interrupts the flow of electricity, preventing heat generation.
- Wear and Tear on Switches: The buttons or knobs you use to control the seat heater are mechanical. Like any switch, they can wear out. Internal contacts can become corroded or loose, failing to make a proper electrical connection when pressed.
- Loose or Corroded Connections: Under the seat, many wires and connectors come together. These can become loose due to vibrations from driving or can corrode if exposed to moisture, especially in areas prone to rain or snow. A poor connection means no power reaches the heater.
- Thermostat Malfunction: The thermostat is designed to regulate temperature. If it fails, it might send incorrect signals, preventing the heater from activating or causing it to run too hot and potentially damage itself or other components.
How to Fix a Car Seat Heater Step-by-Step
Now that we have a better grasp of what might be wrong, let’s get into the practical steps of diagnosing and fixing your car seat heater. This process involves a logical approach to pinpoint the problem and then apply the correct solution. We’ll start with the easiest checks and move towards more involved repairs.
Safety is paramount, so always disconnect the battery before working on electrical components.
Safety First When Troubleshooting
Before you begin any work on your car’s electrical system, safety is the absolute priority. Always disconnect the negative terminal of your car’s battery. This prevents any accidental electrical shorts, shocks, or damage to your car’s electronics.
You’ll typically find the battery under the hood. Locate the negative terminal, usually marked with a minus sign or the color black. Loosen the clamp with a wrench and carefully lift the cable off the terminal post.
- Battery Disconnection: This is the most critical safety step. Removing battery power stops all electricity flowing to components, making your work safe. Never skip this.
- Work in a Well-Lit Area: Good lighting helps you see small wires, connectors, and components clearly, reducing the chance of mistakes.
- Use Insulated Tools: If possible, use tools with insulated handles. This provides an extra layer of protection against accidental contact with live wires, though with the battery disconnected, this is less of a concern for the seat heater itself.
- Consult Your Vehicle Manual: Your car’s owner’s manual often contains specific diagrams and instructions for accessing various components, which can be incredibly helpful.
Checking Fuses and Relays
The simplest thing to check first is the fuse for your seat heater. Your car has a fuse box, usually located under the dashboard or in the engine bay. Consult your owner’s manual to find the exact location and identify the fuse related to the heated seats.
- Locate the Fuse Box: Your car’s manual will tell you where this is. It often has a diagram on the cover or inside the panel.
- Identify the Seat Heater Fuse: Look for a label like “Seat Heater,” “Heated Seat,” or a similar designation. The manual will show you the corresponding fuse number.
- Inspect the Fuse: Pull the fuse out using a fuse puller or a small pair of needle-nose pliers. Hold it up to the light. If the metal filament inside the fuse is broken or looks burnt, the fuse is blown and needs replacement.
- Replace the Fuse: If the fuse is blown, buy an identical replacement (same amperage rating). in the system that needs further investigation.
Relays are like automatic switches. If your car has a relay for the heated seats, it’s usually located in the same fuse box. While less common for simple failures, a faulty relay can prevent power from reaching the heater.
Testing a relay is a bit more complex and might require a multimeter or swapping it with an identical relay from a non-essential system to see if the seat heater then works.
Inspecting Wiring and Connectors Under the Seat
The wiring harness and connectors beneath your seat are vital. Over time, these can become loose, corroded, or damaged from the seat’s movement and general wear.
- Access the Area: You might need to slide the seat all the way forward or backward, or even remove some plastic trim pieces, to get a clear view of the connections underneath. Again, ensure the battery is disconnected.
- Look for Visible Damage: Carefully examine all wires leading to and from the seat. Check for any signs of pinching, fraying, or cuts in the insulation. Pay close attention to where wires bend or move frequently.
- Check Connectors: There will be one or more electrical connectors joining the seat’s wiring to the car’s main harness. Unplug these connectors and inspect the pins and sockets for any signs of corrosion (a greenish or white powdery substance) or bent pins.
- Clean and Secure Connections: If you find corrosion, you can gently clean the pins and sockets with electrical contact cleaner or a small wire brush. Ensure all connectors are firmly plugged back in. Sometimes, a simple re-seating of a connector can solve the problem.
A common scenario is finding a connector that has partially pulled apart. This might happen due to vibration or if it got snagged on something. If a connector is loose, push it firmly until it clicks into place.
This small action can often restore the connection and get your heater working again.
Testing the Heating Elements
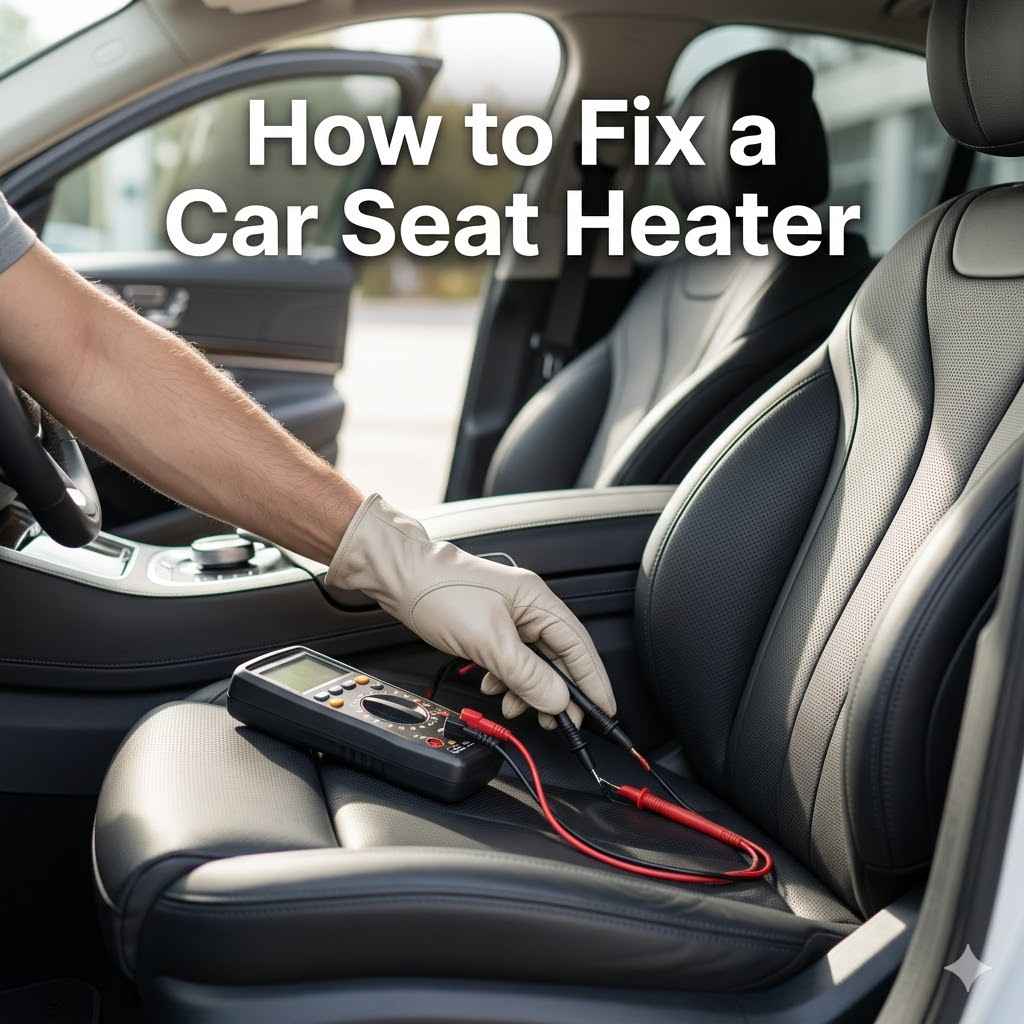
If the fuses are good and the wiring connections seem secure, the next step is to test the heating elements themselves. This usually requires a multimeter.
- Set Up Your Multimeter: Ensure your multimeter is set to measure resistance (Ohms) or DC voltage. For testing resistance, you’ll do this with the battery disconnected. For voltage, you’ll test with the battery connected and the switch on.
- Locate Element Leads: You’ll need to find where the heating elements connect to the seat’s wiring. This might involve carefully lifting the seat upholstery or accessing the back of the element pad.
- Test Resistance: With the battery disconnected, touch the multimeter probes to the leads of the heating element. A good element will show a specific resistance value. Consult your vehicle’s repair manual for the expected resistance range. If you get no reading (OL or infinity) or a very low reading, the element is likely damaged and needs replacement.
- Test Voltage (with caution): With the battery connected and the seat heater switched on, you can test if voltage is reaching the heating element. Touch the probes to the leads. If you read battery voltage (around 12V), the problem is with the element or its connection. If you read zero voltage, the issue is further up the circuit (switch, relay, or wiring).
If your tests indicate a faulty heating element, the repair involves replacing that specific element. This can be a delicate process as it often means removing the seat cover and carefully installing a new heating pad or element.
Replacing a Damaged Heating Element or Switch
Replacing parts is where things can get more involved. If you’ve identified a blown fuse that keeps blowing, or a heating element that tests faulty, replacement is the next step.
- Sourcing Parts: You’ll need the correct replacement part. This could be a specific fuse, a replacement switch, or a heating element designed for your car’s make and model. Online parts retailers or your dealership can help you find the right part.
- Replacing the Switch: If the switch is the culprit, it often involves carefully prying out the old switch from the dashboard or center console and plugging in the new one. Then, reconnect the wiring harness.
- Replacing the Heating Element: This is often the most challenging part. It usually requires removing the seat covers, which can be tricky due to clips and fasteners. Once the old element is removed, the new one is carefully positioned and secured before the covers are reassembled.
- Reassembly and Testing: After replacing the faulty component, reassemble everything. Reconnect the battery and test the seat heater to ensure it’s working correctly.
For example, if a blown fuse keeps reappearing, it strongly suggests a short circuit somewhere in the wiring or a faulty component drawing too much power. A common cause for this might be a wire that has rubbed through its insulation and is touching the metal frame of the seat. Repairing this involves insulating the damaged wire or replacing the affected section of the harness.
When to Seek Professional Help
While many car seat heater issues can be resolved with basic DIY steps, some problems require specialized knowledge and tools. Knowing when to hand over the reins to a professional can save you time, frustration, and potentially prevent further damage to your vehicle.
Complex Electrical Issues
If you’ve checked the fuses and relays, inspected the visible wiring, and the seat heater still doesn’t work, you might be dealing with a more complex electrical problem. This could involve internal wiring within the seat that is hard to access, problems with the car’s Body Control Module (BCM), or intermittent electrical faults that are difficult to pinpoint.
- Intermittent Faults: Sometimes, a seat heater might work on one day and not the next. These “ghost” issues are notoriously difficult to diagnose and often require advanced diagnostic equipment to track.
- Wiring Harness Issues: If the wiring harness itself is damaged deep within the car’s structure, or if there are multiple breaks, repairing it can be a significant undertaking.
- Control Module Problems: Modern cars use sophisticated control modules to manage various functions, including heated seats. A fault in the BCM or a related module is beyond the scope of most DIY repairs.
Damage Requiring Upholstery Work
Replacing heating elements often involves working with seat upholstery. If you’re not comfortable with the idea of potentially damaging your car’s interior or if the upholstery is particularly delicate or complex, it’s best to let a professional handle it.
- Seat Cover Removal: Some car seats have complex clips, zippers, or adhesive attachments that hold the fabric covers in place. Improper removal can tear the fabric or break plastic components.
- New Element Installation: Ensuring the new heating element is perfectly positioned and secured without creating lumps or discomfort for the occupant is key.
- Interior Aesthetics: Professionals have the tools and experience to ensure the seat looks as good as new after the repair, maintaining your car’s interior appeal.
When to Call a Mechanic
If you’re unsure about any step, uncomfortable working with electrical systems, or if the problem persists after your initial checks, it’s time to contact a qualified automotive technician. They have specialized diagnostic tools, such as advanced multimeters and scan tools, that can quickly identify the root cause of the problem. They also have access to detailed repair manuals and the expertise to perform complex repairs safely and effectively.
Many mechanics offer free initial inspections or quotes, so you can get an idea of the cost before committing to a repair.
Consider this scenario: A car owner notices their passenger seat heater isn’t working. They check the fuse, and it’s good. They slide the seat forward and find a wire that looks intact.
However, the multimeter shows no voltage reaching the heating element. After a bit of wiggling, the heater suddenly works again, but only for a few minutes before cutting out. This intermittent issue points to a loose connection or a break in the wire that’s only making contact sometimes.
Trying to fix this without proper diagnostic tools could lead to replacing parts that aren’t faulty or not finding the real problem. A mechanic would use a scope or a specialized circuit tester to trace the signal and find the exact point of failure, which might be a hidden break inside a conduit or a failing solder joint.
Frequently Asked Questions
Question: How much does it typically cost to fix a car seat heater?
Answer: The cost can vary widely. Replacing a blown fuse might only cost a few dollars for the fuse itself. If a switch needs replacing, it could be anywhere from $50 to $200 depending on the car.
Replacing a heating element, which involves labor and the part, can range from $200 to $600 or more, especially if it requires extensive disassembly of the seat. Professional diagnosis fees can also add to the cost if the problem is hard to find.
Question: Can I use a universal heating element kit?
Answer: Universal kits are available, but they often require careful installation and may not perfectly match your car’s original system. It’s generally better to use a part specifically designed for your vehicle’s make and model to ensure proper fit, function, and safety. Universal kits might also lack the specific safety features of OEM parts.
Question: How long should a car seat heater last?
Answer: With normal use, car seat heaters can last for many years, often for the lifetime of the vehicle. However, factors like frequent use, exposure to moisture, physical stress on the seats, and manufacturing defects can shorten their lifespan. If a component fails earlier than expected, it might be due to a manufacturing issue or an external factor.
Question: What should I do if my heated seat gets too hot?
Answer: If your heated seat gets excessively hot, turn it off immediately and stop using it. This is a sign of a potential malfunction, likely with the thermostat or a short circuit in the heating element. Continued use could damage the seat, the electrical system, or pose a burn risk.
You should have it inspected by a professional as soon as possible.
Question: How can I prevent my car seat heater from breaking?
Answer: To help prevent issues, avoid placing sharp objects on the seats. Be mindful of what you place in seat pockets. Clean up spills promptly to avoid moisture damage.
Avoid using the heated seats on the highest setting for extended periods if not necessary. Regular visual checks for any visible damage to the seat or wiring can also be helpful.
Summary
Fixing a car seat heater often starts with simple checks like fuses and visible wiring. If those are okay, testing the heating elements or switch might be needed. Sometimes, you’ll need to replace parts like a fuse, switch, or heating element.
If you’re not comfortable with electrical work or dealing with seat upholstery, it’s wise to get help from a mechanic. With these steps, you can likely get your warm seat back.