
To make a simple, safe, temporary heater, you should focus on converting readily available safe materials, like a simple candle setup inside a terracotta pot system, or understanding the basics of using safe, approved electric space heaters. This guide focuses on simple, low-power, DIY-style thermal mass projects for warmth, prioritizing safety above all else for temporary relief.
Is your home feeling chilly, and you need a little extra warmth fast? Sometimes, traditional heating systems struggle to keep up, or maybe you are in a small space that needs a quick boost. Trying to figure out how to make a simple heater can feel overwhelming, especially when safety is your biggest concern. Don’t worry! You absolutely can create small, effective sources of warmth using common household items.
As Tanim, your trusted home heating guide, I am here to simplify this process. We will walk through straightforward, beginner-friendly methods to harness gentle heat safely. Forget complex wiring or scary projects. We focus on achievable steps that bring cozy comfort to your space without causing headaches. Let’s get started on bringing that comfortable warmth back into your home!
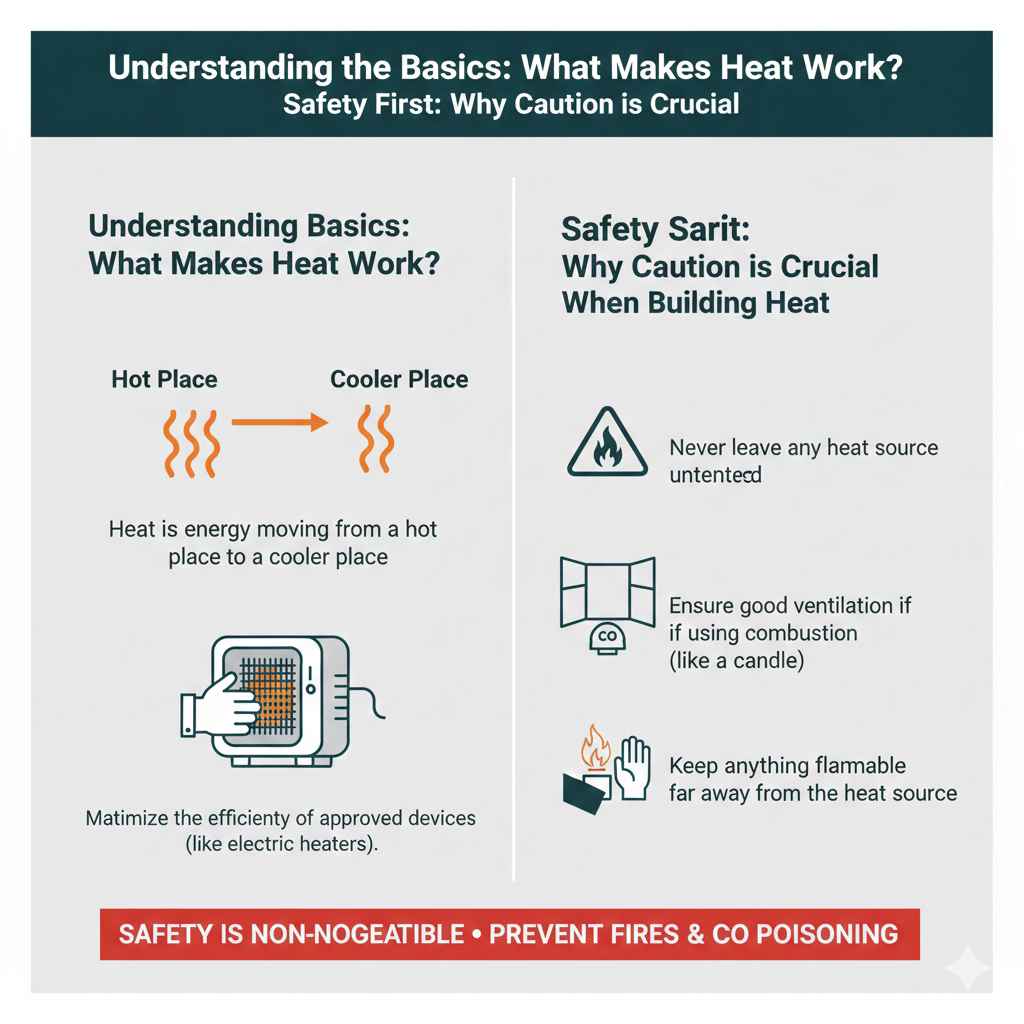
Understanding the Basics: What Makes Heat Work?
Before we build anything, it’s helpful to know what we are trying to achieve. Heat is just energy moving from a hot place to a cooler place. To make a simple heater, we are essentially finding a safe way to generate a small amount of heat and then spread it around a small area effectively. We aren’t aiming to replace your furnace; we are looking for supplemental, cozy warmth.
The safest and easiest way to create simple, controllable heat in a modern setting often involves using an already approved device—like a small electric space heater—and maximizing its efficiency. However, for educational or very short-term, low-risk warmth solutions, some simple thermal principles can be applied using safe, non-combustible household items. We will explore both the efficiency of approved tools and a very gentle DIY thermal concept.
Safety First: Why Caution is Crucial When Building Heat
This is the most important part of this guide. When dealing with heat, fire, or electricity, safety must be your number one priority. Attempting to create complex heating elements from improper materials is extremely dangerous and can lead to fires or carbon monoxide poisoning. We will stick to methods that involve low-intensity, easily controllable heat sources or safe thermal mass principles.
- Never leave any heat source unattended, especially if it involves candles or an open flame.
- Ensure good ventilation if you are using any method that involves combustion (even a candle).
- Keep anything flammable (curtains, paper, bedding) far away from the heat source.
- If you plan to use any electrical device, ensure it is certified and in good repair.
Option 1: Maximizing Efficiency of Approved Space Heaters
For most homeowners looking for a simple, safe way to heat a room, the best approach is using a commercially available, safety-tested electric space heater. The trick to making them feel more effective isn’t making them more powerful; it’s making them work smarter. This is often the most reliable way to “make a simple heater” effective in your home.
Choosing the Right Space Heater for Beginners
When you look at portable heaters, you’ll find a few main types. For simple, beginner use, safety features and quiet operation are key.
| Heater Type | How It Works | Best For | Safety Feature Check |
|---|---|---|---|
| Convection (Oil-Filled Radiator) | Heats oil sealed inside, which radiates gentle, consistent heat. | Silent, long-term warmth in medium rooms. | Often has tip-over shutoff and overheat protection. |
| Ceramic Fan-Forced | Uses an electric element and a fan to blow warm air quickly. | Fast, targeted spot heating in small areas. | Tip-over switch is standard; look for ceramic safety elements. |
| Infrared/Radiant | Heats objects and people directly using infrared light (like the sun). | Warming people immediately without significantly heating the air. | Usually very safe as the heating element stays contained. |
Step-by-Step: Placing Your Heater for Maximum Impact
The placement of your existing heater makes a huge difference in how much warmth you feel. Think of it like positioning a lamp to light up a whole corner!
- Identify Cold Spots: Locate where the cold air is entering your room (often near windows or exterior doors).
- Place Near the Cold Source: Position the heater near, but not directly next to, the cold air source. This allows the heater to warm the air before it fully enters your living space.
- Keep Clearances Wide: This is critical for safety. Follow the manufacturer’s instructions, but generally, keep at least three feet (one meter) of clear space around the front, sides, and back of the heater.
- Use Thermostat Wisely: If your heater has a built-in thermostat, set it to a comfortable temperature (e.g., 68°F or 20°C). Let it cycle on and off rather than running constantly on high.
- Utilize Fans (Carefully): If you have a ceiling fan, set it to run on the lowest speed in reverse (clockwise direction). This gently pushes warm air trapped near the ceiling back down to where you are sitting.
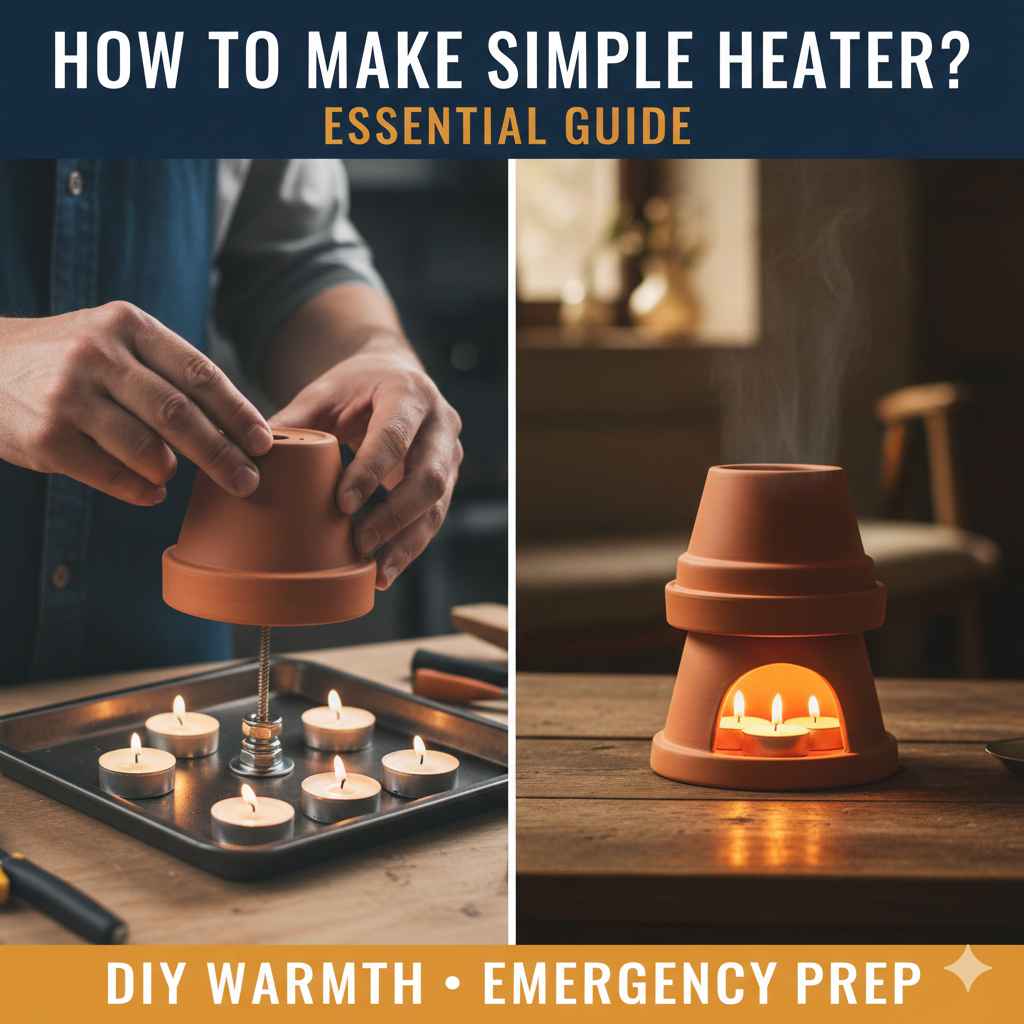
Option 2: The Simple Thermal Mass Heater (Candle & Terracotta Method)
For an extremely simple demonstration of heat retention and slow release—often called a “candle heater” or “terracotta pot heater”—we use thermal mass. This method is NOT meant to heat an entire room or replace primary heating. It is for adding a small, localized zone of gentle, retained warmth and demonstrating physics principles safely. Always use proper ventilation and supervision.
Tools and Materials You Will Need
This project relies on materials that can withstand moderate heat without breaking down or releasing toxins.
- Two terracotta (clay) flower pots of different sizes (one must fit over the other, leaving an air gap).
- One large, sturdy, non-flammable base (like a thick ceramic tile or metal tray).
- Three or four metal bolts, nuts, and washers (to create a pedestal/stand).
- Several tea light candles (ensure they are new and high quality).
- A small block of non-flammable material (like concrete or thick ceramic) to elevate the candles slightly.
Step-by-Step Assembly of Your Thermal Mass Warmer
Remember, this is a low-heat demonstration. The goal is for the clay pots to absorb the candle heat slowly and then radiate that warmth gently.
- Prepare the Base: Place your large ceramic tile or metal tray on a stable, non-flammable surface away from walls and foot traffic.
- Create the Candle Platform: On your base, set the small, non-flammable block. This elevates the candles slightly, allowing better airflow underneath the top pot. Place your tea lights on top of this block.
- Assemble the Inner Pot Stand: Take the smaller terracotta pot. You need to create small feet so the inner pot sits above the candles but below the outer pot. Use your bolts, nuts, and washers to create a small stand directly over the candles. A typical setup might involve pushing two bolts through the drainage hole of the small pot and using nuts to secure them as feet that keep the pot slightly suspended over the flame area.
- Position the Inner Pot: Carefully place the smaller pot on its new stand, ensuring there is a gap between the pot sides and where the flames will burn.
- Position the Outer Pot: Place the larger terracotta pot over the entire assembly. The space between the inner and outer pot is crucial—this trapped air acts as an insulator and heats up slowly.
- Light the Candles: Carefully light your tea lights. Do not light them until the entire structure is assembled.
- Monitor and Observe: Allow 15–20 minutes for the clay to absorb the heat. The outer pot surface will become mildly warm, radiating gentle, steady heat into the immediate vicinity.
Important Note on Thermal Mass: Clay is a great insulator. This setup heats the air between the pots and the pots themselves, slowly releasing heat for a longer period after the flames diminish. It will never generate intense heat, and you must check the terracotta pots frequently to ensure they are not cracking from uneven heating.
Making Heat Practical: Insulation and Heat Retention
Even the simplest heater—whether it’s a well-placed electric model or a thermal mass demo—works best in a well-insulated space. If the heat escapes immediately, you are wasting energy and effort. Think of insulation as trapping the warmth you create.
Simple Home Insulation Checks
Improving your home’s ability to hold heat is often the cheapest way to feel warmer without buying new equipment. Check out recommendations from the U.S. Department of Energy on basic efficiency improvements:
Visit the Department of Energy’s energy-saving tips page for more official advice.
- Seal Air Leaks: Use inexpensive foam weatherstripping around doors and windows. Cold air infiltration is a huge heat robber.
- Use Window Coverings: Keep heavy curtains or thermal blinds closed at night to trap the day’s warmth inside.
- Rugs on Floors: Hard floors (wood, tile) can feel very cold. Putting down area rugs adds a layer of insulation between you and the cold subfloor.
- Door Snakes/Draft Stoppers: Place fabric tubes or rolled-up towels at the base of doors leading to unheated areas (like basements or garages).
When to Call a Professional Electrician
If you find yourself thinking about wiring anything to generate heat beyond simply plugging in a certified space heater, stop immediately. Creating your own heating element or wiring modifications is extremely hazardous. Electricity and heat require specific safety standards that only trained professionals can meet. Always consult a licensed electrician if you suspect issues with your home’s wiring or need dedicated heating solutions installed.
Comparing Heating Methods: DIY vs. Commercial
To help you decide which path is right for your temporary warming needs, here is a quick comparison. For daily use, commercial options are overwhelmingly superior in terms of safety and consistency.
| Feature | Simple DIY Thermal Mass (Candle) | Approved Electric Space Heater |
|---|---|---|
| Heat Output | Very Low; localized, gentle warmth only. | Moderate to High; designed to heat defined spaces. |
| Safety Record | Requires constant supervision; risk of fire if misused. | High; built-in safety shutoffs (tip-over, overheat). |
| Cost to Run | Very low (cost of tea lights). | Moderate (depends on usage and electricity rates). |
| Ease of Setup | Requires careful assembly of multiple parts. | Plug-and-play operation. |
| Best Use Case | Emergency demonstration or localized, very gentle boost. | Reliable, everyday supplemental zone heating. |
Focusing on Comfort: Heating People, Not Just Rooms
Sometimes, we feel cold not because the room temperature is too low, but because our bodies are losing heat too quickly. By focusing on warming yourself directly, you feel comfortable without needing to crank up the thermostat for the entire house. This is a fantastic, low-energy way to supplement any heat source.
Quick Ways to Boost Personal Warmth
These steps require zero building or electricity:
- Layer Your Clothing: Wear multiple thin layers instead of one thick one. Air trapped between the layers acts as excellent insulation.
- Use a Warm Drink: Holding or sipping a hot mug of tea or cocoa warms you from the inside out.
- Blanket Strategy: Use a heavy throw blanket over your lap while sitting. If you use an electric blanket or heated mattress pad, you heat your body directly with very little energy waste heating the surrounding air.
- Keep Extremities Warm: Wear thick socks, slippers, and maybe even a light hat indoors. If your hands and feet are warm, your core temperature perception improves significantly.
- Move! Even five minutes of light stretching or walking in place can generate enough internal heat to last for a while.
Maintenance Tips for Your Portable Heaters
If you are relying on an electric space heater, regular, simple cleaning ensures it runs safely and efficiently. A dusty heater works harder and is more prone to overheating.
Easy Heater Cleaning Checklist
- Unplug It: Always ensure the heater is completely unplugged from the wall before touching it.
- Check the Vents: Use a soft cloth or a vacuum cleaner with a brush attachment to gently clear dust from the exterior vents and grills.
- Clean the Inside (If Accessible): If your model allows safe access to the internal heating element (usually only on ceramic models), use canned air to blow out any accumulated debris. Consult your manual first.
- Inspect the Cord: Visually check the power cord for any fraying, cuts, or damage. If you see damage, do not use the heater—replace it immediately.
- Store Safely: When the season ends, clean the heater thoroughly and store it in a dry place, ideally in its original box, away from damp basements or garages.
Frequently Asked Questions (FAQ) About Simple Heating
Q1: Is it safe to make a heater using an alcohol burner and metal cans?
A: No, this is highly discouraged for beginners. Alcohol burners produce a very hot, intense flame that is difficult to control, especially when balanced on makeshift stands. This significantly increases the risk of fire or severe burns. Stick to low-intensity, supervised candle methods or approved electric heaters.
Q2: How much electricity does a small space heater use?
A: Most standard space heaters run between 1,000 and 1,500 watts. While safe to use temporarily, running a 1,500-watt heater continuously can add noticeably to your electricity bill. Always use a dedicated wall outlet and never an extension cord.
Q3: Can I use my DIY terracotta heater to heat a small tent?
A: Absolutely not. Tents are highly flammable, and the terracotta setup requires constant supervision and non-flammable surroundings. Never use any open flame or heating device inside a tent unless it is specifically rated and vented for that purpose.
Q4: What is the safest, cheapest temporary heat source?
A: The safest and cheapest temporary solution is improving your home’s insulation (sealing drafts, using blankets) combined with wearing proper layers of clothing. For active heat generation, a modern, safety-certified ceramic heater used briefly is the best balance of effectiveness and safety.
Q5: Why is my electric space heater blowing cold air?
A: This usually means the heater is in fan-only mode, or the internal thermostat has shut the heating element off because the room has reached the set temperature. Check the setting dial to ensure it is set to a heat setting (often marked with a sun symbol or high/low settings) and not just the fan setting.
Q6: Should I use a surge protector or power strip for my space heater?
A: Never plug a space heater into a power strip or surge protector. Heaters draw too much current and can overload the strip, causing it to overheat or melt. Always plug space heaters directly into a properly grounded wall outlet.
Conclusion: Staying Warm with Confidence and Care
Creating a little extra warmth for your home doesn’t have to mean expensive repairs or complicated engineering projects. As we’ve seen, the most effective route for reliable, safe heating is understanding how to maximize the efficiency of modern, approved tools, combined with simple insulation improvements around your home. If you opt for a DIY thermal demonstration using the terracotta pot method, remember it is for gentle, monitored warmth only.
Your comfort and safety are paramount. By approaching heating smartly—placing your existing tools correctly, trapping the heat you generate, and dressing in layers—you can easily manage those chilly spells. You now have the essential guidance to make simple, effective choices that keep your living space cozy throughout the colder months. Keep checking those seals, keep those heater vents clean, and enjoy the warmth you’ve achieved!