How To Clean Storage Heater Stains Easily
Storage heaters are great for keeping our homes warm, but sometimes they can get those stubborn, unsightly marks. For many people, figuring out how to get rid of these stains can be a bit confusing at first. It might seem like a tough job, but don’t worry!
We’re going to show you a super simple way to make your storage heaters look good as new again. Get ready for a step-by-step guide that makes cleaning easy.
Understanding Storage Heater Stains
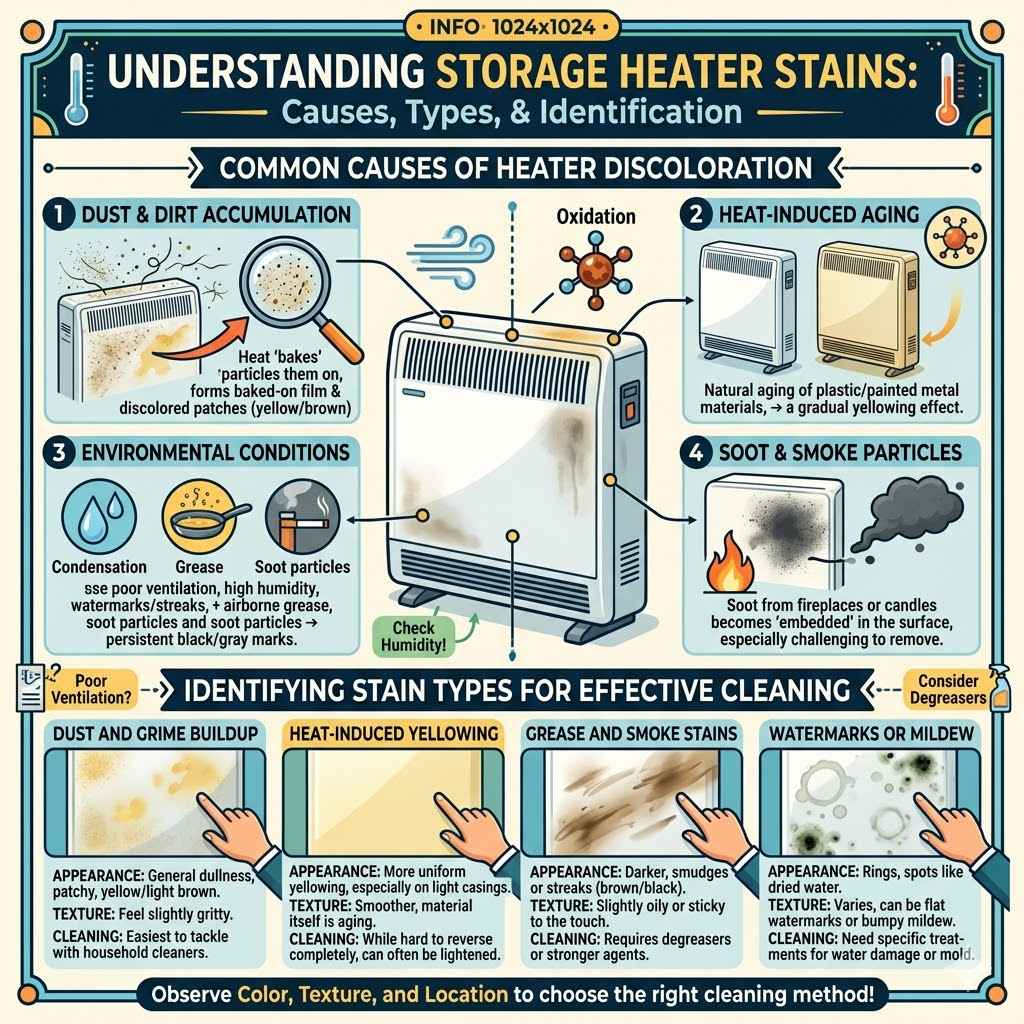
Storage heaters can develop stains for a few common reasons, and knowing these helps us tackle them effectively. Most often, stains come from dust and dirt in the air that settles on the heater’s surface and then gets baked on by the heat. Over time, this buildup becomes visible as discolored patches.
Another cause can be minor leaks or condensation, especially if the heater is located in a damp area of your home. Sometimes, the materials used in the heater itself can react with heat, causing slight yellowing. For beginners, identifying the type of stain can be the first hurdle, as different stains might require slightly different cleaning approaches.
This section breaks down the common culprits behind those annoying marks and gives you a clear picture of what you’re dealing with.
Common Causes of Heater Discoloration
Dust accumulation is perhaps the most frequent reason for storage heater stains. As the heater warms up, fine particles of dust, lint, and even tiny airborne fibers from carpets and upholstery get drawn towards the heat source. These particles then adhere to the surface.
When the heater cools down, these particles remain stuck. The next time the heater is used, the heat causes these stuck particles to bake onto the surface, gradually forming a discolored film or patches. Over many heating cycles, this film can darken significantly, appearing as yellow or brown stains.
This is especially noticeable on lighter colored heater casings.
Another common cause is the natural aging of the materials used in the heater’s construction. Many storage heaters are made from plastics or painted metal. Over extended periods and exposure to consistent heat, these materials can undergo a process called oxidation or simply degrade slightly.
This often leads to a gradual yellowing effect, particularly on older models.
The environment where the heater is located also plays a role. Rooms with poor ventilation or high humidity can contribute to stains. Condensation can form on the heater’s surface, and if this water contains impurities or mixes with dust, it can leave watermarks or streaks that, when dried, become visible stains.
In kitchens, grease particles from cooking can also become airborne and settle on the heater, leading to greasy, discolored spots.
Smoke from fireplaces, candles, or even cigarettes can also be a significant source of discoloration. Soot particles are very fine and can easily adhere to surfaces. When heated, these soot particles can embed themselves into the heater’s surface, creating persistent black or dark gray marks that are particularly challenging to remove.
Identifying Stain Types for Effective Cleaning
Before you start scrubbing, it’s helpful to have an idea of what kind of stain you’re dealing with. This helps you choose the right cleaning method and products.
- Dust and Grime Buildup: These stains often appear as a general dullness or patchy discoloration, usually yellow or light brown. They are typically on the surface and can feel slightly gritty if you touch them. These are usually the easiest to tackle with common household cleaners.
- Heat-Induced Yellowing: This is a more uniform yellowing, especially on white or light-colored plastic casings. It’s often a sign that the material itself is aging. While hard to reverse completely, it can often be lightened.
- Grease and Smoke Stains: These are typically darker, often appearing as smudges or streaks of brown or black. They might feel slightly oily or sticky to the touch. These stains require degreasers or stronger cleaning agents.
- Watermarks or Mildew: If the heater is in a damp area, you might see rings or spots that look like dried water. In very damp conditions, you might even see faint signs of mildew, which would appear as black or green spots. These need specific treatments for water damage or mold.
By taking a moment to observe the color, texture, and location of the stain, you can make a more informed decision about the best way to clean your storage heater. This initial assessment saves time and effort by preventing you from using ineffective cleaning methods or potentially damaging the heater’s surface with the wrong products.
Simple Steps for Cleaning Storage Heater Stains
This section is all about the practical application of cleaning. We’ll guide you through each step, from preparing your heater to the final wipe-down. The goal is to make this process as straightforward and effective as possible, ensuring you can achieve a clean finish without hassle.
We will cover selecting the right tools and cleaning solutions that are safe for your storage heater.
Gathering Your Cleaning Supplies
Having the right tools and cleaning agents ready before you begin is key to a smooth cleaning experience. This helps you avoid interruptions and ensures you have everything you need at hand.
- Soft cloths: Microfiber cloths are ideal. They are gentle on surfaces and great at picking up dust and grime without scratching. You’ll want a few for wiping and buffing.
- Warm water: This is your primary cleaning solution base. It helps to loosen dirt and grime effectively.
- Mild dish soap: A few drops of mild dish soap in warm water can boost cleaning power for general dirt and light grease. It’s gentle enough for most surfaces.
- Baking soda: This is a fantastic natural abrasive and deodorizer. Mixed with a little water, it forms a paste that can tackle tougher stains.
- White vinegar: A natural disinfectant and degreaser, white vinegar is excellent for cutting through grime and can help brighten surfaces. Dilute it with water for most uses.
- Rubbing alcohol (Isopropyl alcohol): For stubborn marks or sticky residue, rubbing alcohol can be very effective. Use sparingly and ensure good ventilation.
- A soft brush or old toothbrush: Useful for getting into nooks and crannies where dust can hide or for gently scrubbing tougher spots with a cleaning paste.
- Gloves: To protect your hands from cleaning solutions and dirt.
- A bucket or basin: To mix your cleaning solutions.
It’s important to avoid harsh chemicals like bleach, abrasive scouring pads, or steel wool, as these can damage the heater’s casing and finish. Always check your storage heater’s manual if you have it, as some manufacturers might recommend specific cleaning products or methods.
Preparing the Storage Heater
Before you start cleaning, it’s crucial to prepare your storage heater properly. This ensures your safety and protects the heater itself from damage.
- Turn Off and Unplug: Always ensure the storage heater is completely switched off at the wall socket and unplugged. Storage heaters are electrical appliances, and safety is paramount. Never attempt to clean a heater that is switched on or still warm from recent use.
- Allow to Cool Completely: Wait for the heater to cool down entirely. Cleaning a warm or hot surface can be dangerous and may cause some cleaning solutions to evaporate too quickly, reducing their effectiveness or even damaging the material.
- Protect Surrounding Areas: Place old towels or newspapers on the floor around the base of the heater. This will catch any drips from your cleaning solutions and prevent them from staining your flooring.
- Remove Loose Debris: Use a dry, soft cloth or a vacuum cleaner with a brush attachment to gently remove any loose dust, cobwebs, or debris from the exterior of the heater. This prevents you from smearing loose dirt around when you start wet cleaning.
Proper preparation ensures that your cleaning session is safe, efficient, and effective. It sets the stage for easily tackling the stains without unnecessary risks or complications.
Step-by-Step Cleaning Process
Now for the actual cleaning. Follow these simple steps to make your storage heater look fresh again.
- Gentle Surface Wipe Down:
Mix a solution of warm water and a few drops of mild dish soap in your bucket. Dip a soft cloth into the solution, wring it out well so it’s damp, not dripping, and gently wipe down the entire exterior of the storage heater. Pay attention to areas where you see dust and general grime. This initial wipe helps remove the surface layer of dirt, making it easier to tackle specific stains. Rinse your cloth frequently in the soapy water to keep it clean. - Tackling Stubborn Stains with Baking Soda Paste:
For stains that didn’t come off with the initial wipe, make a paste of baking soda and a small amount of water. The consistency should be like toothpaste. Apply this paste directly to the stained areas. Let it sit for about 5-10 minutes to allow the baking soda to work on the stain. Then, using a damp, soft cloth, gently rub the paste into the stain in a circular motion. The mild abrasive nature of baking soda will help lift the stain without scratching the surface. - Using White Vinegar for Grime and Shine:
If stains persist or if you want to give the heater a good clean and shine, a diluted white vinegar solution can be very effective. Mix equal parts white vinegar and warm water. Dampen a clean cloth with this solution and wipe down the stained areas. Vinegar is excellent at cutting through grease and grime. For tougher spots, you can apply the vinegar solution directly to the stain and let it sit for a few minutes before wiping. Ensure you rinse the area with a clean damp cloth afterward to remove any vinegar smell. - Spot Treatment for Difficult Marks:
If you have very specific or dark marks, a small amount of rubbing alcohol on a cotton pad can be useful. Apply it gently to the mark and rub lightly. Rubbing alcohol evaporates quickly and can lift stubborn residues. Always test this in an inconspicuous area first to ensure it doesn’t affect the heater’s finish. After using rubbing alcohol, wipe the area with a clean damp cloth. - Final Rinse and Dry:
Once you have treated all the stains, use a clean cloth dampened with plain water to wipe down the entire heater to remove any residual cleaning solutions. Then, immediately dry the heater thoroughly with a clean, dry microfiber cloth. This prevents water spots and ensures a polished finish.
This systematic approach, moving from general cleaning to targeted treatments and finishing with a thorough rinse and dry, ensures that you address stains effectively and leave your storage heater looking clean and well-maintained.
Dealing with Tougher Stains and Materials
Sometimes, standard cleaning methods aren’t enough for those really stubborn marks. This section explores how to handle particularly challenging stains and considers the different materials storage heaters might be made of, ensuring you can clean them safely and effectively without causing damage. We’ll also discuss preventive measures to keep your heater looking good long-term.
Specific Stain Types and Solutions
Some stains are more persistent than others. Here’s how to approach them.
- Yellowed Plastic Surfaces:
For plastic casings that have yellowed over time due to heat exposure, baking soda paste can help lighten the discoloration. You can also try a solution of hydrogen peroxide (3%) and baking soda. Apply the paste, let it sit for up to 30 minutes, then gently wipe and rinse. For severe yellowing, some people use specialized plastic restorers, but always test these on a hidden area first. - Grease and Smoke Residue:
These dark, sticky stains often require a stronger degreaser. A solution of warm water with a few drops of dish soap works well as a first step. If that’s not enough, try a mixture of equal parts white vinegar and water. For very tough grease, you might consider a specialized oven cleaner (use with extreme caution, dilute it heavily, test first, and ensure good ventilation, wearing gloves and eye protection). Always wipe down thoroughly with plain water afterwards to remove all cleaner residue. - Ink or Marker Stains:
If you have accidental ink or marker marks, rubbing alcohol is usually the best bet. Apply a small amount to a cotton ball or soft cloth and gently rub the stain. Work from the outside of the stain inwards to prevent spreading. For very persistent ink, a melamine foam sponge (like Magic Eraser, but use it gently) can sometimes lift the stain, but always test it on a hidden spot first as it can be mildly abrasive. - Watermarks and Mildew Spots:
For watermarks, a diluted white vinegar solution is effective. Wipe the affected area, let it sit for a few minutes, then wipe clean with a damp cloth. If you suspect mildew, which is more common in humid environments, you might need a mild bleach solution (use very cautiously, diluted with plenty of water, and ensure excellent ventilation, wearing gloves and eye protection). After using bleach, rinse thoroughly with plain water multiple times.
Remember, patience is key. For tough stains, you might need to repeat a cleaning process or let a cleaning solution sit for a longer period. Always prioritize gentle methods first and escalate cautiously if needed.
Cleaning Different Heater Materials
Storage heaters are typically made of metal or plastic, and sometimes a combination. Understanding the material helps prevent damage.
- Metal Casings:
Most metal casings are painted or powder-coated. Mild dish soap and warm water are generally safe. For tougher stains, a diluted vinegar solution is good. Avoid abrasive cleaners or scrubbers that can scratch the paint. If the paint is chipped or damaged, be extra careful as the bare metal underneath can be more susceptible to corrosion if exposed to moisture for too long. - Plastic Casings:
Plastic can be more prone to scratching or yellowing from heat. Stick to soft cloths and mild cleaning agents like dish soap or diluted vinegar. Baking soda paste is generally safe for most plastics but avoid vigorous scrubbing. Harsh solvents or alcohol can sometimes dull or damage certain types of plastic, so always test in an inconspicuous spot first. - Control Panels and Vents:
These areas often have small gaps and openings. Use a slightly damp cloth for cleaning and be careful not to let excess water drip into electrical components. A soft brush or cotton swab can help clean debris from vents and around buttons or displays. Ensure the heater is unplugged and cool before cleaning these sensitive areas.
The key is to be gentle and to always test any cleaning solution on a small, hidden area of the heater first. This allows you to see how the material reacts before applying it to a more visible stain.
Preventative Measures for Future Stains
Once your storage heater is clean, you’ll want to keep it that way. A few simple habits can prevent new stains from forming.
- Regular Dusting:
Make it a habit to dust your storage heater regularly, perhaps once a week or every other week. Use a dry microfiber cloth to wipe down the surfaces. This prevents dust from building up to a point where it bakes onto the surface and becomes a stain. Pay attention to the top and sides where dust tends to settle. - Improve Air Quality:
Consider using air purifiers in rooms with storage heaters, especially if you live in an area with a lot of dust or if you have pets. Keeping windows closed during dusty periods can also help. Regularly vacuuming carpets and soft furnishings reduces airborne particles that can settle on the heater. - Ventilation:
Ensure good ventilation in the room where the heater is located. If the heater is in a bathroom or kitchen, make sure the extractor fan is used properly to remove steam and grease particles. Proper airflow helps to prevent condensation and reduces the amount of airborne contaminants that can stick to the heater. - Avoid Placing Items on Top:
Do not place items on top of your storage heater. This can block airflow and trap dust and heat, potentially leading to hotter spots and increased discoloration. It also makes it harder to clean the top surface. - Wipe Spills Immediately:
If any liquids are accidentally spilled on or near the heater, clean them up immediately. This prevents watermarks or other residues from forming.
By incorporating these simple preventative steps into your routine, you can significantly reduce the likelihood of future stains and keep your storage heater looking clean and tidy with minimal effort.
Maintenance Tips for Long-Term Care
Keeping your storage heater in good condition goes beyond just cleaning. Regular maintenance ensures it functions efficiently and looks its best. This section provides practical advice on how to maintain your heater over time, helping you avoid common issues and prolong its lifespan.
Annual Checks and Cleaning
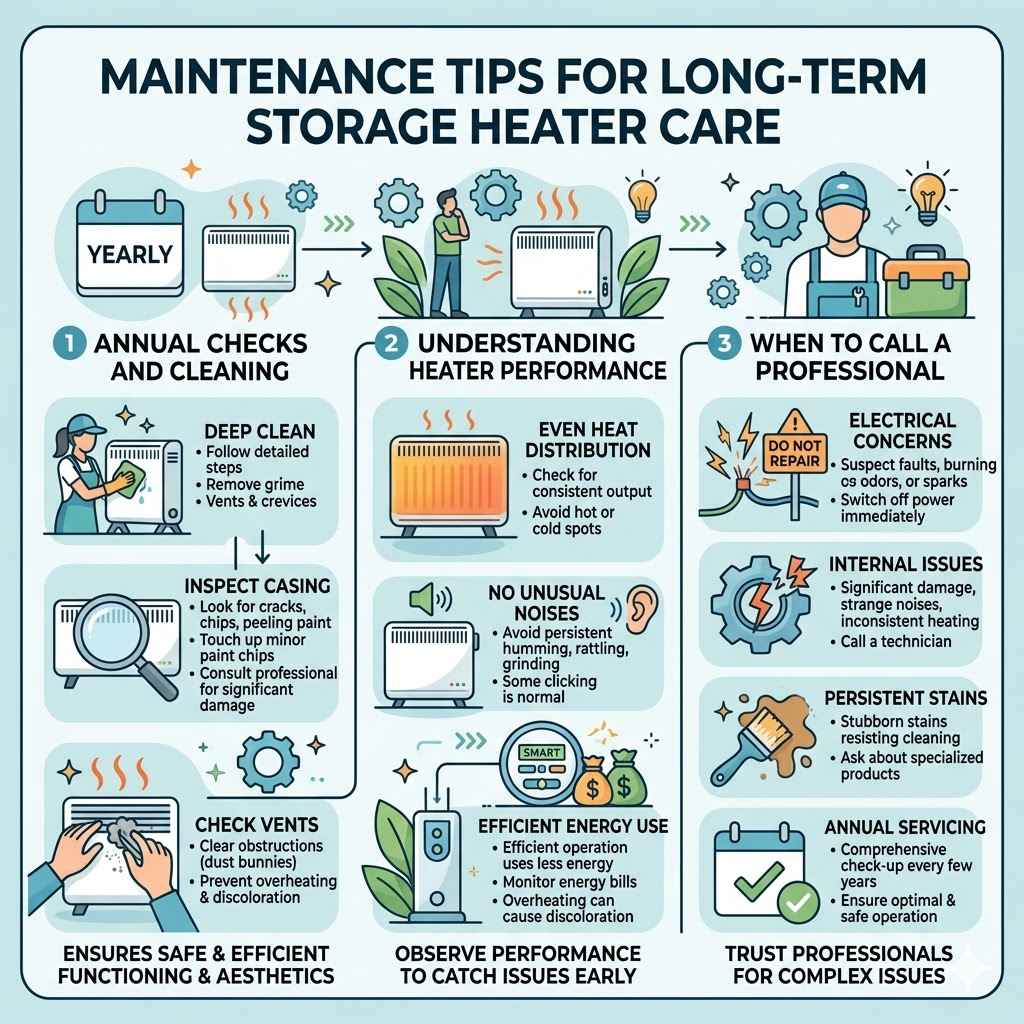
Once a year, it’s a good idea to give your storage heater a more thorough cleaning and inspection. This is best done before the heating season begins.
- Deep Clean:
Perform the detailed cleaning steps outlined in the “Simple Steps for Cleaning Storage Heater Stains” section. This ensures that any grime accumulated over the year is removed. Pay extra attention to the vents and any crevices where dust might have collected. - Inspect Casing:
Carefully examine the heater’s casing for any signs of damage, such as cracks, chips, or peeling paint. Address minor paint chips by touching them up with appropriate paint designed for the material. If you find significant damage, consult a professional. - Check Vents:
Ensure all vents are clear of obstructions like dust bunnies or debris. Blocked vents can impair the heater’s performance and lead to overheating in certain areas, potentially causing more discoloration.
This annual check-up ensures that your heater is not only aesthetically pleasing but also functioning safely and efficiently.
Understanding Heater Performance
A well-maintained storage heater performs better. Here’s what to look for.
- Even Heat Distribution:
If your heater is functioning correctly, it should distribute heat evenly. If you notice that some parts of the heater are much hotter than others, or if the heat output seems inconsistent, there might be an internal issue. - No Unusual Noises:
While some clicking sounds during the heating and cooling cycles are normal, any persistent humming, rattling, or grinding noises could indicate a problem with the internal components or insulation. - Efficient Energy Use:
While not directly related to stain cleaning, ensuring your heater is efficient means it’s less likely to overheat due to poor insulation, which can contribute to discoloration. If your energy bills are unusually high, it might be worth getting the heater inspected by a professional.
Observing your heater’s performance can help you catch potential issues early, preventing more serious problems and ensuring it operates as intended.
When to Call a Professional
While most cleaning and minor maintenance can be done yourself, there are times when you should call in the experts.
- Electrical Concerns:
If you suspect any electrical faults, smell burning odors, or see sparks, immediately switch off the power and call a qualified electrician. Never attempt to repair electrical components yourself. - Internal Issues:
If you notice significant internal damage, strange noises, or inconsistent heating that can’t be resolved by cleaning, a professional storage heater technician can diagnose and fix the problem. - Persistent Stains You Can’t Remove:
For extremely stubborn stains that resist all gentle cleaning methods, a professional might have access to specialized products or techniques. However, always ask them about the safety of these for your specific heater model. - Annual Servicing:
For a comprehensive check-up and servicing, especially on older units, it’s wise to have a professional inspect your storage heater every few years to ensure it’s operating optimally and safely.
Trusting professionals for complex issues ensures your safety and the longevity of your storage heater.
Frequently Asked Questions
Question: Can I use bleach to clean my storage heater?
Answer: It’s generally not recommended to use bleach on storage heaters. Bleach is a harsh chemical that can damage the casing, especially if it’s plastic or painted metal. It can also leave streaks or cause discoloration itself.
Stick to milder cleaning solutions like dish soap, baking soda, or diluted white vinegar.
Question: How often should I clean my storage heater?
Answer: You should do a quick wipe-down with a dry cloth every couple of weeks to remove surface dust. A more thorough cleaning, as described in this guide, should be done at least once a year, ideally before the heating season starts.
Question: My storage heater is yellow. Can I make it white again?
Answer: While it’s hard to completely reverse permanent yellowing caused by material aging and heat, you can often lighten the color. Using a baking soda paste or a diluted hydrogen peroxide and baking soda mixture, and allowing it to sit for a while, can help reduce the yellowing. Always test any product on a small, hidden area first.
Question: What if I can’t remove a stain completely?
Answer: Some old or very deep stains might not come off completely without risking damage to the heater. If a stain is very faint and not noticeable, it might be best to leave it. Alternatively, for very persistent stains, you could consider contacting a professional cleaning service or a storage heater specialist to see if they have further solutions.
Question: Is it safe to clean my storage heater myself?
Answer: Yes, it is safe to clean your storage heater yourself as long as you follow essential safety precautions. Always ensure the heater is turned off, unplugged, and completely cool before cleaning. Avoid getting water into electrical components and never use abrasive materials or harsh chemicals that could damage the heater or pose a safety risk.
Summary
Effectively cleaning stains off storage heaters is achievable with simple methods. By identifying stain types, gathering the right gentle supplies, and following a step-by-step process, you can restore their appearance. Regular dusting and annual checks help maintain a clean look and optimal performance, ensuring your storage heater remains both functional and aesthetically pleasing for years to come.