

Many homeowners wonder if they can vent their garage heater sideways. This question pops up when the usual upward vent path just doesn’t work. It’s a common challenge for folks setting up a cozy garage space.
Don’t worry, figuring this out is simpler than it seems. We’ll walk you through exactly how to do it, step by step, so your garage stays warm and safe. Get ready to learn the straightforward way to handle your garage heater’s vent.
Understanding Horizontal Garage Heater Venting
When you think about venting a heater, most people picture a pipe going straight up through the roof. This is often the easiest and most common method. However, garages don’t always have the right setup for a vertical vent.
Maybe there are attic joists in the way, or you’re looking for a cleaner look. This is where the question Can You Vent a Garage Heater Horizontally? becomes really important. It offers a flexible solution, but it needs careful planning to ensure it’s done safely and effectively.
We’ll explore what makes horizontal venting different and why it’s a valid option for many situations.
What Horizontal Venting Involves
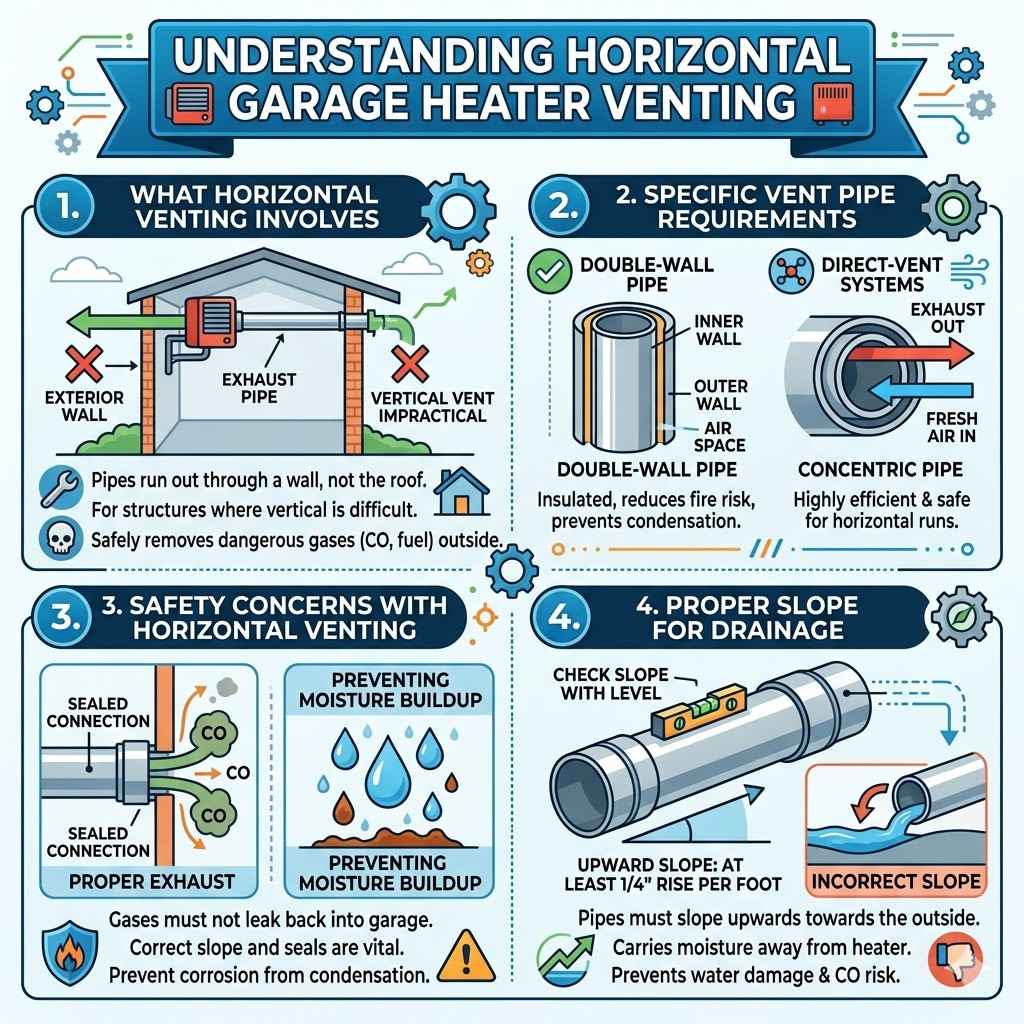
Horizontal venting means running the exhaust pipe out through a wall instead of a ceiling or roof. This requires creating an opening in the exterior wall of your garage. The pipe will then extend outwards, typically to a safe distance away from any windows or doors.
This method is chosen when a vertical vent is impractical due to building structure, accessibility, or aesthetic preferences. It involves specific types of vent pipes designed for horizontal runs to prevent moisture buildup and ensure proper airflow.
The main idea behind any venting is to safely remove combustion byproducts like carbon monoxide and unburned fuel from your garage. These gases are dangerous if they build up indoors. Horizontal venting achieves this by pushing these fumes outside.
It’s crucial that the vent is properly sloped away from the heater to allow condensation to drain properly. Also, the exit point on the wall needs to be sealed well to prevent drafts and water leaks.
Many modern garage heaters are designed with venting flexibility in mind. Some models are specifically built to allow for horizontal runs, while others might require special venting kits. Always check your heater’s manual.
It will clearly state if horizontal venting is permitted and provide specific instructions. Ignoring this can lead to safety hazards and damage to your heating unit.
The key components for horizontal venting usually include a vent termination cap, which is fitted on the outside wall to prevent rain, snow, and animals from entering the vent pipe. There are also elbows and straight pipe sections to connect the heater to the outside. The material of the vent pipe is also important; it needs to be able to withstand the heat and corrosive byproducts of combustion.
Specific Vent Pipe Requirements
Not all vent pipes are created equal. For horizontal installations, you often need to use double-wall or triple-wall pipe. This type of pipe is designed for safety and efficiency.
Double-wall pipes have an inner and outer wall with an air space in between. This insulation helps keep the outer surface cooler, reducing fire risk. It also helps prevent condensation from forming inside the vent pipe, which can lead to corrosion.
Some heaters might use a specific type of venting system, like direct-vent systems. These systems use a concentric pipe, where one pipe is inside another. The inner pipe carries exhaust gases out, and the outer pipe brings fresh air in for combustion.
This setup is very efficient and safe for horizontal runs. It ensures that the heater gets the air it needs to burn fuel cleanly, even when venting horizontally.
The diameter of the vent pipe is also critical. It must match the heater’s exhaust outlet size. If the pipe is too small, it can restrict airflow, causing the heater to work less efficiently or even shut down.
If it’s too large, it might not create enough draft to push the exhaust gases out effectively. Always follow the manufacturer’s recommendations for pipe size and type.
Installation of the vent pipe must also meet safety codes. This includes clearances to combustible materials. Even with insulated pipes, you need to maintain a safe distance from wood framing, insulation, and other flammable items.
These clearances are set by building codes to prevent fires. Local building codes often have specific rules for horizontal venting that you must follow.
Safety Concerns with Horizontal Venting
Safety is the number one priority when dealing with any heating appliance, and garage heaters are no exception. Horizontal venting introduces a few specific safety considerations that need to be addressed carefully. One of the biggest concerns is ensuring proper exhaust of dangerous gases like carbon monoxide.
If the vent isn’t sealed properly or slopes incorrectly, these gases can leak back into the garage.
Another significant safety point is preventing moisture buildup. When exhaust gases cool down in a vent pipe, they can form condensation. In a horizontal vent, this condensation has a harder time draining away compared to a vertical vent where gravity helps.
If moisture collects, it can lead to rust and corrosion of the vent pipe and the heater itself. This can shorten the lifespan of your equipment and create a safety hazard.
Fire prevention is also key. The vent pipe gets hot as it carries exhaust gases. It must be kept clear of any flammable materials in the garage.
This includes wood structures, stored items like paint or solvents, and even dust. Proper clearance, as specified by the heater manufacturer and local building codes, must be maintained along the entire length of the horizontal vent run.
Finally, securing the vent pipe is important. It needs to be firmly attached to the wall and supported throughout its run to prevent sagging. A sagging pipe can create low spots where condensation can collect.
It also ensures the vent doesn’t become dislodged, which could lead to a dangerous venting failure. Regular inspection of the vent system is a good practice to catch any potential issues early.
Proper Slope for Drainage
The slope of a horizontal vent is absolutely critical. For most gas heaters, the vent pipe needs to slope upwards from the appliance towards the outside termination point. This might seem counterintuitive, but the upward slope helps to carry any moisture that forms away from the heater and out of the garage.
A common recommendation is at least a quarter-inch rise for every foot of horizontal pipe run.
If the pipe slopes downwards towards the heater, condensation will pool inside. This pool of water can then flow back into the heater, causing damage to the burner and other components. It can also lead to exhaust gases backing up into the garage, creating a serious carbon monoxide risk.
Ensuring a consistent upward slope prevents these dangerous situations.
When installing the pipe, it’s a good idea to use a level to check the slope as you go. You might need to use mounting brackets or straps that allow for this specific angle. Even small dips or sags in the pipe can create problems.
The entire run needs to have a continuous upward pitch. This might require some creative work around framing members or other obstacles in the wall.
The type of heater and the manufacturer’s instructions will give you the exact slope requirements. Always refer to your heater’s manual for the precise specifications. Getting this slope wrong is one of the most common mistakes people make, and it can have severe safety consequences.
It’s a simple step that makes a huge difference in the safe operation of your garage heater.
Steps for Venting a Garage Heater Horizontally
So, you’ve decided that a horizontal vent is the way to go for your garage heater. Now, let’s break down how to get it done safely and effectively. This process involves careful planning, accurate measurements, and adherence to safety guidelines.
By following these steps, you can ensure your garage stays warm and well-ventilated without compromising safety. We’ll cover everything from preparing the wall to finishing the exterior.
Preparation and Planning
Before you even think about cutting into a wall, thorough preparation is key. First, consult your garage heater’s installation manual. It will specify if horizontal venting is allowed and provide detailed instructions, including required pipe types, diameters, and clearance distances.
This manual is your most important guide.
Next, choose the location for your vent exit. It needs to be on an exterior wall, far enough away from windows, doors, and air intakes to prevent exhaust gases from being drawn back into the building. Building codes typically specify minimum distances.
You’ll also need to ensure the interior path for the vent pipe is clear of electrical wires, plumbing, and structural framing.
Mark the desired location on the exterior wall. From inside the garage, identify the spot where the vent pipe will exit. You may need to drill a small pilot hole through the wall to mark the exact center of your planned exit point on the outside.
This pilot hole is crucial for accurate cutting.
Gather all the necessary materials: the correct type and size of vent pipe, elbows, connectors, termination cap, wall flashing, sealant, mounting brackets, and any other specialized parts recommended by the heater manufacturer. Having everything ready before you start minimizes interruptions and ensures you have the right components.
Measuring and Cutting the Wall Opening
Once you’ve identified the exit point and confirmed your vent pipe’s diameter, it’s time to make the opening. Use the vent pipe or a fitting of the same diameter to trace a circle on the exterior wall. Be precise.
A slightly too large opening is easier to seal than one that’s too small and needs to be enlarged.
If you are using a specialized vent kit, follow its specific instructions for marking and cutting. Some kits come with a template to make this easier. For standard vent pipes, ensure your traced circle accounts for any necessary clearances around the pipe itself, as specified by code and manufacturer guidelines.
With the circle marked, carefully cut the opening. This might involve using a drywall saw for interior surfaces and a reciprocating saw or a hole saw for the exterior sheathing and siding. Be mindful of what’s behind the wall, such as insulation, vapor barriers, or framing.
You may need to remove a section of siding and sheathing.
After cutting the hole, remove any debris. You’ll want a clean edge for installing the vent pipe and flashing. If you encounter unexpected obstacles like a stud, you may need to adjust the location slightly or plan to notch the framing if codes permit.
Safety first – always wear safety glasses and gloves during this process.
Consider the outside termination. Will your vent pipe exit flush with the siding, or will it need to extend slightly? This affects how you’ll install the termination cap and flashing to ensure a watertight seal.
Planning this detail now will save you headaches later during the sealing phase.
Installing the Vent Pipe
With the opening made, you can now install the vent pipe. Start by inserting the first section of pipe through the wall opening. If you are using a single-wall pipe transitioning to double-wall, ensure the transition is made according to manufacturer specifications, typically within a certain distance from the appliance.
For horizontal runs, it is crucial to maintain the specified upward slope away from the heater. Use a level to ensure each section of pipe is correctly angled. Secure the pipe using appropriate mounting brackets or straps.
These should be spaced according to manufacturer recommendations to prevent sagging and maintain the slope.
Connect sections of pipe using the manufacturer-provided connectors and sealant. Ensure all joints are tight and secure to prevent leaks. Many vent pipe systems use a twist-lock mechanism or require screws to hold them together.
Always follow the specific connection method for your chosen vent pipe type.
As you run the pipe through the wall, pay close attention to clearance requirements. Maintain the specified distance between the vent pipe and any combustible materials, such as wood framing or insulation. This is a critical fire safety measure.
If you are passing the vent through a wall cavity, you may need to use a thimble or firestop if required by code.
The final section of the vent pipe will connect to the exterior termination cap. Make sure this connection is also secure and sealed. The termination cap should be installed with appropriate flashing to prevent water from entering the wall cavity around the pipe.
This flashing needs to be properly integrated with the siding to shed water effectively.
Securing and Sealing the Vent
Once the vent pipe is in place and properly sloped, it needs to be securely fastened. Use sturdy brackets that are rated for exterior use. These brackets should support the weight of the pipe and any potential debris or snow load it might carry.
Ensure the brackets are anchored firmly to the garage structure, not just the siding.
Sealing is paramount to prevent air and water leaks. On the exterior, install the vent termination cap and its accompanying flashing. This flashing should overlap the siding and the vent pipe collar correctly to direct water away from the opening.
Use a high-quality exterior sealant, such as silicone or polyurethane caulk, around the edges of the flashing and any other gaps where water could enter.
On the interior, seal the gap between the vent pipe and the wall opening. Use fire-rated sealant or appropriate firestop material if required by code. This seal prevents drafts and also helps to block the passage of insects or rodents into the wall cavity.
Ensure the sealant is flexible enough to accommodate slight movements of the pipe due to temperature changes.
Regularly inspect the seals, especially after periods of heavy rain or snow. If you notice any cracks or gaps in the sealant, repair them promptly. A well-sealed vent not only keeps water out but also ensures the integrity of your heating system by preventing uncontrolled air entry or exit.
The goal is a tight, watertight, and airtight seal that will last for years. This protects your garage structure from water damage and ensures the vent system functions as intended by directing all exhaust gases safely outside. A small amount of effort here prevents much larger problems down the road.
When to Call a Professional
While many DIY enthusiasts can tackle home improvement projects, some tasks are best left to the experts. Venting a garage heater horizontally is one of those projects where professional help can be invaluable. If you’re not completely comfortable with any part of this process, or if local codes are complex, bringing in a professional ensures the job is done right and safely.
Understanding Local Building Codes
Building codes exist for a reason: to ensure safety and structural integrity. When it comes to venting appliances, these codes are particularly strict. They cover aspects like the type of vent pipe allowed, minimum clearances to combustible materials, the maximum length of horizontal runs, and the requirements for terminating the vent outside.
Local codes can vary significantly from one municipality to another. What is acceptable in one town might be a violation in another. These codes are often updated to reflect new safety standards and building practices.
A professional installer will be familiar with the most current codes in your area and can ensure your installation meets all requirements.
Failing to comply with building codes can result in several problems. You might face fines, be forced to redo the installation, or have trouble selling your home in the future if the work isn’t permitted and inspected. Furthermore, non-compliant installations can create serious safety hazards, such as fire risks or carbon monoxide leaks.
When you hire a professional, they can guide you through the permitting process, which is often required for this type of work. They will also be able to advise on the best venting strategy based on your specific garage layout and local regulations. This knowledge saves you time, stress, and potential costly mistakes.
Think of professional consultation as an investment in safety and compliance. They have the experience to anticipate potential issues and the expertise to resolve them properly. This is especially true for horizontal venting, which can be more complex than simple vertical installations.
Professional Installation Benefits
Hiring a qualified professional for your horizontal garage heater venting project offers several key advantages. Firstly, they possess the specialized knowledge and experience to correctly interpret manufacturer instructions and local building codes. This ensures the installation is not only functional but also safe and compliant.
Professionals have the right tools and equipment for the job. This means precise cutting, secure fastening, and proper sealing. They know how to work around existing structures without causing damage and how to integrate the vent system seamlessly and safely into your garage’s exterior.
Their familiarity with different vent materials and their properties is also a significant plus.
Safety is paramount, and professionals are trained to handle potentially hazardous tasks. They understand the risks associated with gas appliances and combustion byproducts and take all necessary precautions. This includes proper ventilation during installation and ensuring all connections are gas-tight and exhaust-tight.
Moreover, a professional installation often comes with a warranty or guarantee. This provides you with peace of mind, knowing that if any issues arise due to the installation, the contractor will stand behind their work. It also helps avoid costly future repairs that might stem from an improperly executed DIY job.
Finally, professionals can often complete the job more efficiently than a DIYer. Their experience allows them to work through the process quickly and effectively, minimizing disruption to your home. This can be particularly important if you need your garage heater up and running by a specific deadline.

Frequently Asked Questions
Question: Can I use dryer vent pipe for my garage heater?
Answer: No, you should never use dryer vent pipe for a gas heater. Dryer vents are designed for lint and moist air, not for the high heat and corrosive byproducts of combustion. Using the wrong type of vent pipe is a serious fire hazard and can lead to dangerous gas leaks.
Question: How far can a horizontal vent pipe run?
Answer: The maximum length of a horizontal vent run depends on the specific garage heater model and the type of vent pipe used. Always consult your heater’s installation manual, as it will specify the maximum allowable length and any restrictions on horizontal runs, often expressed as a ratio of horizontal to vertical length.
Question: Do I need a special kit for horizontal venting?
Answer: Some garage heaters come with specific venting kits that are designed for horizontal installations. Others may require you to purchase a separate kit or specific components. It is essential to check your heater’s manual to see if a special kit is needed and what parts are recommended.
Question: How do I prevent condensation in a horizontal garage heater vent?
Answer: Proper installation is key. Ensure the vent pipe has a continuous upward slope of at least 1/4 inch per foot towards the outside termination. Using double-wall or insulated vent pipe also helps minimize condensation by keeping the exhaust gases hotter for longer.
Proper termination with a rain cap also helps.
Question: Can I vent my garage heater through a window?
Answer: Venting through a window is generally not recommended or permitted by building codes. This method typically does not provide a secure, sealed, or permanent solution. It can also compromise the safety and efficiency of the heating system, and create an entry point for pests or drafts.
Conclusion
Yes, you can vent a garage heater horizontally, but it requires careful attention to detail and safety. Always follow your heater’s manual and local building codes. Proper slope, secure installation, and thorough sealing are key to safely expelling exhaust and preventing moisture issues.
When in doubt, consult a professional to ensure your garage stays warm and safe.