

Imagine transforming your resin printing experience with just one simple addition: a DIY resin printer heater. If you’ve ever struggled with slow curing times or inconsistent print quality, this could be the game-changer you need.
Picture your prints coming out smoother, faster, and with fewer errors. Sounds like a dream, right? By learning how to make your own resin printer heater, you’re not just saving money; you’re also taking control of your printing process. This guide will walk you through the steps and benefits, helping you unlock the full potential of your 3D printer.
Ready to elevate your printing game and see dramatic improvements? Let’s dive in and discover how a DIY resin printer heater can make all the difference!

Credit: www.reddit.com
Understanding Resin Printing
Resin printing is a fun way to create things. It uses liquid resin and a light to make objects. The printer shines a light to harden the resin. This makes layers one by one. Each layer is very thin. This helps make smooth and detailed parts. Resin printers are different from regular 3D printers. They use liquid, not plastic strands. The finished objects are strong and look nice.
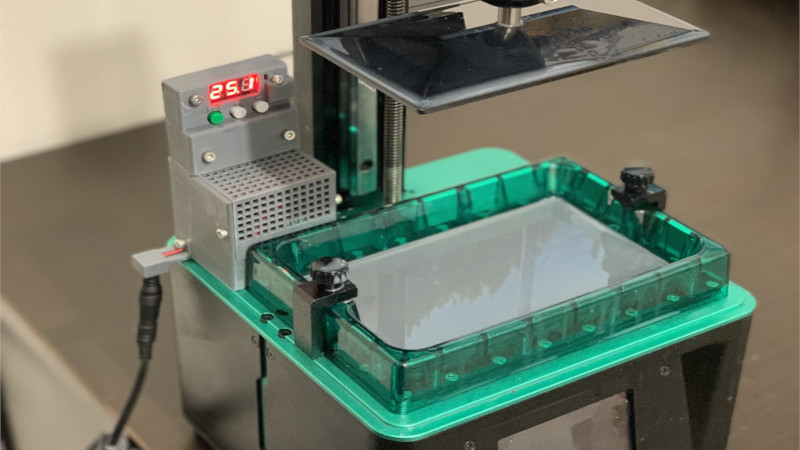
Temperature is very important in resin printing. The resin must be at the right temperature. Too cold, and it won’t cure well. Too hot, and it might get messy. Keeping the resin warm helps it cure properly. This makes sure the print turns out great. A heater can help keep the temperature just right. It helps the printer work better.

Credit: www.reddit.com
Challenges In Resin Printing
Resin printing can be tricky. Prints may have rough edges or holes. Sometimes, layers don’t stick well. This causes warped prints. Sticky residues can remain. The printer’s settings matter. Wrong settings lead to poor prints. Resin type affects quality too. Some resins print better than others.
Temperature impacts resin printing. Cold rooms can cause resin to cure poorly. Humidity plays a role too. High humidity can make prints sticky. Low humidity can dry them out. Airflow matters. Strong airflow can distort prints. Light affects curing. Too much light can over-harden resin. Dust can settle on prints. This makes them less smooth.
Benefits Of Using A Printer Heater
Enhanced Print Qualityis a key advantage of using a printer heater. The heater warms up the resin evenly. This helps in reducing errors during printing. Prints come out smoother and more detailed. Small details are much clearer. The finish looks professional and neat. It helps to prevent warping of prints. Warping can ruin the final product. Using a heater makes each print look its best.
Consistent Temperature Controlis vital for good printing. A heater keeps the temperature steady. This steady heat ensures uniform prints. Sudden temperature changes can cause print issues. The heater prevents those changes. It ensures better resin curing. Curing is important for strong prints. Strong prints last longer. With steady heat, the printer works better. This means fewer mistakes and better results.
Credit: hackaday.com
Choosing The Right Heater
Different heaters suit different needs. Ceramic heaters are common. They are safe and efficient. Silicone heaters are flexible. They can fit around curves. Wire heaters are simple and easy to use. Each has its own benefits.
Think about size first. The heater must fit your printer. Power is another factor. More power means more heat. Safety features are important too. Ensure the heater has an auto-off function. This keeps your setup safe. Cost may also matter. Choose one within your budget. The right heater makes printing easier.
Diy Heater Installation
First, gather all necessary materials. You will need a heater, some wires, a power supply, and toolslike a screwdriver and pliers. Ensure you have heat-resistant tape. This keeps wires safe. Use some glovesfor safety. Check if you have a multimeter. This tool helps to test connections. All items are easy to find at local stores.
Begin by turning offyour printer. This prevents accidents. Locate the spot for your heater. Attach the heater securely. Use the heat-resistant tape. Connect the wires to the heater. Attach the wires to the power supply. Use the multimeter to check connections. Ensure no wires are loose. Once checked, turn on the printer. Watch if the heater warms up. If it works, your job is done. Always be careful while working. Ask an adult to help if unsure.
Safety Precautions
Ensure safe use of DIY resin printer heaters by wearing gloves and goggles. Keep the workspace well-ventilated and free of flammable materials. Regularly check equipment for faults to prevent accidents.
Handling Electrical Components
Be cautious with electrical components. Electricity can be dangerous. Always turn off power before touching wires. Wear rubber gloves for safety. Use insulated tools to prevent shocks. Check connections regularly. Loose wires can cause fires. Inspect cords for damage. Replace damaged cords immediately. Avoid water near electrical parts. Water increases shock risk. Label wires clearly. This helps prevent mistakes.
Avoiding Overheating
Overheating can be harmful. Monitor the temperature of your printer. Place the printer in a cool area. Ensure proper ventilation around your device. Use a fan to keep it cool. Check for blocked vents. Blocked vents lead to overheating. Remove dust from vents. Dust restricts air flow. Limit printer usage time. Extended use increases heat. Set a timer to remind you. Rest your printer regularly. This prevents overheating.
Troubleshooting Common Issues
Resin printers often face heater issues that can affect print quality. Ensure wiring connections are secure and inspect the power source. Regular maintenance and checking for firmware updates can prevent common heater problems, enhancing printer performance.
Identifying Heater Malfunctions
Resin printer heaters can break down. Look for unusual noises. Check if the heater is warm. Cold heaters may be broken. Flickering lights could mean a problem. Inspect connections. Loose wires cause issues. Check for error messages on the screen. These messages help find problems. Look for smoke or burning smell. These are serious signs. Turn off the printer if you smell smoke. Safety is important.
Solutions For Temperature Fluctuations
Temperature changes can spoil prints. Check the room temperature. Cold rooms affect heaters. Use a thermometer to check. Adjust the heater settings. Set a stable temperature. Ensure the heater is clean. Dust can block heat. Look at the power source. Stable power helps heaters work well. Use a surge protector for safety. Insulate the printer to maintain heat. Cover it with a cloth. Keep it away from drafts. Drafts make heaters work harder.
Maintaining Your Heater
Check the heater’s wiresand connectionsoften. Look for any signs of wear or damage. Ensure all parts are secureand tight. Inspect the power supplyfor any issues. Check for strange smells or noises. These may indicate problems. Always turn off the heater before inspecting. Safety is important.
Keep the heater clean. Dust can cause problems. Use a soft clothto wipe the surfaces. Avoid using water on electric parts. Unplug the heater before cleaning. Check the fan for dust build-up. A clean fan works better. Regular care extends the heater’s life. Follow these steps for a happy heater.
Frequently Asked Questions
How Do Resin Printer Heaters Work?
Resin printer heaters maintain optimal temperature for resin curing. They ensure consistent printing results by reducing viscosity. Heaters help achieve better layer adhesion, leading to improved print quality. Additionally, they prevent resin from thickening, which can cause print failures. Proper temperature regulation is essential for successful resin printing.
Why Add A Heater To A Resin Printer?
Adding a heater to a resin printer ensures stable printing conditions. It reduces resin viscosity, enhancing layer adhesion. Heaters also prevent resin thickening, minimizing print failures. Maintaining consistent temperature improves overall print quality. It’s especially useful in colder environments where resin may become too thick.
Can I Make A Diy Resin Printer Heater?
Yes, you can make a DIY resin printer heater. Use simple components like heating pads and temperature controllers. Ensure compatibility with your printer model. Follow safety guidelines during installation. DIY heaters can be cost-effective and customizable. Proper setup can lead to improved printing results.
What Temperature Is Best For Resin Printing?
The ideal temperature for resin printing is around 25-30°C. This ensures optimal resin viscosity for smooth printing. Consistent temperatures improve layer adhesion and print quality. It’s important to monitor and adjust based on resin type. Cooler environments may require additional heating for best results.
Conclusion
Creating a DIY resin printer heater offers several benefits. It enhances print quality. Consistent temperatures result in smoother prints. Resin cure times decrease, speeding up projects. It’s a cost-effective solution for enthusiasts. Easily assembled with basic tools. Tailor it to suit personal needs.
Saves money while boosting efficiency. Perfect for those who love hands-on projects. A rewarding experience for creators. Try building your heater today. Enjoy improved printing results!
Last Updated on August 25, 2025 by Tanim