How To Make A Garage Heater Quieter (Simple Diy Fixes)
Making a garage heater quieter often involves addressing vibration sources, insulating sound, or checking simple mechanical parts. Common fixes include adding rubber dampeners, ensuring proper installation, and cleaning filters. Many noisy heater issues stem from simple causes that can be resolved with basic DIY adjustments, leading to a much more comfortable garage environment.
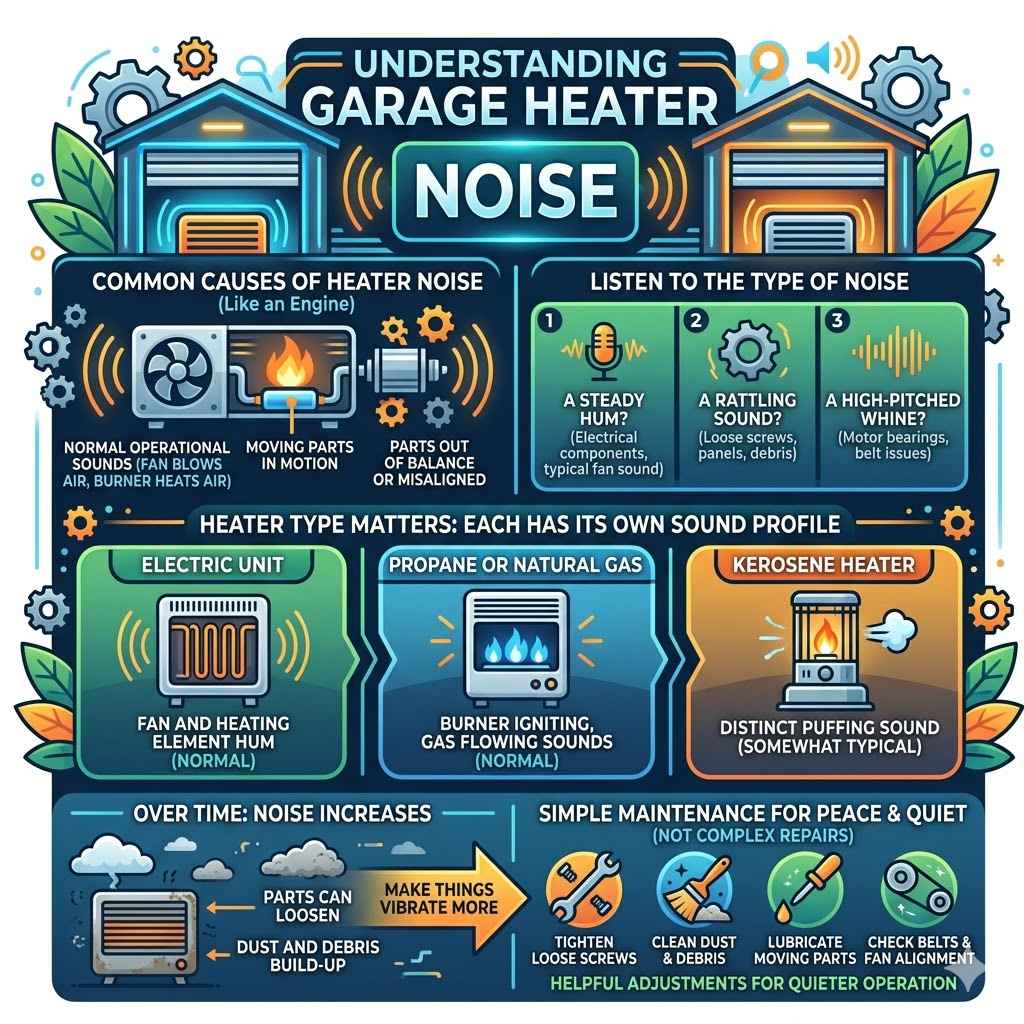
Understanding Garage Heater Noise
Garage heaters make noise for a few main reasons. Think of it like a car engine. It’s supposed to run, but sometimes parts vibrate or aren’t aligned perfectly.
This can create sounds you don’t want. Most heaters have moving parts. A fan blows air.
A burner heats that air. These actions naturally create some sound. But when the noise is too much, something is usually out of balance.
We need to find that imbalance. Understanding the type of noise is the first step. Is it a steady hum?
A rattling sound? A high-pitched whine?
The type of heater matters too. Are you using an electric unit, a propane or natural gas heater, or perhaps a kerosene one? Each has its own sound profile and common noise issues.
Electric heaters often hum from the fan and heating element. Gas heaters add the sound of the burner igniting and gas flowing. Kerosene heaters can sometimes have a distinct puffing sound.
Over time, parts can loosen. Dust and debris can build up. This can make things vibrate more.
A heater that was once quiet might start making new sounds. It’s like an old appliance. It might need a little tune-up.
We’ll look at how simple maintenance can bring back peace and quiet. This isn’t about complex repairs. It’s about simple, helpful adjustments.
My Own Experience with a Racket-Making Heater
I remember one particularly chilly autumn. I had just gotten a new propane space heater for my garage. I was so excited to finally start organizing my tools without shivering.
I plugged it in, turned it on, and waited for that cozy warmth. Instead, I got… a racket. It sounded like a small engine was trying to take off from my workbench.
There was a deep, rattling vibration that seemed to shake the whole garage. I couldn’t even hear myself think, let alone listen to a podcast while I worked.
I was so frustrated. This was supposed to make my life easier, not give me a headache. I spent the first hour just staring at it, trying to pinpoint where the noise was coming from.
Was it the fan? Was something loose inside? I even worried it might be dangerous.
The noise was so intense that I almost decided to turn it off and just deal with the cold. But then I thought, “There has to be a way to fix this without spending a fortune.” I remembered reading about how vibrations are often the culprit. That night, I decided to investigate further.
Common Heater Noise Types
Steady Hum: Often from the fan motor or electrical components. Usually normal, but can get louder if dirty.
Rattling: Suggests something is loose. Could be a panel, a screw, or debris.
Whining/Screeching: Might indicate a fan bearing issue or something rubbing.
Puffing/Popping: Common with gas or kerosene heaters. Can be normal ignition sounds or indicate fuel flow issues.
The Root Causes of Heater Noise
Let’s break down why your heater might be making all that racket. The most common reason is vibration. Almost every heater has a fan.
Fans move air. When the fan spins, it can cause the whole unit to vibrate. If the heater isn’t on a stable, level surface, these vibrations can get amplified.
Imagine shaking a box versus shaking a box sitting on a soft mat. The mat absorbs some of the shaking.
Loose parts are another big one. Over time, screws can loosen. Panels can shift.
Even small components inside can become less secure. When these parts vibrate against each other or the main housing, they create noise. This is especially true for heaters that get moved around a lot.
Or those that have been running for many years.
Dust and debris are also sneaky noise makers. A fan can suck dust into the heater. This dust can build up on fan blades.
It can clog air intakes. It can even get into the motor. A dirty fan blade isn’t balanced.
It spins unevenly. This makes the motor work harder and vibrate more. Clogged vents also force the fan to work harder.
This can make the motor hum louder.
Installation is key. If your heater was not installed correctly, it might be leaning. It might not be mounted securely.
This can lead to vibrations transferring to your floor or walls. Think about a picture frame that isn’t hung straight. It looks off.
A heater that’s not level can sound off too. Proper mounting helps keep things stable and quiet.
The motor itself can also be a source of noise. Fan motors have bearings. These bearings allow the fan to spin smoothly.
Over time, these bearings can wear out. They can become dry. This can cause them to make a whining or grinding sound.
This is a bit more serious, but often still fixable. We’ll cover how to spot these issues.
Simple DIY Fixes for a Quieter Heater
Now for the good stuff! You don’t need to be a technician to make your heater quieter. Many fixes are simple and quick.
They use things you might already have at home. The goal is to stop or reduce vibrations. We also want to make sure the heater is running as smoothly as possible.
The first thing to try is checking for loose parts. Unplug your heater. Gently shake the unit.
Listen for anything rattling inside. Look for any panels that seem loose. If you find a loose panel, see if there are screws holding it in place.
Tighten them up. Sometimes, the screws are on the outside. Other times, you might need to gently remove a cover.
Just be careful. Always unplug the heater first.
Next, let’s tackle vibrations. Rubber is your best friend here. You can buy small rubber pads or feet designed for appliances.
You can even use thick rubber mats. Place these under the heater. Ensure the heater is sitting on top of the rubber.
This acts as a cushion. It absorbs vibrations. It stops them from traveling to the floor.
This is a super effective trick for many rattling heaters.
Cleaning is essential. A dusty heater is a noisy heater. Unplug the unit.
Use a vacuum cleaner with a brush attachment. Gently clean the air intake vents. Clean the fan blades if you can access them safely.
You can also use compressed air. Blow out dust from vents and any accessible internal parts. Make sure to do this outdoors or in a well-ventilated area.
The dust can be messy. This simple cleaning can often quiet down a humming or whirring fan.
Quick DIY Tune-Up Checklist
- Unplug heater. Safety first!
- Check for loose panels. Tighten any screws.
- Add rubber dampeners. Place under the unit.
- Clean vents and fan blades. Use vacuum or air.
- Ensure level placement. Use a level tool.
Check if your heater is level. Use a small level tool. Place it on top of the heater.
If it’s not level, adjust the feet. Some heaters have adjustable feet. You can screw them in or out.
If your heater doesn’t have adjustable feet, you might need to place shims. These are small wedges. You can use wood or sturdy plastic.
Place them under the corners. Make sure the heater sits flat and stable.
If your heater has a filter, clean or replace it. A clogged filter makes the fan work harder. This causes more noise.
Check your heater’s manual for filter location. Most are easy to access. A clean filter means better airflow.
It means less strain on the fan motor.
For gas or kerosene heaters, check the fuel line and connections. Ensure they are secure. Sometimes a loose connection can cause a slight buzzing sound as fuel flows.
Make sure there are no leaks. If you smell gas, turn off the heater immediately. Do not try to fix gas lines yourself.
Call a professional.
When Installation Might Be the Culprit
Sometimes, the noise isn’t from the heater itself. It’s how it’s installed. If your heater is mounted on a wall or ceiling, make sure it’s attached securely.
Loose mounting brackets can cause significant rattling. These vibrations can travel through the structure of your garage. This makes the noise seem louder than it is.
Check all the bolts and screws. Ensure they are tight. You might need a wrench for this.
If your heater sits on the floor, the surface matters. A flimsy metal shelf is not ideal. It can resonate.
It can amplify vibrations. A solid concrete floor is best. If you don’t have that, a sturdy workbench or a thick wooden surface can help.
Again, rubber mats or pads under the heater are crucial here. They decouple the heater from the surface. This breaks the vibration path.
For permanent installations, like hard-wired electric heaters or gas heaters vented outside, ensure all connections are sound. A poorly fitted vent pipe can vibrate. It can make a whistling or rattling noise.
Ensure the heater has enough clearance around it. This is often a safety requirement. But it also helps with airflow.
Better airflow can mean quieter operation. Always follow the manufacturer’s installation guidelines.
Installation Check-Up
- Mounting Security: Are wall/ceiling mounts tight?
- Surface Stability: Is the floor or surface solid?
- Level Check: Is the unit perfectly level?
- Clearance: Is there enough space around vents?
- Vent Connections: Are pipes and ducts sealed and secure?
Think about the room itself. Hard surfaces everywhere can reflect sound. This makes any noise seem louder.
While you can’t easily change your garage walls, adding some soft materials can help. Think about a rug or some thick blankets stored nearby. These can absorb some sound.
This is more about reducing the echo effect.
Dealing with Fan and Motor Noises
The fan is often the main source of consistent noise. If you’ve cleaned the fan blades and they still seem off, the issue might be deeper. The fan motor has bearings.
These bearings allow the fan to spin. If the bearings are worn, they can make a grinding or whining sound. This is a more advanced repair.
It might be time to consider professional help or replacement.
However, sometimes a noisy fan motor is just dirty. Even after basic cleaning, some grime can remain. You might need to carefully access the motor housing.
Use a small brush and some electrical contact cleaner. Spray a little cleaner on the motor shaft and bearings. Then, use compressed air to dry it.
This can sometimes free up sticky bearings. Remember to unplug the heater. And let it dry completely before plugging it back in.
This is a bit more involved, so be cautious.
If the noise is a high-pitched squeal, it’s very likely the fan motor bearings. Some smaller, less expensive heaters might not be designed for easy motor replacement. For these, the most cost-effective solution might be to replace the entire heater unit.
For more robust heaters, you might be able to find a replacement motor. Check the model number. Look online or contact the manufacturer.
Before you try any motor work, check your heater’s manual. It might have specific instructions for maintenance or troubleshooting motor noise. Safety is paramount.
Electrical components can be dangerous if handled improperly. If you’re not comfortable, it’s best to leave motor repairs to the pros.
Fan Motor Troubleshooting Steps
1. Cleanliness: Ensure fan blades and housing are dust-free.
2. Bearing Check: Listen for grinding or whining sounds from the motor.
3. Lubrication (Cautious): For some motors, a tiny bit of electrical lubricant might help bearings. Use sparingly.
4. Motor Replacement: If bearings are bad, consider replacing the motor unit or the whole heater.
Sometimes, the fan itself can become unbalanced if a blade is slightly bent or damaged. This is less common but can happen. If you notice a fan blade looks bent, it might be the source of the vibration and noise.
Gently try to straighten it if it’s metal. If it’s plastic, it might be harder to fix without breaking it. In that case, a new fan assembly would be needed.
Soundproofing Your Garage Heater Area
When DIY fixes don’t quite silence the beast, you can take extra steps to reduce the sound reaching you. This is more about soundproofing. It’s about blocking or absorbing the noise.
Your garage is likely full of hard surfaces. These surfaces reflect sound. This makes noise bounce around.
One easy way to absorb sound is with soft materials. Think about hanging thick blankets or moving blankets around the heater. You can even create a temporary enclosure.
Use heavy fabric or even acoustic foam panels. Ensure you leave plenty of space for ventilation. Never block air vents.
This is a fire hazard. It also makes the heater work harder and potentially overheat.
You can also add sound-dampening materials to the walls or ceiling around the heater. Things like mass-loaded vinyl (MLV) are excellent for blocking sound. You can apply this to walls.
Then, cover it with drywall or wood paneling. This is a more involved project. But it can significantly reduce noise transmission.
For a simpler approach, consider thick rugs on the floor.
Sound Absorption Ideas
- Heavy Blankets: Drape around the heater, ensuring ventilation.
- Acoustic Foam: Place panels on nearby walls.
- Thick Rugs: Cover hard floors to absorb sound.
- Mass-Loaded Vinyl (MLV): For more permanent sound blocking on walls.
Consider placing the heater further away from where you spend most of your time. If you work at a workbench, try to position the heater so it’s not directly behind you. Even a few extra feet can make a difference.
The further the sound source, the less intense it seems.
If the noise is a high-pitched whine, and it’s coming from the exhaust of a gas heater, there might be a specific muffler or dampener available. Check the manufacturer’s accessories. Sometimes, these are sold separately.
They are designed to reduce specific types of noise. These are usually simple to install.
Safety First: When to Call a Professional
While many of these fixes are simple DIY tasks, there are times when you should not attempt repairs yourself. Safety is always the top priority. If you smell gas, or suspect a gas leak, turn off the heater immediately.
Do not try to fix gas lines. Call your gas company or a qualified HVAC technician. This is not a DIY job.
If your heater is making loud grinding or screeching noises, and you’ve tried cleaning and basic maintenance, it might be a sign of a failing motor or internal component. Replacing these parts can be complex. It often requires specific tools and knowledge.
If you’re not comfortable with electrical work or internal mechanics, it’s safer to hire a professional. They can diagnose the issue accurately.
Electrical issues are also a serious concern. If you see sparks, smell burning plastic, or notice wires that look frayed or damaged, do not try to fix it. Unplug the heater.
Call an electrician or an HVAC technician. Faulty wiring can cause fires. It’s not worth the risk.
When to Call for Help
- Gas Smells: Immediate professional attention needed.
- Electrical Sparks/Burning Smells: Stop using, call an expert.
- Loud Grinding/Screeching: If basic fixes fail, professional diagnosis is best.
- Overheating: If the unit gets too hot to touch or shows signs of distress.
- Persistent Loud Noise: After trying DIY steps, a pro can find hidden causes.
Also, if your heater is old and showing signs of wear and tear beyond simple noise issues, it might be time to consider replacement. A new heater will likely be more energy-efficient. It will also probably be quieter.
The cost of repeated professional repairs on an old unit can add up. Sometimes, a new start is the best solution.
Regular Maintenance for Lasting Quiet
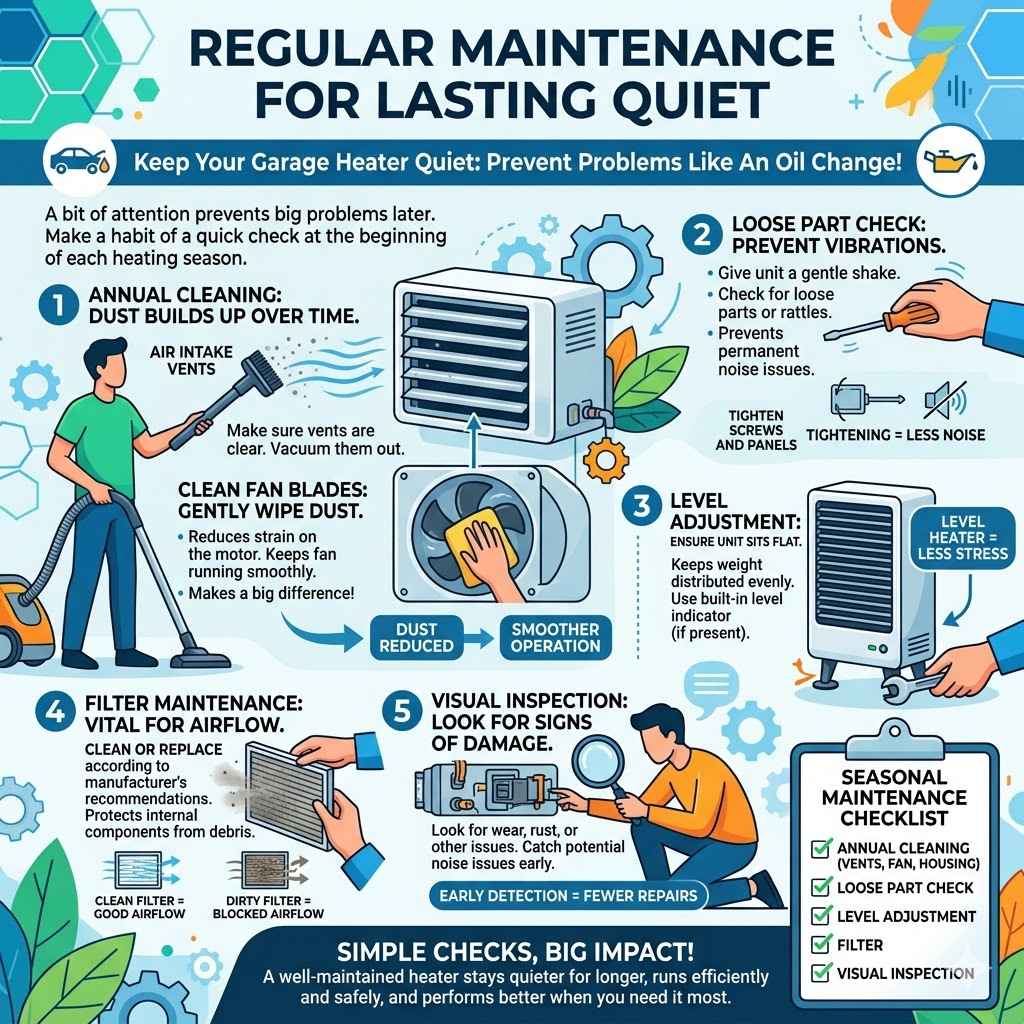
The best way to keep your garage heater quiet is through regular maintenance. Think of it like changing the oil in your car. A little bit of attention can prevent big problems later.
Make it a habit to do a quick check at the beginning of each heating season.
This includes cleaning. Dust builds up over time. Make sure your air intake vents are clear.
Vacuum them out. Check the fan blades. If they look dusty, clean them gently.
This alone can make a big difference. It keeps the fan running smoothly. It reduces strain on the motor.
Check for loose screws or panels. Give the unit a gentle shake. See if anything rattles.
Tighten any loose fasteners. This prevents vibrations from becoming permanent problems. Ensure the heater is still sitting level.
Adjust the feet if needed. This keeps the weight distributed evenly.
Seasonal Maintenance Checklist
- Annual Cleaning: Vents, fan blades, housing.
- Loose Part Check: Tighten screws and panels.
- Level Adjustment: Ensure unit sits flat.
- Filter
- Visual Inspection: Look for any signs of damage or wear.
If your heater has a filter, make sure you clean or replace it according to the manufacturer’s recommendations. A clean filter is vital for good airflow. It also protects the internal components from dust and debris.
This is a simple task that has a big impact.
By performing these simple checks regularly, you can catch potential noise issues early. You can also ensure your heater is running efficiently and safely. A well-maintained heater will likely stay quieter for longer.
It will also perform better when you need it most.
Frequently Asked Questions
Why is my new garage heater louder than expected?
New heaters can sometimes be a bit noisy as they break in. However, if it’s excessively loud, check if it’s on a level surface. Ensure all shipping materials are removed.
Sometimes, a loose panel or a fan issue can occur even on new units. Try placing rubber pads underneath to absorb vibrations.
Can I use spray lubricant on my heater’s fan motor?
Use lubricants very cautiously. Only use lubricants specifically designed for electrical motors or bearings. Apply sparingly to the motor shaft.
Too much lubricant can attract dust and create a bigger mess. Always unplug the heater and let it dry completely before use. Check your manual for specific recommendations.
How often should I clean my garage heater?
It’s best to clean your garage heater at least once a year, ideally before the heating season begins. If your garage is particularly dusty, you might need to clean it more often, perhaps twice a year. Focus on cleaning the air intake vents and fan blades.
What’s the difference between normal heater noise and a problem noise?
Normal heater noise is usually a gentle hum or whirring sound from the fan. Gas heaters might have a soft ignition sound. Problem noises are often loud rattles, grinding, squealing, or banging sounds.
If the noise is sudden, very loud, or accompanied by strange smells, it’s a definite problem.
Will soundproofing make my heater less efficient?
Soundproofing materials placed correctly should not affect heater efficiency. The main concern is ensuring proper airflow. Never block air intake or exhaust vents.
If sound-dampening materials are placed around the heater, ensure there is plenty of space for air to circulate freely. This is crucial for safe operation.
My gas heater makes a ‘whooshing’ sound. Is that normal?
A gentle ‘whooshing’ sound when a gas heater ignites or runs is often normal. It’s the sound of gas and air mixing and burning. However, if this sound becomes very loud, or is accompanied by popping or banging, it could indicate an issue with the gas pressure or burner.
If in doubt, consult your manual or a technician.
Conclusion: Enjoy Your Quiet Space
Tackling a noisy garage heater doesn’t have to be a daunting task. By understanding the common causes of noise, like vibrations and loose parts, you can often find simple, effective solutions. Simple cleaning, adding rubber dampeners, and ensuring the heater is level can make a huge difference.
These are things most of us can do ourselves without special tools.
Remember to always prioritize safety. Unplug your heater before any cleaning or adjustments. If you encounter gas smells or electrical issues, call a professional immediately.
Regular maintenance will keep your heater running smoothly and quietly for seasons to come. Enjoy your now peaceful and warm garage space!