
Don’t let a chilly home catch you off guard! Checking your heater’s pilot light is a simple, essential maintenance task that can save you time, energy, and a lot of discomfort. This guide will walk you through the easy steps to ensure your pilot light is on and your heater is ready to warm your home safely.
Is your heater not blowing warm air? Before you call for professional help, a quick check of the pilot light might be all you need. Many people find this task a bit daunting, but it’s actually quite straightforward. Knowing how to check your heater’s pilot light can save you from unnecessary service calls and keep your home cozy. We’ll break this down into simple steps, making it easy for anyone to do.
This guide is here to give you the confidence to tackle this common heating issue. You’ll learn what a pilot light is, why it’s important, and exactly how to check it for yourself. Let’s get your home back toasty warm!
Understanding Your Heater’s Pilot Light
Think of your pilot light as a tiny, constant flame that’s ready to ignite the main burner when your home’s thermostat calls for heat. It’s a small but crucial part of many older furnaces and gas water heaters. When it’s lit, it means your heater is receiving gas and is ready to fire up. If it goes out, your heater won’t be able to produce heat.
Why does it go out? Sometimes it’s just a natural occurrence, like a little flicker caused by a draft. Other times, it could be a sign of something else, like a buildup of debris or an issue with the gas supply. Whatever the reason, knowing where to locate it and how to check its status is a valuable skill for any homeowner.
Why is the Pilot Light Important?
The pilot light serves a critical function in gas-powered heating systems. It acts as a continuous ignition source, waiting for the signal from your thermostat to light the main gas burners. Without an active pilot light, the burners won’t receive gas and therefore won’t produce heat, leaving you in the cold.
Keeping your pilot light lit ensures your heating system is ready to perform its job efficiently. It’s a fundamental step in keeping your home comfortable during colder months. Moreover, a consistently going-out pilot light can sometimes indicate underlying issues that, if addressed early, could prevent more significant problems down the line.
Types of Pilot Lights
While the concept is the same, pilot lights can vary slightly between different types of heating systems.
- Standing Pilot Light: This is the most traditional type. It’s a small flame that burns continuously, 24/7, even when your heating system isn’t actively heating your home. It’s always there, waiting to ignite the main burners.
- Intermittent Pilot Light (or Electronic Ignition): Newer systems often don’t have a standing pilot light. Instead, they use an electronic igniter that sparks to light the main burner only when heat is needed. If your heater has a small, constant flame, it’s likely a standing pilot. If you don’t see a constant flame, you probably have an electronic ignition system.
For this guide, we’ll focus on checking the status of a standing pilot light, as this is the type you can visually inspect and potentially relight yourself.

What You’ll Need to Check Your Pilot Light
Gathering a few simple items beforehand will make the process smoother and safer. You don’t need fancy tools, just a little preparation.
- Flashlight: Essential for seeing into the dark ignition chamber.
- Gloves: To keep your hands clean and protected from any dust or grime.
- Owner’s Manual: If you have it, this can be a great resource for specific instructions for your model.
- A Long Lighter or Match: For relighting, if necessary. Always use a tool that keeps your hands at a safe distance.
- A Clear Head: Make sure you’re not rushed and can focus on the steps. Safety first!
Step-by-Step Guide: How to Check a Heater’s Pilot Light
Checking your pilot light involves a few simple, sequential steps. It’s designed to be accessible for most homeowners. Always prioritize safety and follow these steps carefully.
Step 1: Locate Your Heater’s Access Panel
First, you need to find the area where the pilot light is housed. For most natural gas furnaces or gas water heaters, this panel is usually found near the bottom of the unit. It’s often a small metal door or cover that can be slid aside or lifted off.
Look for labels on the appliance that might indicate “Burner Access,” “Control Panel,” or something similar. If you’re unsure, consult your owner’s manual. You might need a screwdriver to remove the panel, though some just lift or slide open easily.
Safety Note: Before you even think about opening this panel, ensure the heater is in the “Off” position. If your heater has a gas shut-off valve, turn it to the “Off” position as well. This is crucial for safety.
Step 2: Identify the Pilot Light Assembly
Once the access panel is open, use your flashlight to look inside. You’ll typically see a small metal tube with a tiny flame at the end, or a small opening where a flame should be. This is the pilot light assembly. Next to it, you’ll usually see the main gas burner tubes.
You might also spot a control knob or switch. This knob often has settings like “On,” “Off,” and “Pilot.” This is where you’ll typically control the pilot light. Take a moment to familiarize yourself with the components you see. If a flame is present, it will be a small, steady blue or yellow flame. If there’s no flame, that’s your first clue to what’s happening.
Step 3: Observe the Pilot Light Status
With your flashlight, carefully observe the pilot light assembly. Are you seeing a flame?
- If there IS a flame: A small, steady flame (usually blue with maybe a yellow tip) means your pilot light is working correctly. If your heater is still not producing heat, the issue might be with the thermostat, a safety sensor, or the main burner itself. In this case, it’s best to contact a qualified HVAC technician.
- If there is NO flame: This is the most common reason for a pilot light check. If you see no flame, your pilot light has likely gone out, and this is probably why your heater isn’t working.
Step 4: Relight the Pilot Light (If It’s Out)
If you’ve determined that the pilot light is out, you can try relighting it. This process is designed to be simple, but it requires careful attention. Remember, always have the heater and gas valve in the “Off” position before you begin.
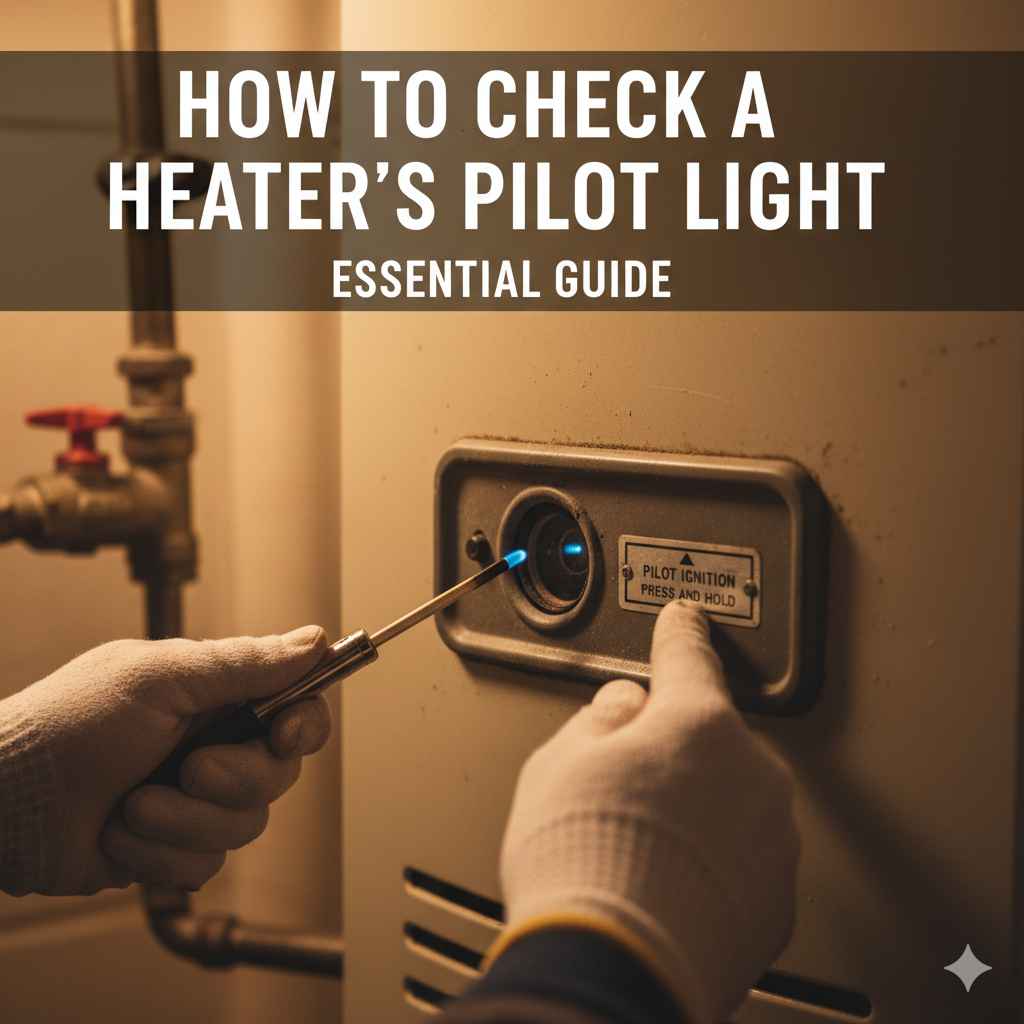
First, locate the control knob on the gas valve near the pilot assembly. Turn this knob to the “Pilot” position. You might need to press and hold this knob down to allow gas to flow to the pilot light orifice. While holding the knob down, use your long lighter or match to carefully ignite the gas at the pilot light opening.
Keep holding the knob down for about 30-60 seconds after the flame ignites. This allows a small thermocouple (a safety device) to heat up and signal to the gas valve that the pilot light is indeed lit and stable. Once you release the knob, the pilot flame should remain lit.
If the pilot light stays lit, you can then turn the control knob to the “On” position. You should hear the main burners ignite shortly after, provided your thermostat is set to call for heat. If it lights successfully, replace the access panel securely.
Step 5: Troubleshoot if Relighting Fails
What if the pilot light won’t stay lit, or won’t ignite at all? Don’t get discouraged! It just means there might be a slightly more complex issue or a specific quirk with your unit.
Here are a few common reasons why a pilot light might refuse to light or stay lit:
- Thermocouple Issues: The thermocouple is a safety device that shuts off the gas if the pilot light goes out. If it’s dirty, damaged, or out of place, it might prevent the pilot from lighting or staying lit. Sometimes simply cleaning the tip of the thermocouple with fine-grit sandpaper can help. Make sure it’s positioned correctly to sense the pilot flame.
- Gas Supply Problems: Ensure the main gas valve to the appliance is fully open. If you’re on natural gas, verify there are no interruptions to your home’s gas supply. If you use propane, check your tank levels.
- Blocked Orifice: The small opening (orifice) where the gas comes out for the pilot light can sometimes become clogged with dust or debris. Gently cleaning this with a fine wire or needle might be necessary, but be very careful not to damage it.
- Drafts: Strong drafts can blow out a pilot light. Ensure the access panel is properly sealed, and there are no significant air currents around the heater.
- Control Valve Issues: The gas control valve itself could be faulty, preventing proper gas flow.
If you’ve tried relighting the pilot light a couple of times and it still won’t stay lit, or if you are uncomfortable at any step, it’s time to call a professional. Trying to force it can be unsafe or cause damage.
When to Call a Professional
While checking and relighting a pilot light is often a DIY task, there are clear signs it’s time to bring in an expert. Your safety and the efficient operation of your heater are the top priorities.
- Persistent Pilot Light Issues: If the pilot light repeatedly goes out after you’ve relit it, or if you cannot get it to light at all, don’t keep trying. This usually indicates an underlying problem that requires professional diagnosis.
- Unusual Smells: If you smell gas strongly at any point, leave the area immediately and call your gas company or 911 from a safe distance. Do not try to relight anything.
- Strange Noises: Popping, hissing, or banging sounds from your heater could signal more significant mechanical issues.
- Lack of Heat After Relighting: If the pilot light is on and stable, but your home still isn’t heating, the problem lies elsewhere in the system.
- Lack of Confidence: If you feel unsure or uneasy about any part of the process, it’s always best to err on the side of caution and call a qualified HVAC technician.
A professional HVAC technician has the tools, knowledge, and experience to safely diagnose and fix complex issues. They can also perform routine maintenance to prevent future problems.
Safety First: Important Considerations
Working with gas appliances requires a commitment to safety. Here are some crucial points to keep in mind:
- Never force components. If something feels stuck, don’t apply excessive pressure.
- Always turn off the gas supply before attempting to relight. This is the most critical safety step.
- Use long lighters or matches designed for lighting stoves or fireplaces to keep your hands and face away from the ignition area.
- Ensure proper ventilation. Never operate a gas appliance in an area with poor ventilation.
- If you smell gas, leave immediately. Do not operate any electrical switches or devices, as a spark could ignite the gas.
- Understand your system. Refer to your owner’s manual. Different models may have slightly different procedures. For advanced information on gas line safety, you can consult resources like the Occupational Safety and Health Administration (OSHA) for guidance on handling gas systems, although their standards are for workplaces, they highlight general safety principles.
Preventative Maintenance for Your Pilot Light
While pilot lights are generally reliable, a little preventative care can go a long way in ensuring they function smoothly throughout the heating season. Regular maintenance can save you hassle and prevent unexpected cold spells.
Here are some tips:
- Annual Professional Servicing: Schedule an annual check-up for your HVAC system with a qualified technician. They will inspect the pilot light assembly, thermocouple, and gas valve as part of their routine service.
- Keep the Area Clean: Ensure the area around your heater is free of dust, cobwebs, and debris. A clean environment reduces the chances of obstructions forming around the pilot light.
- Check Thermocouple Condition: As mentioned in troubleshooting, a dirty or slightly misaligned thermocouple is a common culprit. If you are comfortable, a gentle cleaning with fine-grit sandpaper during your annual check can be beneficial.
- Monitor for Consistency: Pay attention to your heater’s performance. If you notice the pilot light flickering more than usual or if it seems to take longer to ignite, it might be an early sign of a developing issue.
By incorporating these simple maintenance practices, you can help ensure your pilot light remains a dependable beacon of warmth for your home.

Frequently Asked Questions About Heater Pilot Lights
Q1: How often should my standing pilot light need relighting?
A: Ideally, a standing pilot light should not need to be relit often. If it goes out frequently, it indicates a problem that needs professional attention. A properly functioning pilot light can stay lit for months or even years.
Q2: Can a draft really blow out my pilot light?
A: Yes, a strong draft can certainly extinguish a pilot light. This is why it’s important to ensure that access panels are sealed correctly and that there aren’t excessive air currents in the vicinity of the pilot assembly. Sometimes, a technician might install a draft shield if this is a recurring issue.
Q3: What’s the difference between a pilot light and an igniter?
A: A standing pilot light is a small, continuous flame that’s always on, ready to ignite the main burners. An igniter, used in electronic ignition systems, is a device that creates a spark or heats up to light the gas only when the thermostat calls for heat. Newer systems often use igniters instead of standing pilot lights.
Q4: My pilot light is lit, but my heater still isn’t working. What could be wrong?
A: If the pilot light is on and stable, the issue is likely with another component of your heating system. Common culprits include a faulty thermostat, a tripped safety limit switch, a problem with the blower motor, or clogged air filters restricting airflow. In these cases, it’s best to consult an HVAC professional.
Q5: Is it safe to relight my own pilot light?
A: For most standard furnaces and water heaters, relighting a pilot light is considered a safe DIY task if you follow the instructions carefully and prioritize safety—especially by turning off the gas supply. However, if you smell gas, are unsure about any step, or if the pilot repeatedly goes out, it is no longer safe to proceed, and you should call a professional.
Q6: What does the thermocouple do?
A: The thermocouple is a safety device. It’s a metal stem that sits in the pilot flame. When heated, it generates a small electrical current that tells the gas valve it’s safe to keep the gas flowing to the pilot light and, when called for, the main burner. If the pilot light goes out, the thermocouple cools, stops generating current, and signals the valve to shut off the gas, preventing unburned gas from filling your home.
Q7: Can I convert my standing pilot light system to electronic ignition?
A: Yes, it is possible to convert a standing pilot light system to an electronic ignition system, but this is a complex job that should only be performed by a qualified HVAC professional. It involves modifying the gas valve and installing new ignition components. While it can improve energy efficiency, it’s a significant undertaking.
Conclusion
You’ve now got the essential knowledge to check your heater’s pilot light! By understanding what it is, where to find it, and how to safely check and relight it, you’ve empowered yourself to tackle a common home heating issue. Remember, safety is paramount, so if you ever feel uncertain or if the problem persists, don’t hesitate to reach out to a trusted HVAC professional.
Keeping your pilot light in good working order is a simple yet effective way to ensure your home stays warm and comfortable. With a little bit of know-how and careful attention, you can maintain your heating system’s readiness and avoid those unexpected cold moments. Stay warm and cozy!